NYT Pips Hints & Answers for October 26, 2026

Oct 26, 2026

🚨 SPOILER WARNING

This page contains the final answer and the complete solution to today's NYT Pips puzzle. If you haven't attempted the puzzle yet and want to try solving it yourself first, now's your chance!

Click here to play today's official NYT Pips game first.

Want hints instead? Scroll down for progressive clues that won't spoil the fun.

SEE ALSO:

🎲 Today's Puzzle Overview

Ian Livengood builds today's easy around one beautifully over-determined idea: a three-cell equals corner tucked into the top-left. Because an equals region can only borrow pips from tiles that already repeat a value, the whole five-tile tray is tuned so that exactly one value shows up three times — the corner solves itself the moment you count copies rather than guess placements. Everything around it is symmetry: two slim sum-7 pairs flanking the lower rows with a fat sum-11 slot bridged between them by a 5/5 double that does double duty on both sides of the board.

Rodolfo Kurchan's medium is a study in contrast — a lattice of tiny single-cell regions (a greater-2 corner, a sum-4, a less-1, a less-5) wrapped around one repeating equals block and a genuinely rare 'unequal' pair. The design charm is that the smallest regions do the heaviest lifting: the less-1 cell collapses to one possible pip and shoves its partner straight down into the unequal pair, and the entire left flank unrolls from there. Nothing is decorative; every square is load-bearing.

For this NYT Pips hard, Kurchan goes maximal — a 6×9 board, 22 regions, 16 dominoes, and two four-cell equals blocks pulling in opposite directions. One is a vertical column down the right edge quietly demanding a value the tray can barely supply; the other is a broad L-shaped block on the left that must commit to a different repeat entirely. Around them the single-cell sums act as a switchboard — sum 0, sum 2, sum 3, sum 6 — each pinning one pip and redirecting the next domino. Elegant, unforgiving, and a fine demonstration of how much structure two equals regions can impose.

💡 Progressive Hints

Try these hints one at a time. Each hint becomes more specific to help you solve it yourself!

💡 Count constraint types first
Today's easy leans on two shapes: a multi-cell equals block and a cluster of narrow sum pairs. Start with the equals block. Every cell in it must carry the same pip, so one decision there fills a whole corner at once — far more information per tile than any sum region gives you.
💡 Three cells that must agree
The purple equals block in the top-left corner has three cells, and its top-right cell touches nothing but its left-hand neighbour. Whichever domino covers that cell must cover its neighbour too — and since both cells carry the same pip, only a matching double can sit there. That single observation pins most of the corner.
💡 The full layout
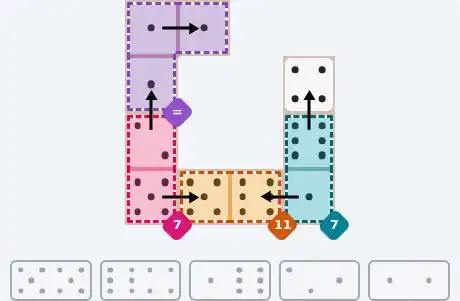
Complete answer: the 1/1 double lies flat across the top of the purple equals corner, a 1 in each top cell. The 2/1 stands vertically beneath the corner's left cell — 1 up inside the equals block, 2 down in the upper cell of the pink sum 7 on the left edge. The 5/5 double runs flat along the bottom row: its left 5 is the pink pair's lower cell, its right 5 the left cell of the orange sum 11. On the right side the 6/4 stands vertically, 4 up in the uncoloured free square and 6 down in the teal sum 7's upper cell; the 1/6 lies flat just below, 6 left into the orange sum 11 and 1 right into the teal pair's lower cell.
💡 Start where choice runs out
Look for the constraint types that admit almost nothing: a very tight 'less' cell and a small 'sum' single cell. Single-cell regions are the cheapest deductions on the board — each one pins an entire pip before you have placed a single domino.
💡 The cell that feeds the unequal pair
The orange less-1 cell sits on the left side, directly above the right-hand cell of the green unequal pair. Only one pip can satisfy it, so the tile covering it must drop its partner straight down into that unequal pair — which immediately rules out the pair ever being a matching set.
💡 The full layout
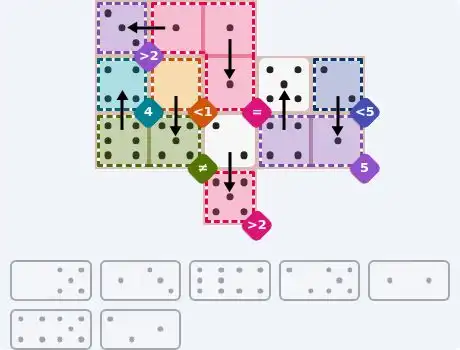
Complete answer: the 0/5 stands vertically, 0 up in the orange less-1 cell and 5 down in the green pair's right cell. The 6/4 also stands vertically on the left, 4 up in the teal sum 4 and 6 down in the green pair's left cell. The pink equals block is all 1s — the 1/3 lies flat, 3 left in the purple greater-2 corner and 1 right into the block's top-left cell, while the 1/1 double stands vertically to fill the block's two right-hand cells. Down the middle the 2/5 stands vertically, 2 up in the uncoloured centre square and 5 down in the pink greater-2 cell at the bottom. On the right the 4/5 stands vertically, 5 up in the top-right uncoloured square and 4 down in the left cell of the purple sum 5; the 2/1 stands beside it, 2 up in the blue less-5 cell and 1 down to finish the purple sum 5.
💡 Two equals regions set the agenda
Two constraint types dominate: two long equals regions and a swarm of single-cell sums. Begin with the equals regions — each demands four identical pips, more than any one domino can supply, so they force you to count how many copies of a value the tray actually holds.
💡 The cheapest square on the board
The blue sum-0 cell on the left side is the freest deduction here: only a single pip value can satisfy it. Look at its two vertical neighbours — one belongs to the blue equals block, the other to the orange sum-7 pair beneath. Deciding which way its partner falls settles which value the equals block is allowed to repeat.
💡 Why the block cannot be zeros
Count the zeros. The pink equals column on the right edge needs four matching pips and the blue sum-0 cell needs a fifth, and zeros are the only value with enough copies to feed a four-cell equals region. But they don't stretch to nine, so the blue equals block cannot repeat zeros either — it must repeat ones, which means the sum-0 cell's partner drops downward into the orange sum 7, not upward into the block.
💡 Two anchors fall into place
With the 4/0 standing vertically at the sum-0 cell (0 up, 4 down), the orange sum 7 owes 3 to its lower cell — and the 3/3 double lies flat to its right, planting the matching 3 in the pink sum-3 square. Meanwhile the pink equals column assembles from the top: the 0/5 (5 up in the teal sum 5), then the 0/0 across the middle two cells, then the 0/6 flat at the bottom whose 6 slides left into the purple sum 8 and demands a 2 above it.
💡 The full layout
Complete answer: the 4/0 stands vertically on the left, 0 up in the blue sum 0 and 4 down in the orange sum 7; the 3/3 lies flat beneath it, 3 left in the orange sum 7 and 3 right in the pink sum 3. The pink equals column is four 0s — the 0/5 at the top with 5 up in the teal sum 5, the 0/0 in the middle two cells, and the 0/6 flat at the bottom with its 6 going left into the purple sum 8; the 5/2 stands vertically just left of that column, 5 up in the pink sum 5 and 2 down in the purple sum 8. The blue equals block is four 1s: the 5/1 lies flat with 5 left in the orange sum 5 and 1 at the block's top-left, the 1/0 lies flat with its 1 at the block's top-right corner and its 0 in the left cell of the green sum 4, and the 1/1 stands vertically in the block's two lower cells. The 2/4 lies flat, 4 left completing the green sum 4 and 2 right in the purple sum 2. The 6/1 stands vertically, 6 up in the purple sum 6 and 1 down in the green sum 1; the 2/3 stands beside it, 2 up in the green sum 2 and 3 down in the blue sum 3. Up in the top-right the 5/3 stands vertically, 5 in the purple sum 5 and 3 below in the uncoloured square, while the 4/4 stands beside it, 4 up in the pink sum 4 and 4 down in the uncoloured square. The 2/6 lies flat, 2 left in the teal sum 2 and 6 right in the orange sum 6, and the 3/6 stands vertically in the bottom-right teal greater-8 pair, 6 up and 3 down so the pair clears 8.

🎨 Pips Solver

Oct 26, 2026

Click a domino to place it on the board. You can also click the board, and the correct domino will appear.
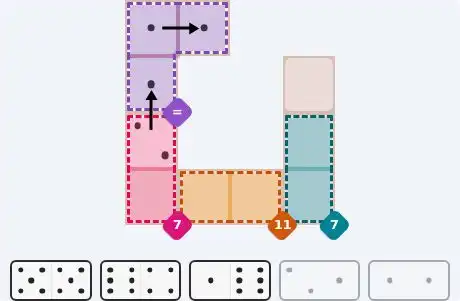
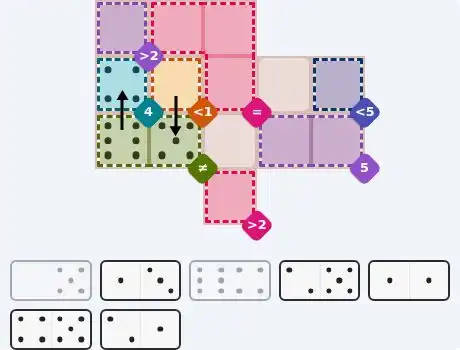
✅ Final Answer & Complete Solution For Hard Level

The key to solving today's hard puzzle was identifying the placement for the critical dominoes highlighted in the starting grid. Once those were in place, the rest of the puzzle could be solved logically. See the final grid below to compare your solution.

Starting Position & Key First Steps
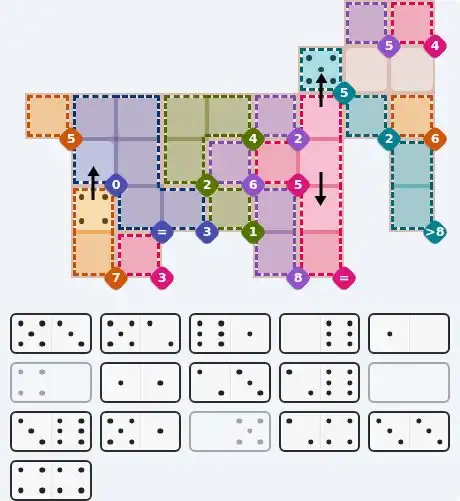
Pips hint for October 26, 2026 – hard level puzzle grid with critical first placements and strategy

This image shows the initial puzzle grid for the hard level, with a few critical first placements highlighted.

Final Answer: The Solved Grid for Hard Mode
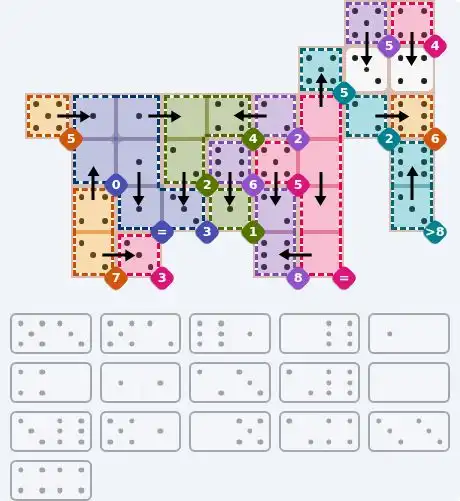
NYT Pips October 26, 2026 hard puzzle full solution grid showing final answer with hints

Compare this final grid with your own solution to see the correct placement of all dominoes.

🔧 Step-by-Step Answer Walkthrough For Easy Level

1
Step 1: Three cells, one value
The purple equals corner needs three identical pips, and a single domino can supply at most two of them — so you need a value that exists at least three times in the tray. Count the copies across all five tiles: only one value reaches three. That immediately tells you which double has to live in the corner and that a second tile will donate the third pip.
2
Step 2: The cell with one neighbour
The equals block's top-right cell touches nothing except its left-hand neighbour, so those two cells must be covered by the same domino — and since both carry the equals value, it has to be the matching double lying flat. That leaves the block's third cell, the bottom-left of the corner, with exactly one free neighbour below it.
3
Step 3: Down the left edge
The 2/1 stands vertically there, feeding the equals pip up into the corner and dropping its partner into the upper cell of the pink sum 7 on the left edge. Seven minus that pip leaves the pink pair's lower cell, and the only tile still carrying the right value is the 5/5 double — which lies flat to the right, running along the bottom row.
4
Step 4: Two pairs on the right
The 5/5's right half opens the orange sum 11, so the slot beside it wants a 6. That's the 1/6 lying flat, 6 into the orange pair and 1 into the lower cell of the teal sum 7. The teal pair then needs a 6 above, and the 6/4 provides it standing vertically: 6 down in the teal pair, 4 up into the uncoloured free square in the top-right. Every cell is now accounted for.

🔧 Step-by-Step Answer Walkthrough For Medium Level

1
Step 1: The cell that only takes zero
The orange less-1 region is a single cell, and the only pip below 1 is 0. Exactly one tile in the tray carries a zero, so it is committed here. Standing vertically, it puts 0 up in the orange cell and sends its partner down into the right-hand cell of the green unequal pair — which means that pair can never be a matching set.
2
Step 2: The left column closes
The green pair's left cell has only two neighbours: the teal sum-4 cell above it and its own partner to the right, already holding 5. So it must pair upward. The teal cell needs a 4, and the unequal constraint forbids a second 5 landing in the pair, so the tile is the 6/4 standing vertically — 4 up in the teal sum 4, 6 down in the green pair.
3
Step 3: Counting copies for the equals block
The pink equals block wants three of a kind. With the 0/5 and the 6/4 out of the tray, count what remains: only one value still appears three times. That fixes the block's value and tells you the 1/1 double is needed to cover two of its cells, leaving a single pip to be borrowed from elsewhere.
4
Step 4: The corner with one option
The purple greater-2 corner now has just one free neighbour — the equals block's top-left cell — so a domino lies flat across them. That's the 1/3, with 3 satisfying the greater-2 corner and 1 joining the equals block. The block's two right-hand cells then take the 1/1 standing vertically, finishing the repeat.
5
Step 5: Filling the rest
The 2/5 stands vertically in the middle, 2 in the uncoloured centre square and 5 in the pink greater-2 cell at the bottom. On the right edge the 4/5 stands vertically, 5 up in the top-right uncoloured square and 4 down in the left cell of the purple sum 5; the 2/1 stands beside it, 2 up in the blue less-5 cell and 1 down to bring the purple pair to exactly 5.

🔧 Step-by-Step Answer Walkthrough For Hard Level

1
Step 1: The cheapest square on the board
The blue sum-0 region is a single cell on the left side, and only one pip can satisfy it: 0. Six zeros sit in the tray, which sounds generous until you notice the pink equals column on the right needs four of them and the blue equals block would need four more if it were zeros too. Nine zeros don't exist — so the block must repeat something else, and the sum-0 cell's partner has to drop downward into the orange sum 7 rather than upward into the block.
2
Step 2: Cashing in the zeros
That places the 4/0 standing vertically: 0 up in the blue sum 0, 4 down in the orange sum 7's upper cell. Seven minus four leaves 3 for the orange pair's lower cell, and the 3/3 double lies flat to its right, planting its matching 3 in the pink sum-3 square at the bottom left of the coloured area.
3
Step 3: Assembling the equals column
The pink equals column takes the 0/5 at the top, with 5 going up into the teal sum 5; the 0/0 fills the middle two cells; and the 0/6 lies flat at the bottom, its 6 sliding left into the lower cell of the purple sum 8. Eight minus six leaves 2 for the purple pair's upper cell, so the 5/2 stands vertically just left of the column — 5 up in the pink sum 5, 2 down in the purple sum 8.
4
Step 4: The green pair and the last zero
One zero remains unclaimed, and the green sum-4 pair needs it on the left. That's the 1/0 lying flat: 0 into the green pair, 1 into the top-right corner of the blue equals block. The pair's right cell takes the 4 from the 2/4 lying flat beside it, whose 2 lands in the purple sum-2 square.
5
Step 5: The vertical spine
The purple sum 6 and the green sum 1 sit one directly above the other in the middle of the board, and the 6/1 stands vertically between them — 6 up, 1 down. Immediately to its left the 2/3 stands vertically, 2 up in the green sum 2 and 3 down in the blue sum 3, so both single-cell sums below the spine are satisfied in one move.
6
Step 6: Closing the block and the corners
The blue equals block's remaining cells all take 1: the 5/1 lies flat along the top of the block with its 5 in the orange sum 5 at the far left, and the 1/1 stands vertically in the block's two lower cells. In the top-right corner the 5/3 stands vertically, 5 in the purple sum 5 and 3 below in the uncoloured square, while the 4/4 stands beside it, 4 up in the pink sum 4 and 4 down in the free square. Finally the 2/6 lies flat, 2 left in the teal sum 2 and 6 right in the orange sum 6, and the 3/6 stands vertically in the teal greater-8 pair at the bottom right, 6 up and 3 down so the pair clears 8.

💡 Pro Tips for Similar Puzzles

Start with Constraints
Always begin with the most constrained regions - sum regions with small numbers or tight spaces.
Use Equal Regions
Use "equal" regions as anchors - they eliminate many possibilities quickly.
Work Systematically
Let the rules guide your placement rather than guessing randomly.
Double-Check
Verify each region's rules are satisfied before moving to the next.

🎓 Keep Learning & Improve