🔧 Step-by-Step Answer Walkthrough For Easy Level
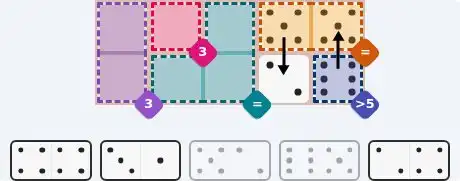
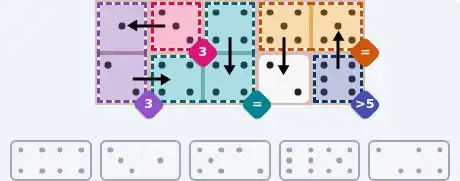
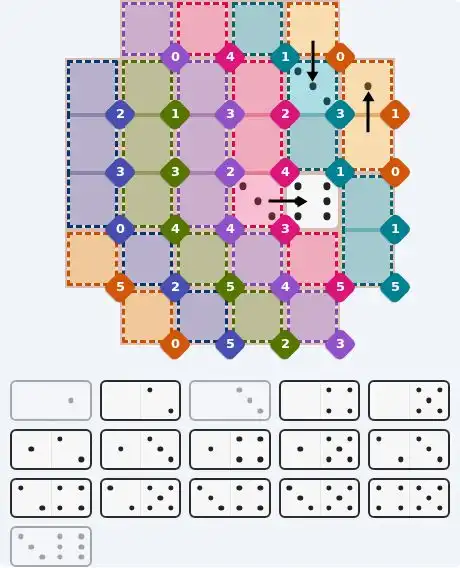
The blue one-cell region at the bottom-right is marked greater than 5. Pips run from 0 to 6, so exactly one value qualifies, and of the five tiles in the tray only the 6/5 carries it. That tile must stand vertically in the right-hand column with the 6 sitting in the blue cell.
The orange equals pair runs along the top-right and shares a domino with the blue cell, so the 5 from the 6/5 already occupies its right-hand cell. Both orange cells must match, so the left one is a 5 as well — and the only other 5 in the tray belongs to the 5/2 tile. Lay it vertically one column to the left, its 2 dropping into the uncoloured free square below.
The teal block is the only three-cell equals region, so three identical pips have to come out of just two tiles. The 4/4 double supplies two of them: stand it vertically in the block's right-hand column, 4 on top and 4 on the bottom, and the third 4 rides on the remaining tile that carries a 4 — the 2/4.
Two tiles are left and the purple sum-3 pair still needs its total. The 2/4's 4 is already claimed by the teal block, so its 2 drops into the lower purple cell; that leaves 1 for the upper purple cell, since 1+2=3. The 3/1 tile provides it, lying flat along the top row — 1 on the left in purple, 3 on the right in the pink single cell, which is precisely the 3 that cell wants.
🔧 Step-by-Step Answer Walkthrough For Medium Level
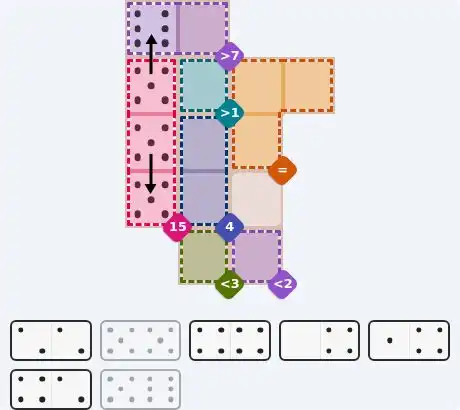
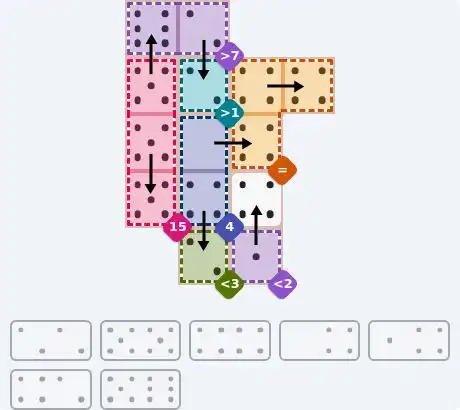
The pink column on the left edge sums to 15 across three cells, and no pip can exceed 6. The only combination that fits is the same value three times over, so every cell in that column is identical — which commits both of the tray's pips of that size to the column at once.
Stand the 5/5 double vertically over the middle and lower cells of the pink column. The third matching pip has to come from the 5/6 tile, and the only cell adjacent to that column is the left cell of the purple greater-7 pair in the top-left corner — so the 6 lands up there and the 5 drops into the column's top cell.
With 6 already in the purple pair, the right-hand cell only needs to push the pair's total past 7. The 2/2 double does it tidily: 2 up into the purple pair for a total of 8, and 2 down into the teal greater-1 cell directly below, which only has to beat 1.
Three orange cells must match. The 4/4 double lies flat across the block's top row — 4 left, 4 right — and the third 4 comes from the 0/4 tile lying flat one row beneath, its 0 sliding into the upper cell of the blue sum-4 pair.
The blue pair's lower cell still needs a 4, and the 4/2 tile supplies it while dropping its 2 into the green less-3 cell below, comfortably under that cap. The final 1/4 tile stands vertically at the bottom right: 4 up in the uncoloured free square, 1 down in the purple less-2 cell — the only pip under 2 still left in the tray.
🔧 Step-by-Step Answer Walkthrough For Hard Level
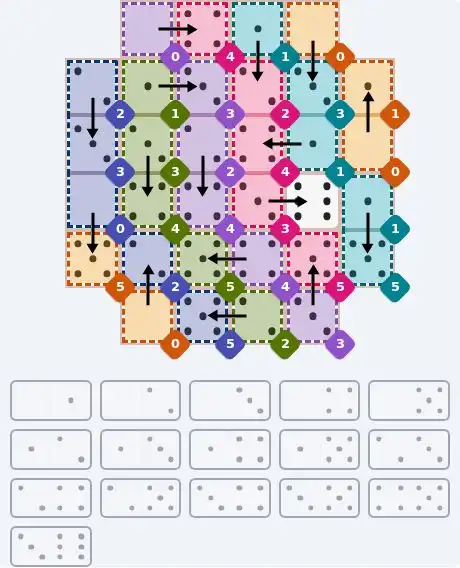
Every region on this grid is a single cell with a sum target, and the largest target anywhere is 5. Pips go up to 6, so the 6 can only sit in the one unconstrained square, on the right edge of the fourth row. Its neighbours read 3, 1, 1 and 5, and only the pink sum-3 cell to its left matches the 3 on the 3/6 tile — so that tile lies flat, 6 in the free square and 3 in the pink cell.
Five cells want a total of zero: the purple sum-0 at the top-left, the orange sum-0 at the top-right, the orange sum-0 on the right edge, the blue sum-0 on the left edge, and the orange sum-0 down at the bottom-left. The tray has exactly five zero-carrying tiles — 0/1, 0/2, 0/3, 0/4 and 0/5 — so every one of them is committed, and each drops its partner into an adjacent cell.
The orange sum-0 on the right edge has just two open neighbours and both read 1, so only the 0/1 tile fits: it stands vertically, 0 down in the zero cell and 1 up in the orange sum-1 above it. That kills the top-right orange zero's 1 option — its neighbours read 1 and 3 — so 0/3 goes into the corner, 0 up and 3 down into the teal sum-3. The top-left purple zero is then left with only the pink sum-4 on its right, so 0/4 lies flat, 0 on the left and 4 on the right.
The bottom-left orange zero sits between a 2 and a 5; the left-edge blue zero sits between a 3, a 4 and a 5. With 0/3 and 0/4 already spent, the blue zero has only one option — 0/5 stands vertically, 0 up in the blue sum-0 and 5 down in the orange sum-5. That leaves 0/2 for the bottom-left corner: 0 down in the orange zero, 2 up in the blue sum-2.
The teal sum-1 on the top row still needs a 1, and its only open side now points down into the pink sum-2 — so the 1/2 stands vertically there and fills both cells in one go. That seals the two cells directly beneath, and the blue sum-2 in the left column can only pair downwards with the blue sum-3: the 2/3 stands vertically, 2 up and 3 down.
The green sum-1 on the second row has a 3 to its right, so the 1/3 lies flat there, and the green sum-3 directly beneath it takes the 3 of the 3/4 with 4 dropping into the green sum-4. Down the centre the purple sum-2 takes the 2 of the 2/4, its 4 falling into the purple sum-4 below; the pink sum-4 near the centre takes the 4 of the 1/4, whose 1 heads right into the teal sum-1. On the right, the 1/5 stands vertically — 1 up in the teal sum-1 at the far right of the fourth row, 5 down in the teal sum-5 — and the 3/5 stands vertically just left of it, 5 up in the pink sum-5 and 3 down in the purple sum-3. The last two lie flat: 4/5 one row above the bottom, 5 left in the green sum-5 and 4 right in the purple sum-4; 2/5 along the bottom row, 5 left in the blue sum-5 and 2 right in the green sum-2.
💬 Community Discussion
Leave your comment