🔧 Step-by-Step Answer Walkthrough For Easy Level
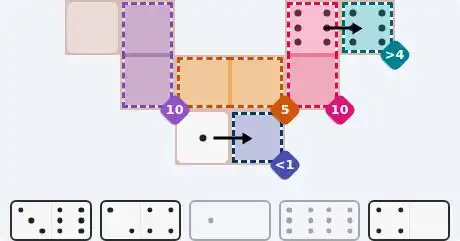
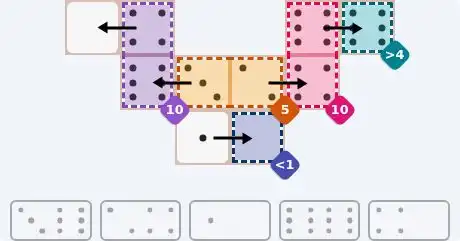
The blue less-1 square at the bottom is the tightest clue on the board: a pip smaller than 1 can only be 0, so one of the tray's two zero-bearing tiles has to serve it. The teal greater-4 square in the top-right corner is nearly as tight — it will accept a 5 or a 6 — but run your eye along the tray and there is no 5 anywhere, so it must be a 6.
A vertical pair summing to 10 cannot use a 5, because the tray has none, so each pair has to be 4 and 6. There are exactly two 4s in the set — one riding with a 2, one riding with a 0 — and that drags their partners along: the 2 has to end up in the orange sum-5 strip, and the 0 in the uncoloured top-left corner.
The teal greater-4 square has only one neighbour on the whole board, the upper cell of the pink sum-10 pair, so whatever tile fills that corner puts a pip in each cell. The corner needs a 6, and the pink pair wants a 6 too (its 4 arrives from the 2/4 tile lower down the board), so the 6/6 double lies flat across them: 6 on the left, 6 on the right.
The purple sum-10 pair still owes a 4 and a 6. The 4/0 tile drops its 4 into the upper cell, its 0 sliding into the free corner on the left, and the 3/6 tile brings the 6 into the lower cell, its 3 landing in the left cell of the orange sum-5 region. That 3 means the orange's right cell must be a 2 — precisely the other half of the 2/4 tile, whose 4 slips into the lower cell of the pink pair. One tile is left: the 1/0 lies flat along the bottom, 1 in the uncoloured free square and 0 in the blue cell.
🔧 Step-by-Step Answer Walkthrough For Medium Level
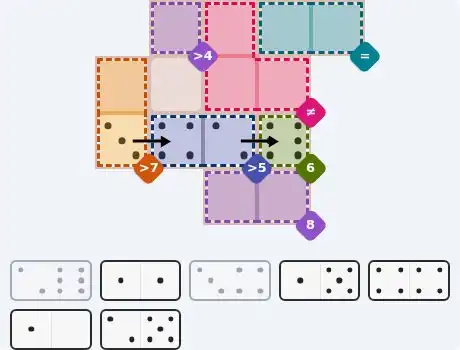
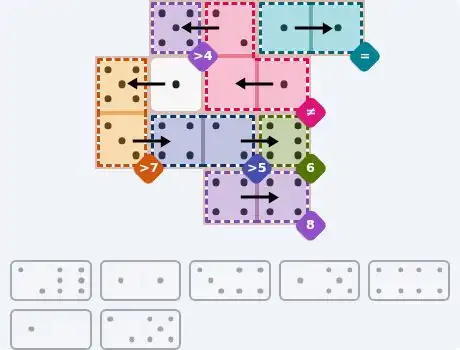
The green square on the right edge of the middle row sums to 6 in a single cell, so it can only be a 6 — the highest pip there is. Exactly one domino in the tray carries a 6, the 2/6 tile, and it must lie flat: 2 on the left in the right-hand cell of the blue greater-5 pair, 6 on the right in the green square.
The blue pair now holds a 2 and its two pips must add to more than 5, so the other cell needs at least a 4. The 3/4 tile is the fit, lying flat along that same row: 3 on the left in the lower cell of the orange greater-7 pair, 4 on the right in the remaining blue cell. Four plus two is six, which clears the test.
The orange pair already has its 3 and needs a total above 7, so the upper cell must be a 5 or a 6 — and the only 6 is busy in the green square. The 1/5 tile lies flat one row higher: 5 on the left in the orange pair's upper cell, 1 on the right in the uncoloured free square beside it. Three plus five gives 8.
The purple sum-8 pair at the bottom could be built as 4+4, 3+5 or 2+6, but the 6, the 5 and the 3 have all been spent above it. That leaves only the 4/4 double, lying flat with a 4 in each of the two cells.
Three tiles remain: the 1/1 double, the 2/5 and the 1/0. The teal equals pair on the top row demands identical pips, and the 1/1 double is the only double still in hand, so 1 goes in each of its cells. The 2/5 tile lies flat at the top-left, 5 on the left in the purple greater-4 square and 2 on the right in the block's top-left cell. The 1/0 then covers the block's two bottom cells, 0 on the left and 1 on the right, so the block reads 2, 0, 1 — three different pips, exactly as the unequal rule requires.
🔧 Step-by-Step Answer Walkthrough For Hard Level
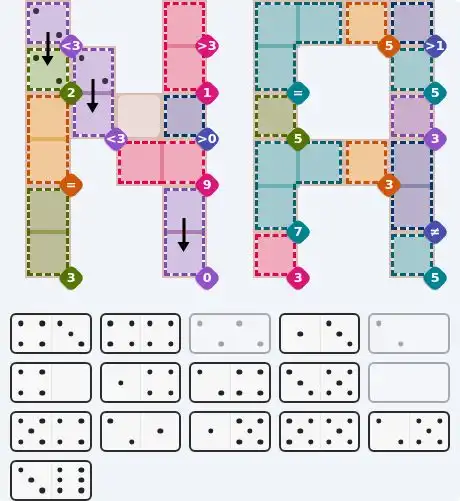
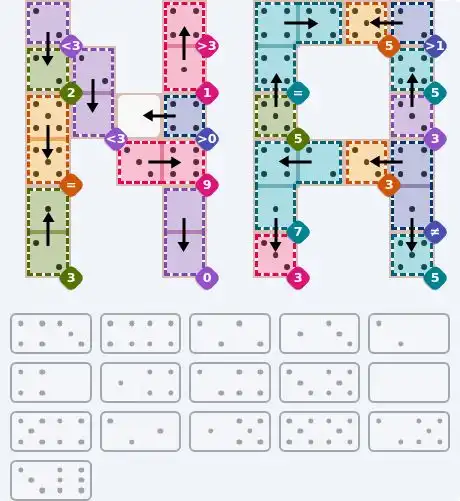
Two cells that must total 0 can only both be zeros, and the only domino in the tray with two zeros is the 0/0 double. The purple sum-0 pair near the bottom of the board takes it standing vertically — 0 in the upper cell, 0 in the lower.
Both equals regions need repeated pips, but they do it differently. The orange equals pair down the left edge is two stacked cells, so one double must cover both. The teal equals block in the top-right is three cells: its two top-row cells sit side by side and are covered by a single double, while the third cell hangs below the left one and must be fed vertically — which means the block's value needs a double plus one more copy from a neighbouring tile.
The teal block's top row is the 4/4 double, lying flat, 4 left and 4 right. Beneath its left cell the 5/4 tile stands vertically: the 4 rises into the block's third cell while the 5 stays in the green sum-5 square below. That frees the 5/5 double for the orange equals pair on the left edge, standing vertically with 5 above and 5 below.
The purple less-3 corner square touches only one other cell, the green sum-2 square beneath it, so one tile covers both; the 2/2 double stands vertically, 2 in the corner and 2 in the green cell. Immediately right, the purple less-3 vertical pair needs two pips under 3 and takes the 2/0 tile standing vertically, 2 upper and 0 lower. The remaining zero rides on the 4/0 tile, which lies flat through the middle of the board — 0 on the left in the uncoloured free square, 4 on the right in the blue greater-0 square.
Along the top, the 1/4 tile stands vertically, 4 in the pink greater-3 square and 1 in the pink sum-1 square below it, while the 2/5 tile lies flat at the far right, 5 on the left in the orange sum-5 square and 2 on the right in the blue greater-1 corner. Down the right edge, the 3/5 tile stands vertically, 5 in the teal sum-5 square and 3 in the purple sum-3 square beneath; the 4/3 tile lies flat below that, 3 on the left in the orange sum-3 square and 4 on the right in the upper cell of the blue unequal pair; and the 1/5 tile stands vertically, 1 in the unequal pair's lower cell, 5 in the teal sum-5 square below.
In the middle, the 2/4 tile lies flat across the teal sum-7 block, 4 on the left and 2 on the right, and the 1/3 tile stands vertically below the block's left cell, 1 in the block's bottom cell and 3 in the pink sum-3 square beneath it. In the bottom-left corner the 2/1 tile stands vertically, 1 in the upper cell of the green sum-3 pair and 2 in the lower. The last tile, the 3/6, lies flat across the pink sum-9 pair at 3 on the left and 6 on the right — a final check that the three plus six lands on nine.
💬 Community Discussion
Leave your comment