🔧 Step-by-Step Answer Walkthrough For Easy Level
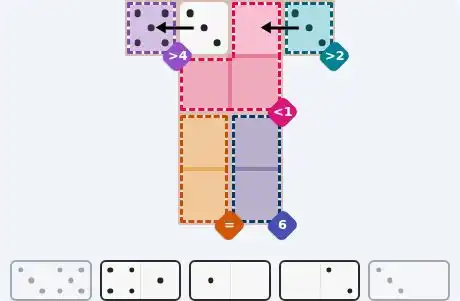
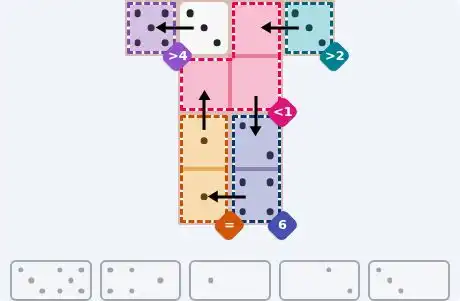
The pink less-1 block in the top middle is the tightest thing on the board: three cells, each of which must hold a pip below 1. Only one value qualifies, so all three cells want it. Now count the tray — the 3/0, 0/2 and 1/0 tiles each carry exactly one zero, and there are no other zeros anywhere — so those three tiles are effectively reserved for the block before you place a single domino.
Move to the purple greater-4 cell in the top-left corner. It needs a pip above 4, and the largest value in the entire easy tray is the 5 on the 3/5 tile — nothing else comes close. So the 3/5 tile lies flat across the top-left: 5 in the purple cell, 3 in the uncoloured square immediately to its right. That also removes the 5 from circulation.
The orange equals column on the left needs two matching pips, and a domino can only fill one cell per region, so it needs two different tiles to agree. With all three zeros promised to the pink block, the only value left that appears more than once in the tray is 1 — once on the 1/0 tile, once on the 4/1 tile. The 1/0 tile stands vertically, 0 up in the pink block's bottom-left cell and 1 down in the upper orange cell; the 4/1 tile puts its 1 in the lower orange cell, which forces its 4 into the lower half of the blue sum-6 pair beside it.
The blue sum-6 pair already holds a 4 in its lower cell, so the upper cell must be 2 — and the only 2 left is on the 0/2 tile, whose zero slides into the pink block's bottom-right cell. One tile remains: the 3/0 lies flat at the top-right, 3 in the teal greater-2 cell and 0 in the pink block's top cell, which completes the three zeros and every region on the grid.
🔧 Step-by-Step Answer Walkthrough For Medium Level
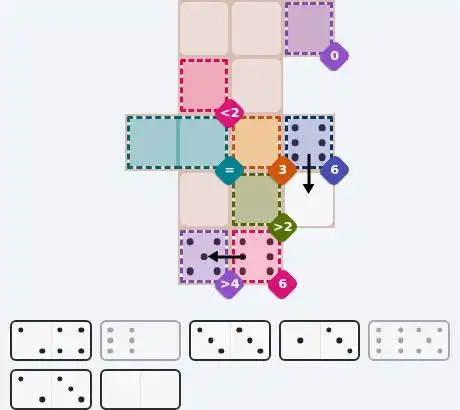
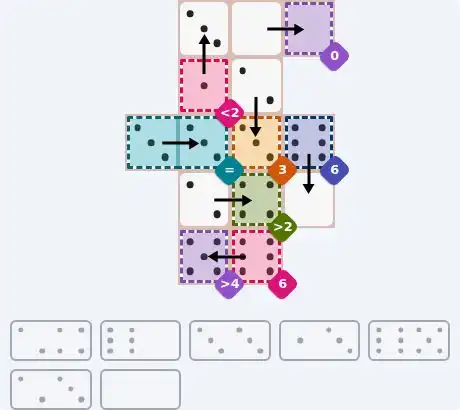
Two cells demand a 6 — the blue sum-6 on the right edge and the pink sum-6 on the bottom row — and the tray carries exactly two sixes, on the 6/0 and 6/5 tiles. Both are therefore committed, which means the purple greater-4 cell in the bottom-left cannot take a 6. It must take the 5, and the 5 lives only on the 6/5 tile. Lay that tile flat: 5 in the purple greater-4 cell, 6 in the pink sum-6 to its right. Then the 6/0 stands vertically, 6 in the blue sum-6 cell on the right edge with its 0 in the uncoloured square directly below (the blue cell's other neighbour is the orange sum-3, which a zero could never satisfy).
The purple sum-0 cell in the top-right corner can only hold a zero, and it touches exactly one other cell — the free square to its left. With the 6/0 tile already spent, the 0/0 double is the tile that fits: lie it flat across the top-right, both zeros in place.
The pink less-2 cell must be 0 or 1. Every zero is used, so it wants the 1 — and the only 1 remaining in the tray belongs to the 1/3 tile. That tile stands vertically with 1 in the pink cell and 3 in the free square directly above it. Putting that 3 into the teal cell below instead would strand the teal region's far-left cell, which has no other neighbour to draw from.
The left-hand cell of the teal equals pair touches nothing except its partner, so a single domino must span both cells. The only way to give them matching pips is the 3/3 double, so it lies flat across the pair: 3 and 3.
The free square between the top row and the centre now reaches only downward to the orange sum-3 cell, so the 2/3 tile stands vertically there: 2 up in the free square, 3 down in the orange cell. That leaves the 2/4 tile to lie flat just below the teal pair — 2 in the uncoloured square on its left, 4 in the green greater-2 cell on its right, and the grid is complete.
🔧 Step-by-Step Answer Walkthrough For Hard Level
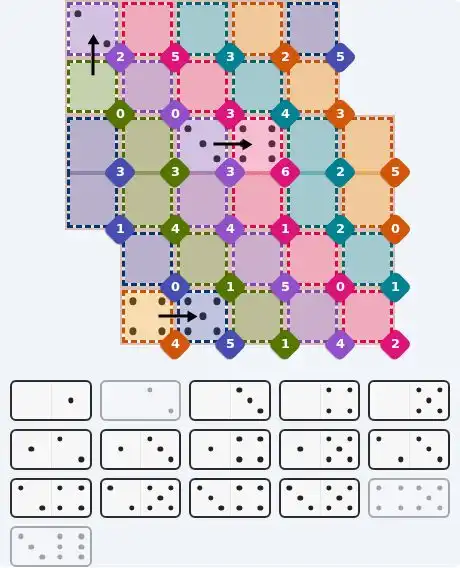
All thirty-two regions on this grid are single cells whose exact sum is printed, so the numbers are the answer key, not a puzzle to compute. What makes it work is the tray: sixteen tiles, and not one of them a double. Every domino must therefore bridge two different printed values, and your job is to find which touching cells can only be joined by which tile.
Only the pink sum-6 near the centre asks for a 6, and only the 3/6 tile carries one. Its small half must land on a neighbour printed 3; of the four cells touching that pink cell, exactly one shows a 3 — the purple sum-3 to its left. So the 3/6 lies flat: 6 in the pink sum-6, 3 in the purple sum-3.
Search the board for a printed 4 that touches a printed 5. There is precisely one such contact, at the bottom-left, where the orange sum-4 cell meets the blue sum-5 cell. Only the 4/5 tile can fill it, laid flat: 4 in the orange sum-4, 5 in the blue sum-5 beside it.
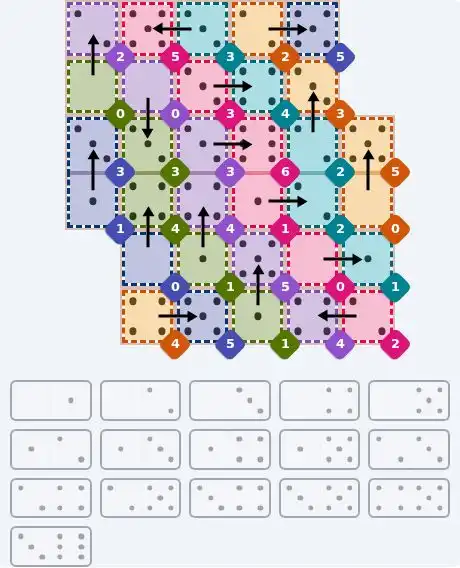
The purple sum-2 corner cell touches just two others: the pink sum-5 to its right and the green sum-0 below. Try the 5 route and the top of the left edge ends up needing the same 0/3 tile twice — a dead end. So the 2 takes the 0 beneath it: the 0/2 tile stands vertically, 2 in the purple cell above, 0 in the green sum-0 below. That leaves the blue sum-3 further down the left edge with only the blue sum-1 beneath it, so the 1/3 tile stands vertically, 3 above and 1 below.
With the left edge settled, the 0/3 tile can no longer sit there, so it must be the vertical pair one column in: 0 in the purple sum-0, 3 in the green sum-3 below it. The pink sum-5 at the top then has only the teal sum-3 to lean on, so the 3/5 lies flat along the top; the green sum-4 lower in that same column can no longer meet a 4, so the 0/4 stands vertically with 4 above and 0 in the blue sum-0 below.
Row two falls next: the pink sum-3 can only reach the teal sum-4, so the 3/4 lies flat there. At the top-right the orange sum-2 meets the blue sum-5, giving the 2/5 flat; the orange sum-3 below it then feeds the upper teal sum-2 with the 2/3 standing vertically. The right edge pairs the orange sum-5 with the orange sum-0 via the 0/5, and the pink sum-1 fills with the 1/2, 1 in the pink cell and 2 in the lower teal sum-2 beside it. The middle follows: 1/4 vertical with 4 in the central purple sum-4 and 1 in the green sum-1 below, and 1/5 vertical with 5 in the purple sum-5 and 1 in the green sum-1 underneath. The final four cells take the last two tiles: the 0/1 lies flat on the fourth row, 0 in the pink sum-0 and 1 in the teal sum-1 to its right, while the 2/4 lies flat along the bottom, 4 in the purple sum-4 at the bottom-right and 2 in the pink sum-2 in the far corner.
💬 Community Discussion
Leave your comment