NYT Pips Hints & Answers for October 22, 2026

Oct 22, 2026

🚨 SPOILER WARNING

This page contains the final answer and the complete solution to today's NYT Pips puzzle. If you haven't attempted the puzzle yet and want to try solving it yourself first, now's your chance!

Click here to play today's official NYT Pips game first.

Want hints instead? Scroll down for progressive clues that won't spoil the fun.

SEE ALSO:

🎲 Today's Puzzle Overview

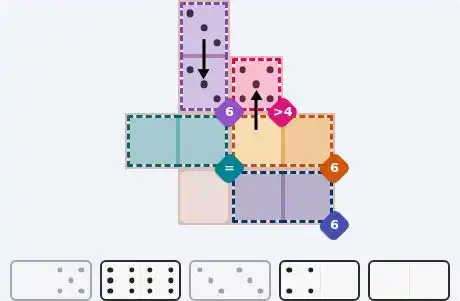
Ian Livengood designs this NYT Pips easy as a study in doubles: three of the five tiles in the tray repeat their pips, and each one is claimed by a different shape. The board is tiny — ten cells, six regions — yet Livengood still finds room for three separate sum 6 zones plus an equals pair and a greater 4 cell, so the same total has to be reached three different ways with completely different tiles. It is the kind of construction where the tray, not the grid, carries the difficulty, and where an early correct call on the equals pair pays off across the whole board.

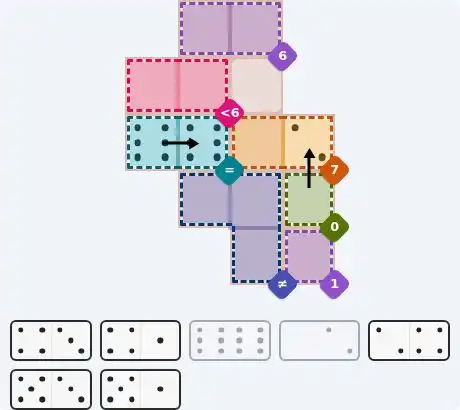
Rodolfo Kurchan's medium moves the pressure into absolutes. Two single-cell regions — a sum 0 and a sum 1 — cannot be argued with, and because the tray contains exactly one zero while the 1s ride on tiles that also carry a 4 and a 5, each of those singles drags a second cell along with it. Kurchan then plants a three-cell unequal block right where those forced pips land, so every deduction checks itself against the same corner of the grid. The lone double in the tray anchors the equals pair on the left; after that the layout almost closes on its own.

Kurchan's hard is the widest board of the day, six rows by nine columns and fourteen regions, built around one of his favourite devices: five separate sum 2 singles scattered from the top edge to the bottom-left corner. Each is a tiny, unambiguous question, and each answer lands beside a far more demanding region — an unequal run, an equals pair, a sum 9 vertical. The zero-sum cell on the right edge is the true ignition point; settle it and the entire top-right corner unravels in one sweep.

💡 Progressive Hints

Try these hints one at a time. Each hint becomes more specific to help you solve it yourself!

💡 Read the constraint types first
Before you think about pips, sort the board by constraint type. This grid hands you one equals pair, one greater-than cell and three sum pairs sharing the same total. The equals pair and the greater-than cell are the two most restrictive shapes on the grid, and both give up their answer almost immediately.
💡 The tightest pair in the corner
Look at the purple sum 6 region stacked vertically in the top-left corner: two cells, one above the other, so one upright tile must supply both halves. Only a single tile in the tray splits into two pips that total 6. Once it is down, the pink greater 4 cell has just one free neighbour left, and the tray's lone 5 is the only pip that can satisfy it.
💡 Complete easy answer
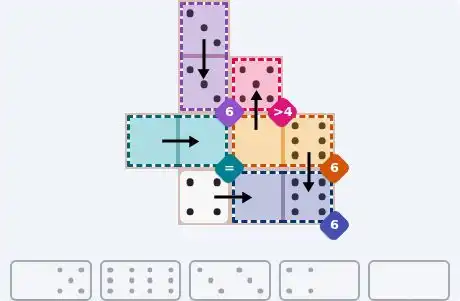
Full layout. The 3/3 double stands upright in the purple sum 6 pair at the top-left, 3 over 3. The 0/5 tile runs vertically through the pink greater 4 cell — 5 in the pink cell, 0 dropping into the left cell of the orange sum 6 pair. The 6/6 double then stands upright with one 6 in the orange pair's right cell and the other 6 directly below in the right cell of the blue sum 6 pair. The 4/0 tile lies flat along the bottom row, 4 in the uncoloured square and 0 in the blue pair's left cell, so blue reads 0 + 6. The 0/0 double lies flat across the teal equals pair on the left.
💡 Two absolutes hide in plain sight
Scan for the constraint types that leave no wriggle room: the equals pair and the zero-sum single. Everything else on this grid is a sum or a threshold that can be argued with — those two cannot. Find them before you look at any of the sum regions.
💡 One double, one zero
The teal equals pair on the left needs two identical pips, and the tray holds exactly one double, so that pair is settled before you place anything else. Then look at the green sum 0 single in the bottom-right corner: it can only take a 0, and exactly one tile in the tray carries a zero at all, which tells you where its partner must point.
💡 Complete medium answer
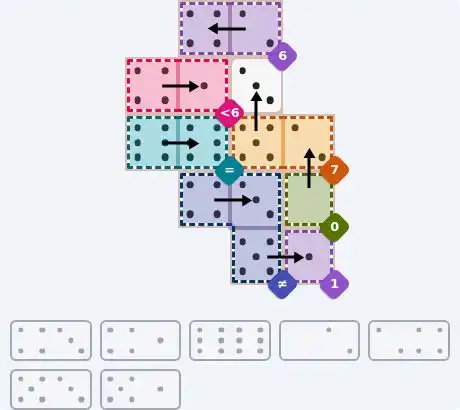
Full layout. The 6/6 double lies flat across the teal equals pair, 6 and 6. The 0/2 tile stands upright in the bottom-right corner: 0 down in the green sum 0 cell, 2 up in the orange sum 7's right cell, which means orange's left cell is a 5. The 5/3 tile stands upright there — 5 down in orange's left cell, 3 up in the uncoloured square. At the bottom-right corner the purple sum 1 single takes the 1 from the 5/1 tile lying flat, its 5 sitting to the left in the blue unequal block; the 4/3 tile lies flat across blue's top two cells, 4 left and 3 right, so blue reads 4, 3, 5, all different. The pink less 6 pair takes the 4/1 tile flat, 4 left and 1 right. The 2/4 tile finishes the purple sum 6 along the top, 4 left and 2 right.
💡 Start with the single-cell sums
Five regions on this board are lone cells with a sum on them, and they are the tightest things you own. Ignore the long unequal runs and the equals pair for now. Hunt for a zero, then for a lone cell whose only remaining neighbour is one specific direction — geometry does half the work before any arithmetic.
💡 The zero on the right edge
The purple sum 0 cell sits on the right edge and can only hold a 0. It touches just two cells, and both of them belong to teal sum 6 regions — the pair near the top-right corner and the single further down the right edge. Decide which of those two the zero's partner climbs into, and the top-right corner starts to open.
💡 Roll the top-right corner
Once the zero's partner — a 6 — lands in the right cell of the top-right teal pair, that pair's left cell has to become a 0. Only one tile in the tray can deliver a 0 into that cell, and it lies flat, slipping its second pip leftwards into the pink sum 2 cell at the top. That pink cell is done, and the teal single on the right edge still needs its own 6 from a tile whose other half is a 4.
💡 Follow the middle downward
Now work the interior. The pink sum 2 cell on the left edge has only one neighbour it can reach — the uncoloured free square — so the 4/2 tile lies flat through them, 4 in the free square. That removes the lower route into the green sum 2 cell, forcing the 6/2 tile to stand upright instead: 6 at the right end of the purple unequal run, 2 in the green cell below it.
💡 Complete hard answer
Full layout. The 0/6 tile stands upright with 0 in the purple sum 0 cell and 6 in the right cell of the top-right teal pair. The 0/2 tile lies flat along the top row, 0 in that pair's left cell and 2 in the pink sum 2 cell beside it. The teal sum 6 single on the right edge takes the 6 from the 4/6 tile standing upright, its 4 dropping into the top cell of the green unequal column. The 4/2 tile lies flat through the middle, 2 in the left-edge pink sum 2 cell and 4 in the uncoloured square; the 6/2 tile stands upright above that 4, 6 at the right end of the purple unequal run and 2 in the green sum 2 cell. The 4/0 tile lies flat to finish the purple unequal run, 4 at its left end and 0 in the middle. The blue sum 9 takes the 4/5 tile upright, 4 above 5. The 2/2 double stands upright between the blue sum 2 cell and the bottom-left purple sum 2 cell. The orange equals pair takes the 1/1 double upright. The 1/3 tile stands upright in the green unequal column, 1 in the middle and 3 at the bottom. The orange less 2 pair takes the 1/0 tile flat, 0 on the left and 1 on the right.

🎨 Pips Solver

Oct 22, 2026

Click a domino to place it on the board. You can also click the board, and the correct domino will appear.
✅ Final Answer & Complete Solution For Hard Level

The key to solving today's hard puzzle was identifying the placement for the critical dominoes highlighted in the starting grid. Once those were in place, the rest of the puzzle could be solved logically. See the final grid below to compare your solution.

Starting Position & Key First Steps
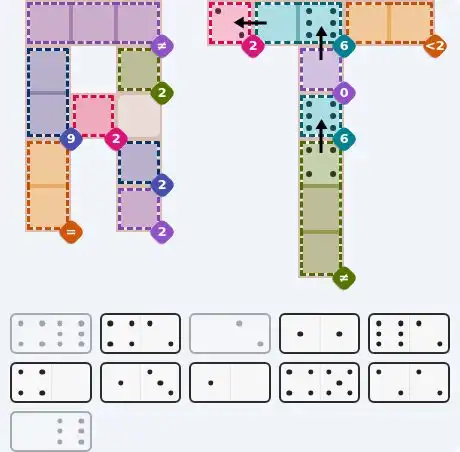
Pips hint for October 22, 2026 – hard level puzzle grid with critical first placements and strategy

This image shows the initial puzzle grid for the hard level, with a few critical first placements highlighted.

Final Answer: The Solved Grid for Hard Mode
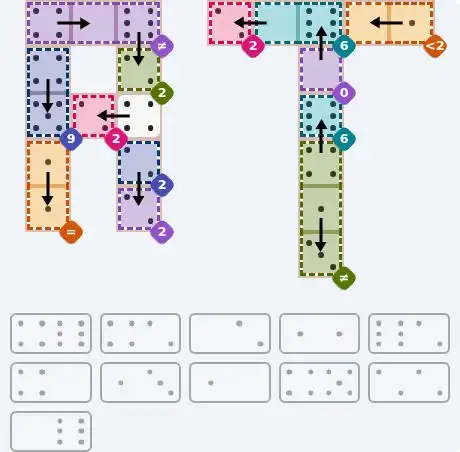
NYT Pips October 22, 2026 hard puzzle full solution grid showing final answer with hints

Compare this final grid with your own solution to see the correct placement of all dominoes.

🔧 Step-by-Step Answer Walkthrough For Easy Level

1
Step 1: The purple pair solves itself
The purple sum 6 region is two cells stacked vertically in the top-left corner, so a single upright tile has to supply both halves. Run through the tray: the 6/6 double overshoots, the 0/0 falls short, the 0/5 and 4/0 do not reach 6 either, and only the 3/3 double lands exactly on target. Stand it upright — 3 in the upper cell, 3 in the lower.
2
Step 2: Pink claims the lone 5
The pink greater 4 cell touches two cells: the lower half of the purple pair, now holding a 3, and the left cell of the orange sum 6 pair underneath it. With the purple side occupied, pink must take the upper half of a tile that drops into orange. It needs a pip above 4 — and the tray's only 5 lives on the 0/5 tile, so 5 goes into pink and 0 falls into orange's left cell.
3
Step 3: Orange pushes a 6 downward
Orange's sum 6 pair now reads 0 on the left, which means its right cell must be a 6. That right cell has one other free neighbour: the right cell of the blue sum 6 pair directly below. That is exactly the shape of the 6/6 double — upright, one 6 sitting in orange, the other sitting in blue.
4
Step 4: Blue, then teal, closes it out
Blue now holds a 6 on its right, so its left cell must be a 0. Two tiles are left, and the 0/0 double is the only one that can satisfy the teal equals pair, so it is reserved. The 4/0 tile therefore lies flat with 4 in the uncoloured square and 0 in blue's left cell — blue totals 6 — and the 0/0 double lies flat across teal on the left, giving two equal pips.

🔧 Step-by-Step Answer Walkthrough For Medium Level

1
Step 1: The equals pair takes the only double
The teal equals region is a flat pair on the left and demands identical pips. Check the tray for doubles: only the 6/6 qualifies, so it lies horizontally across teal, 6 and 6. No other placement is possible, and it removes the only 6s from circulation in one move.
2
Step 2: The zero-sum cell picks up the zero
The green sum 0 single at the bottom-right corner must hold a 0, and exactly one tile in the tray carries a zero — the 0/2. Its partner has nowhere to go but up, into the right cell of the orange sum 7 pair, so the 0/2 stands upright with 0 in green and 2 above it in orange.
3
Step 3: The sum 1 single forces the 5/1
The purple sum 1 single at the bottom-right corner needs a 1, and after the zero has been installed its only reachable neighbour is blue's bottom-right cell, so the tile must lie flat there. Both the 4/1 and the 5/1 carry a 1. If the 4/1 lay there, a 4 would enter the blue unequal block, and the remaining tile for blue's top row is 4/3 — repeating that 4 and breaking the rule. So it is the 5/1: 5 to the left inside blue, 1 in the purple sum 1 cell.
4
Step 4: Orange and blue resolve together
Orange's right cell already holds a 2, so its left cell must be a 5 — and the remaining 5 sits on the 5/3 tile. That cell's free neighbour is the uncoloured square above, so the 5/3 stands upright, 5 down in orange and 3 up in the free square. Blue's top two cells then take the 4/3 tile lying flat, 4 left and 3 right, giving blue 4, 3 and 5 with nothing repeated.
5
Step 5: Two flat pairs finish the board
The pink less 6 region takes the 4/1 tile lying flat, 4 on the left and 1 on the right — both comfortably under 6. The last tile, the 2/4, lies flat along the top of the purple sum 6 pair, 4 on the left and 2 on the right to hit the target exactly. Every region is satisfied and the tray is empty.

🔧 Step-by-Step Answer Walkthrough For Hard Level

1
Step 1: The zero-sum cell on the right edge
The purple sum 0 single on the right edge can only take a 0. It touches two cells, and the only placement that makes sense is upward: the 0/6 tile stands upright with 0 in the purple cell and 6 climbing into the right cell of the top-right teal pair. Choosing the downward neighbour would strand the tiles that still need that part of the board.
2
Step 2: The teal pair drops to zero
That top-right teal pair now has a 6 on its right, so its left cell must be 0. The 0/2 tile lies flat along the top row to deliver it — 0 into the teal pair's left cell, 2 slipping sideways into the pink sum 2 single beside it. The pink cell is satisfied the moment the tile lands.
3
Step 3: The teal single and the unequal column
Further down the right edge, the teal sum 6 single is a lone cell needing a 6. A single cell has to borrow from a neighbour, and the 4/6 tile is the fit: it stands upright with 6 in the teal cell and 4 dropping into the top cell of the green unequal column on the bottom-right. That column already knows its first pip differs from whatever comes next.
4
Step 4: The middle chains into place
The pink sum 2 single on the left edge touches only the uncoloured free square, so the 4/2 tile lies flat across them — 2 in the pink cell, 4 in the free square. That blocks the lower route into the green sum 2 cell, forcing the 6/2 tile to stand upright instead: 6 at the right end of the purple unequal run, 2 in the green cell beneath it.
5
Step 5: The top-left run and the sum 9
The purple unequal run now has a 6 at its right end, so the 4/0 tile lies flat across the first two cells — 4 at the left end, 0 in the middle — leaving three different pips as required. Lower down, the blue sum 9 vertical pair can only be made by the 4/5 tile, standing upright with 4 above and 5 below.
6
Step 6: Doubles and leftovers fill the frame
The 2/2 double stands upright between the blue sum 2 cell and the bottom-left purple sum 2 cell, since neither of those cells can reach anywhere else. The orange equals pair takes the 1/1 double upright. The green unequal column finishes with the 1/3 tile standing upright, 1 in the middle and 3 at the bottom beneath the 4 already there. Finally the orange less 2 pair on the top-right edge takes the 1/0 tile flat, 0 on the left and 1 on the right — both under 2.

💡 Pro Tips for Similar Puzzles

Start with Constraints
Always begin with the most constrained regions - sum regions with small numbers or tight spaces.
Use Equal Regions
Use "equal" regions as anchors - they eliminate many possibilities quickly.
Work Systematically
Let the rules guide your placement rather than guessing randomly.
Double-Check
Verify each region's rules are satisfied before moving to the next.

🎓 Keep Learning & Improve