NYT Pips Hint, Answer & Solution for November 25, 2025

Nov 25, 2025

🚨 SPOILER WARNING

This page contains the final **answer** and the complete **solution** to today's NYT Pips puzzle. If you haven't attempted the puzzle yet and want to try solving it yourself first, now's your chance!

Click here to play today's official NYT Pips game first.

Want hints instead? Scroll down for progressive clues that won't spoil the fun.

🎲 Today's Puzzle Overview

Tuesday, November 25, 2025, brings a sharply structured trio of Pips NYT puzzles, crafted for solvers who love measurable progress, clean logic pathways, and the satisfaction of refining their strategies day by day.

Under the careful editing of Ian Livengood, today’s lineup includes:

Easy #334 (5 dominoes), Medium #335 (7 dominoes), and Hard #336 (12 dominoes), designed by Ian Livengood and Rodolfo Kurchan.

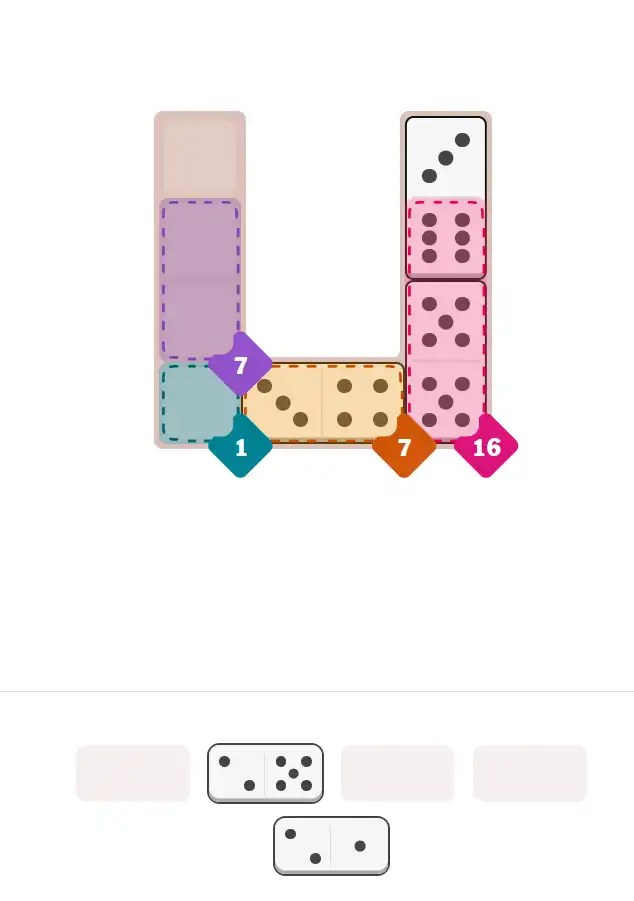
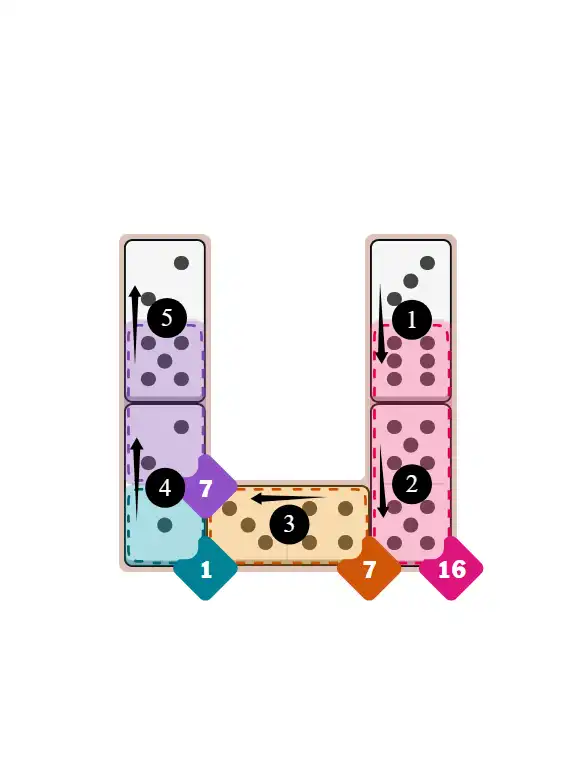
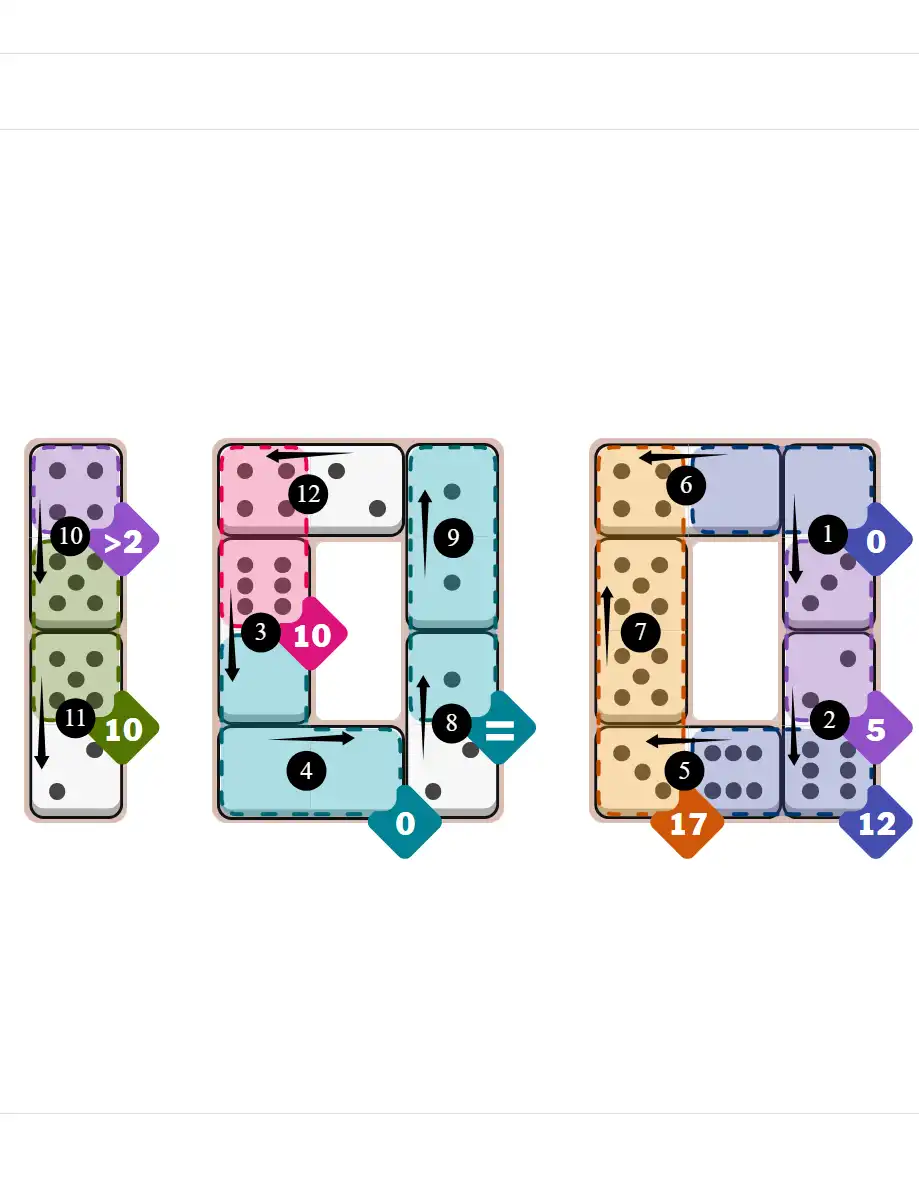
The Easy puzzle focuses on efficient deduction, featuring a compact set of regions that encourage quick pattern identification: a vertical sum-7, a neatly arranged sum-16 trio, and a grounded sum-1 anchor that sets the tone for the grid’s structure.

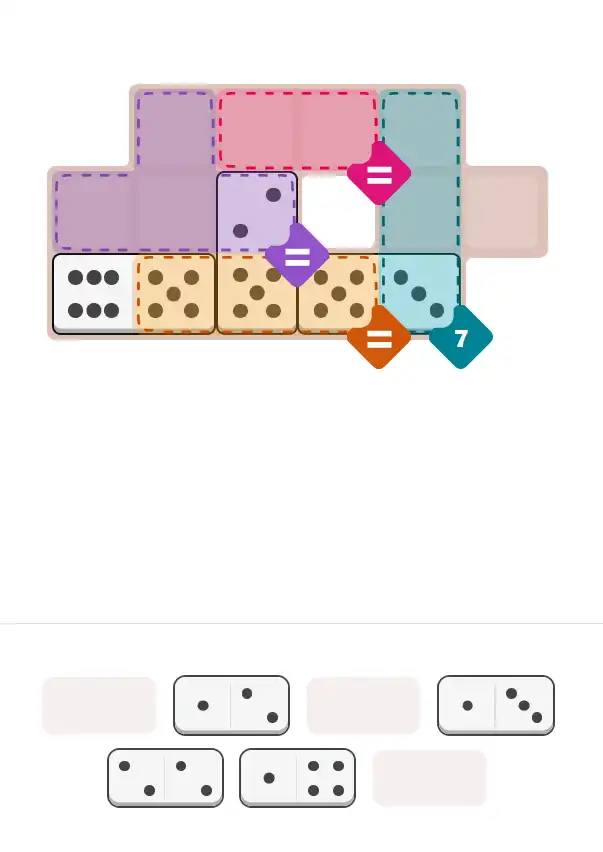
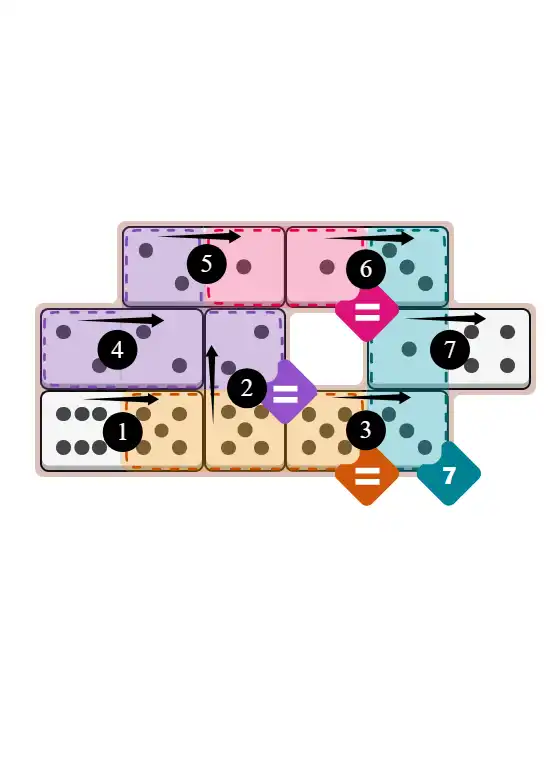
Moving into Medium, complexity rises with three sculpted equals clusters, a tight sum-7 strip, and two empty anchor cells that subtly control puzzle flow—perfect for solvers who enjoy reading grid dynamics and comparing multiple Pips Hint approaches.

The Hard puzzle rounds out the set with a full analytical workout. Layered constraints include a greater-than-2 opener, sum targets of 10, 17, and 12, several zero-sum pockets, and a challenging four-cell equals block that rewards precise pip-value management.

For solvers who enjoy benchmarking performance, tracking progress by puzzle ID, or analyzing how each domino pair reshapes the grid’s geometry, the November 25 set functions like a complete logic laboratory.

Whether you’re reviewing your solving time, checking community-shared Pips Hint strategies, or studying structural patterns for long-term improvement, today’s puzzles offer a deeply satisfying analytical experience.

Written by Anna

Puzzle Analyst – Sophia

💡 Progressive Hints

Try these hints one at a time. Each hint becomes more specific to help you solve it yourself!

💡 Hint #1 - Observe
relative position is very important in this puzzle.
💡 Hint #1 - Observe
Dominoes Include: [6-5], [5-3], [5-2], [4-1], [3-1], [2-2], [2-1]. Only 4 domino halves that contain 2 pips for Purple Equal region. Only one domino with 6 pips (6-5), only 3 domino halves that contain 5 pips. 6 pips can't placed in any color regions.
💡 Hint #1 - Observe
Dominoes Include: [6-3], [6-2], [6-0], [5-5], [5-4], [5-2], [4-2], [4-0], [3-0], [2-1], [1-1], [0-0]. Only 5 domino halves that contain 0 pips for Light Blue Number (0) region+ Blue Number (0) region. The domino [0-0] must placed in the Light Blue Number (0) region.
💡 Hint #2 - Step 2: Purple Number (5)
The domino halves in this region must be 3+2. The answer is 0-3, placed vertically; 2-6, placed vertically.

🎨 Pips Solver

Nov 25, 2025

Click a domino to place it on the board. You can also click the board, and the correct domino will appear.

Final Answer & Complete Solution For Hard Level

The key to solving today's hard puzzle was identifying the placement for the critical dominoes highlighted in the starting grid. Once those were in place, the rest of the puzzle could be solved logically. See the final grid below to compare your solution.

Starting Position & Key First Steps

Pips hint for November 25, 2025 – hard level puzzle grid with critical first placements and strategy

This image shows the initial puzzle grid for the hard level, with a few critical first placements highlighted.

Final Answer: The Solved Grid for Hard Mode

NYT Pips November 25, 2025 hard puzzle full solution grid showing final answer with hints

Compare this final grid with your own solution to see the correct placement of all dominoes.

🔧 Step-by-Step Answer Walkthrough For Easy Level

1
Step 1: Analyze Available Dominoes
Dominoes: 6-3, 5-5, 5-2, 4-3, 2-1. Key observation: only two dominoes contain 5-pips (5-5 and 5-2), giving us three 5-halves total. The Red 16 region demands high values—likely needing multiple 5s and 6s combined. Only one domino has 6-pips (6-3), making it irreplaceable. With such limited high-value tiles, the Red 16 region's solution is nearly predetermined. Pips Hint: when facing extreme sum regions like 16, immediately inventory your highest pip values—if the math only works one way, that's your starting point.
2
Step 2: Red Number 16 Region - The High-Value Stack
This region needs exactly 16. From Step 1, we have very limited options for reaching such a high sum. Testing combinations: 6+5+5=16 works perfectly and uses our scarcest resources. We have one 6 (from 6-3) and three 5-halves (from 5-5 and 5-2). Looking at the board layout and relative positions, place 6-3 vertically with the 6-pip in the Red 16 region and the 3 extending upward into the blank area. Then place 5-5 vertically with both 5-halves stacked within the Red region. This gives us 6+5+5=16. The positioning is confirmed by neighboring regions—the dominoes must align this way to allow subsequent placements. Pips Hint: extreme sum regions like 16 consume your highest pips first—solve these immediately before lower-value regions claim those tiles.
3
Step 3: Yellow Number 7 Region - Finding the Perfect Fit
This region needs exactly 7, and importantly, it needs ONE domino whose two halves sum to 7. From Step 2, we've used 6-3 and 5-5. Remaining dominoes: 5-2, 4-3, 2-1. Testing which single domino sums to 7: 5-2 gives 5+2=7, and 4-3 gives 4+3=7. Looking at the Yellow region's horizontal orientation and relative position between Purple 7 and Orange 7 regions, the answer is 4-3 placed horizontally. Both halves (4 and 3) sit within the Yellow region, summing perfectly to 7. Pips Hint: when a region demands a specific sum from one domino, test each remaining tile—sometimes multiple options exist, so use board layout and neighboring regions to eliminate impossibilities.
4
Step 4: Purple Number 7 + Light Blue Number 1 Regions - The Final Pair
Two regions remain: Purple 7 (left side) and Light Blue 1 (bottom left corner). Remaining dominoes: 5-2, 2-1. Let's map out the placements carefully. Light Blue needs exactly 1, so place 2-1 vertically with the 1-pip in the Light Blue region and the 2 extending upward into the Purple region. Now Purple needs 7 total. Checking what's already there: the 2 from 2-1 contributes, so Purple needs 5 more (2+5=7). Place 5-2 vertically with the 5-pip in the Purple 7 region and the 2 extending LEFT into the blank area. This completes both regions perfectly: Light Blue gets its 1, and Purple gets 2+5=7. Puzzle complete—all constraints satisfied. Pips Hint: final steps often involve carefully positioning dominoes so each half lands in its correct region—visualize the board layout and double-check which pip goes where before committing.

🔧 Step-by-Step Answer Walkthrough For Medium Level

1
Step 1: Inventory Analysis - The 2s, 5s, and Lonely 6
Dominoes: 6-5, 5-3, 5-2, 4-1, 3-1, 2-2, 2-1. Critical observations: only 4 domino halves contain 2-pips (from 2-2, 5-2, 2-1), perfectly matching the Purple Equal region's cell count—this region is predetermined. Only ONE domino has 6-pips (6-5), and only 3 halves contain 5-pips (from 6-5, 5-3, 5-2). This scarcity of high values is crucial: the 6 can't fit into any colored constraint region visible on the board, meaning 6-5 must be positioned so the 6 extends into blank space while the 5 serves a colored region. Pips Hint: when a pip value appears in only one domino and doesn't match any region constraint, that domino's orientation is predetermined—one half must 'escape' to blank space.
2
Step 2: Yellow Equal Region - Why It Must Be 5s
From Step 1, we identified that the 6 from 6-5 cannot enter any colored region. Looking at the board layout, the Yellow Equal region (the tan/beige area in the middle) borders blank space where the 6 can extend. Yellow demands matching pips throughout. Could it be 3s? We have 5-3 and 3-1, giving only two 3-halves—checking the Yellow region's size, it needs more cells filled. Could it be 2s? Those are reserved for Purple (Step 1). Therefore, Yellow must be 5s—we have exactly three 5-halves (from 6-5, 5-2, 5-3). Place 6-5 horizontally with 5 in Yellow and 6 extending into blank space. Place 5-2 vertically with 5 in Yellow and 2 in Purple Equal region. Place 5-3 horizontally with 5 in Yellow and 3 extending into Light Blue 7 region. This strategic placement simultaneously feeds three regions. Pips Hint: when equal regions consume scarce high-value pips, verify you have exactly enough halves to fill all cells—one short means you've misidentified the target value.
3
Step 3: Purple Equal Region - The 2s Lock In
From Step 1's prediction, all four 2-pips must occupy this region. From Step 2, one 2 (from 5-2 vertical) already sits in Purple. Remaining dominoes with 2-pips: 2-2, 2-1. Looking at the board layout, Purple Equal spans the top-left area. Place 2-2 horizontally (both 2-halves in Purple) and 2-1 horizontally (2-half in Purple, 1 extends right into the Pink Equal region). Count check: one 2 from Step 2, plus two from 2-2, plus one from 2-1 equals exactly 4 halves—Step 1's prediction validated perfectly. The 1 from 2-1 extending into Pink Equal sets up our final step. Pips Hint: when Step 1 predictions about equal regions prove accurate during execution, it confirms your initial inventory analysis was sound—trust the math.
4
Step 4: Light Blue Number 7 + Pink Equal Region - The Final Puzzle Pieces
Light Blue 7 region needs exactly 7. From Step 2, one 3 (from 5-3 horizontal) already contributes. Remaining dominoes: 4-1, 3-1. We also have the Pink Equal region that needs matching values. From Step 3, one 1 (from 2-1) already sits in Pink Equal, so Pink needs more 1s. Here's the elegant solution: place 1-3 horizontally with the 1-pip in Pink Equal (satisfying Pink's matching requirement) and the 3-pip in Light Blue 7. Then place 1-4 horizontally with the 1-pip in Light Blue 7 and the 4-pip extending into blank space. Light Blue calculation: 3 (from Step 2) + 3 (from 1-3) + 1 (from 1-4) = 7 ✓. Pink Equal gets two matching 1s (from 2-1 and 1-3) ✓. Puzzle complete—every constraint satisfied through careful dual-purpose positioning. Pips Hint: final steps often require dominoes that serve multiple regions simultaneously—map out which pip lands where to ensure all constraints click into place perfectly.

🔧 Step-by-Step Answer Walkthrough For Hard Level

1
Step 1: The 0-Pip Scarcity Constraint
Dominoes: 6-3, 6-2, 6-0, 5-5, 5-4, 5-2, 4-2, 4-0, 3-0, 2-1, 1-1, 0-0. Critical discovery: only 5 domino halves contain 0-pips (from 0-0, 6-0, 4-0, 3-0). Looking at the board, we have TWO regions demanding 0s—the Light Blue 0 region (middle section bottom) and the Dark Blue 0 region (top right). These two regions combined will consume all five 0-halves. Here's the key insight: the 0-0 domino MUST be placed in the Light Blue 0 region because it's the only domino providing two 0s in one piece, maximizing our scarce 0-pip allocation. This predetermined placement anchors our entire solution strategy. Pips Hint: when multiple regions demand the same scarce pip value, count total halves needed versus available—if the math is tight, certain dominoes become non-negotiable.
2
Step 2: Purple Number 5 Region - Strategic Dual Feeding
This region needs exactly 5. No single domino in our set sums to 5. From Step 1, we know 0-pips must serve two different 0-regions. The Purple 5 region (right side, middle) requires a combination: 3+2=5. But here's the strategic insight—we need dominoes that not only sum to 5 but also feed neighboring constraints. Place 3-0 vertically with the 3-pip in Purple 5 and the 0 extending UPWARD into the Dark Blue 0 region (top right). Then place 6-2 vertically with the 2-pip in Purple 5 and the 6 extending DOWNWARD into the Dark Blue 12 region (bottom right). This gives us 3+2=5 in Purple while simultaneously allocating one 0-pip to the Blue 0 region and one 6-pip to the Blue 12 region. Brilliant multi-region efficiency! Pips Hint: when placing dominoes in sum regions, always check which neighboring regions benefit from your orientation choice—one smart placement can satisfy three constraints at once.
3
Step 3: Light Blue Number 0 Region - Setting Up Red 10
This region needs exactly 0, meaning all domino halves inside must show 0-pips. From Step 1, we reserved 0-0 for this region. From Step 2, we've allocated one 0 (from 3-0) to the Dark Blue 0 region. Remaining dominoes with 0-pips: 6-0, 4-0. Looking at the board layout, the Light Blue 0 region is at the bottom center. Place 0-0 horizontally (both 0-halves filling this region) and 6-0 vertically with the 0-half in Light Blue 0 and the 6-half extending UPWARD into the Red 10 region (left side). This is crucial—the 6 from 6-0 will contribute to Red 10, setting up the final step perfectly. We've now allocated four 0-halves; one more 0 (from 4-0) remains for Step 4. Pips Hint: when placing dominoes in 0-regions, consider where non-zero halves extend—they might be critical contributions to neighboring sum regions that you'll complete later.
4
Step 4: Yellow Number 17 Region - High-Value Calculation
This region needs exactly 17. From Step 2, we positioned 6-2 with the 6 going to Blue 12. Now we need to fill Yellow 17 with remaining high-value dominoes. Remaining dominoes: 6-3, 5-5, 5-4, 5-2, 4-2, 4-0. Let's strategically select: Place 6-3 horizontally with the 6-pip extending into the Dark Blue 12 region and the 3-pip in Yellow 17. Place 4-0 horizontally with the 0-pip extending into the Dark Blue 0 region (using our last 0-pip!) and the 4-pip in Yellow 17. Place 5-5 vertically with both 5-halves in Yellow 17. Yellow calculation: 3+4+5+5=17 ✓. This placement also feeds both the 0 and 12 regions simultaneously—maximum efficiency. Pips Hint: extreme sum regions like 17 require careful domino selection—test combinations until you find the set that hits your target while respecting neighboring constraints.
5
Step 5: Light Purple Equal Region - Finding Matching Pips
The Light Purple Equal region (right side, middle area) demands all domino halves inside show matching pip values. From remaining dominoes: 2-1, 1-1, plus 5-4, 5-2, 4-2. Checking what's needed: this equal region requires consistent pips throughout. The answer is 1s—place 2-1 vertically (1-half in Light Purple Equal, 2 extends elsewhere) and 1-1 vertically (both 1-halves in Light Purple Equal). This creates the matching pattern needed for the equality constraint. Pips Hint: equal regions late in puzzles become easier because your domino inventory has narrowed significantly—scan remaining tiles for matching pairs and place confidently.
6
Step 6: Green Number 10 + Purple Greater-Than-2 - Dual Constraint Strategy
The Green 10 region (left side) needs exactly 10, and it neighbors the Purple >2 inequality region at the top. Remaining dominoes: 5-4, 5-2, 4-2. Green needs 10 total—testing: 5+5=10 is the cleanest approach. We have 5-4 and 5-2 remaining. Place 5-4 vertically (5-half in Green 10, 4-half in Purple >2 region, satisfying 4>2 ✓) and 5-2 vertically (5-half in Green 10, 2-half extends downward). Green calculation: 5+5=10 ✓. Purple >2 receives a 4, easily satisfying its inequality constraint. This elegant dual-purpose placement maximizes strategic efficiency. Pips Hint: when sum constraints neighbor inequality constraints, position higher-value halves to satisfy inequalities while contributing to sum totals—every domino should work double duty when possible.
7
Step 7: Red Number 10 Region - The Perfect Completion
Final region needs exactly 10. From Step 3, the 6 (from 6-0 vertical) already sits in the Red 10 region, contributing 6 pips. Red needs 4 more to reach 10 (6+4=10). Last domino remaining: 4-2. Place 4-2 horizontally with the 4-half in Red 10 region. Perfect calculation: 6 (from Step 3) + 4 (from this domino) = 10 ✓. The 2 from 4-2 extends into another area. Puzzle complete—Step 3's strategic placement of 6-0 set up this final step perfectly, demonstrating how early moves enable later solutions. Pips Hint: final regions that seem incomplete often have hidden contributions from earlier multi-region placements—the last domino simply provides the exact remaining value needed.

🎥 Unlock a key placement in today’s Pips NYT puzzle (November 25 2025) with this speedy highlight!

Witness the domino move that flips the board logic.

💡 Pro Tips for Similar Puzzles

Start with Constraints
Always begin with the most constrained regions - sum regions with small numbers or tight spaces.
Use Equal Regions
Use "equal" regions as anchors - they eliminate many possibilities quickly.
Work Systematically
Let the rules guide your placement rather than guessing randomly.
Double-Check
Verify each region's rules are satisfied before moving to the next.

🎓 Keep Learning & Improve