NYT Pips Hint, Answer & Solution for November 27, 2025

Nov 27, 2025

🚨 SPOILER WARNING

This page contains the final **answer** and the complete **solution** to today's NYT Pips puzzle. If you haven't attempted the puzzle yet and want to try solving it yourself first, now's your chance!

Click here to play today's official NYT Pips game first.

Want hints instead? Scroll down for progressive clues that won't spoil the fun.

🎲 Today's Puzzle Overview

Wednesday, November 27, 2025 delivers a full showcase of Pips NYT puzzle craftsmanship—three grids shaped with precision, personality, and deep logical rhythm, all curated under the steady editorial hand of Ian Livengood.

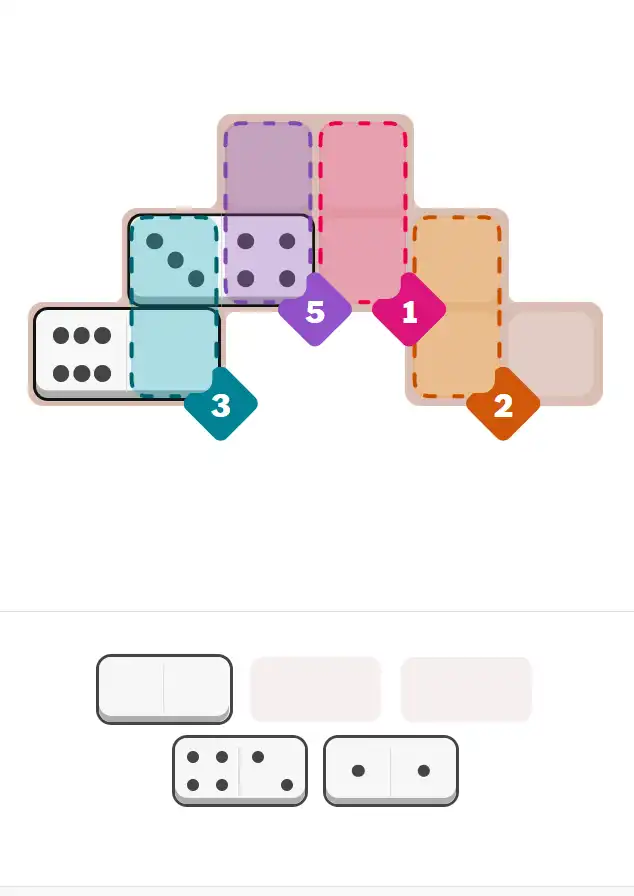
Ian sets the tone with an Easy puzzle that uses just five dominoes, yet feels wonderfully intentional.

The grid blends compact sum regions, clean equals-spots, and a few open cells that invite smooth deduction. It’s an ideal warm-up: approachable, balanced, and perfect for generating that first satisfying Pips Hint of the day.

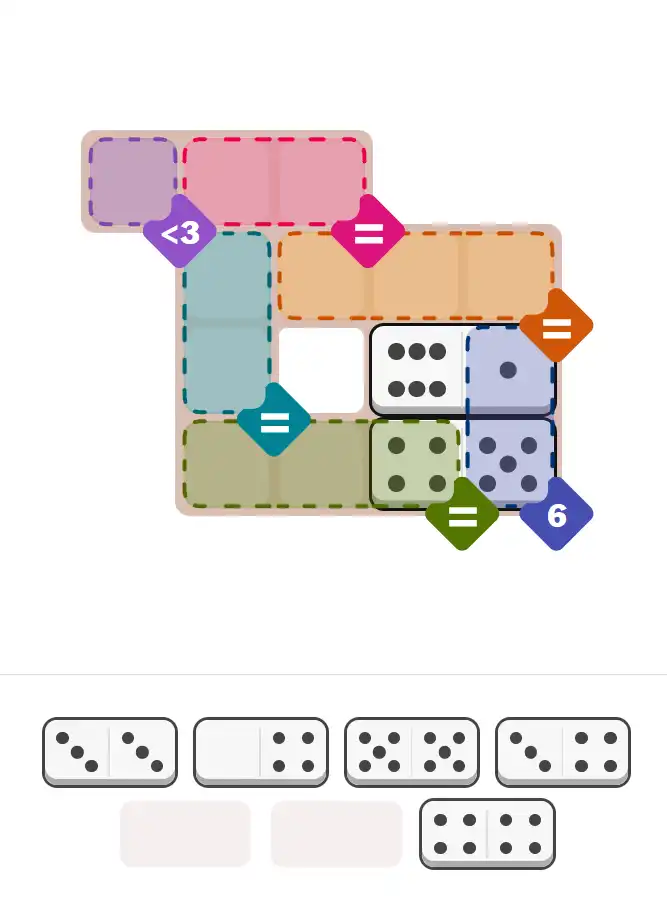
From there, Rodolfo Kurchan raises the curtain on two of his signature constructions.

His Medium puzzle threads seven dominoes through a layout built around equals-clusters and symmetry-driven logic flow. It’s the kind of puzzle where every placement feels earned—structured, elegant, and unmistakably Rodolfo.

Then comes the showpiece: the Hard puzzle, an eleven-domino design that reads like advanced-level puzzle choreography.

Layered greater-than constraints, equals chains that interlock across the grid, and multi-region interactions create a challenge that rewards pattern recognition, careful pip tracking, and thoughtful step-by-step reasoning. It’s the kind of grid where a single Pips Hint can shift the entire solving trajectory.

Today’s set isn’t just a trio of puzzles—it’s a curated experience.

A conversation between constructors.

A study in logical architecture.

A reminder of how thoughtful design transforms simple dominoes into a full solving journey.

Dive in, appreciate the craft, and enjoy a Wednesday where every puzzle is both a challenge and a piece of art.

Written by Ander

Puzzle Analyst – Sophia

💡 Progressive Hints

Try these hints one at a time. Each hint becomes more specific to help you solve it yourself!

💡 Hint #1 - Observe
Dominoes Include: [6-0], [4-3], [4-2], [1-1], [0-0]. All dominoes must placed horizontally. 6 pips can't placed in any color regions.
💡 Hint #1 - Observe
Dominoes Include: [6-1], [5-5], [5-4], [4-4], [4-3], [4-0], [3-3]. Only one domino halves that contain 1 pips. 6 pips can't placed in any color regions. Only 3 dominoes with the same number (5-5, 4-4, 3-3), need two placed in Green Equal and Light Blue Equal (confirmed by relative position).
💡 Hint #2 - Blue Number (6)
The domino halves in this region must be 1+5. The answer is 6-1, placed horizontally; 4-5, placed horizontally.
💡 Hint #1 - Observe
Dominoes Include: [6-4], [6-3], [6-2], [6-0], [5-5], [5-4], [5-0], [4-2], [4-1], [2-0], [0-0]. No domino sum to 12. Only 5 domino halves that contain 0 pips for Purple Equal region. All dominoes are different. Only one domino with the same number 5-5.
💡 Hint #2 - Purple Equal
The domino halves in this region must be 0. The answer is 6-0, placed horizontally; 0-0, placed vertically; 0-2, placed vertically (confirmed by all dominoes are different and [5-5] must placed in the Green Equal region); 5-0, placed horizontally.
💡 Hint #3 - Green Equal
The domino halves in this region must be 5.

🎨 Pips Solver

Nov 27, 2025

Click a domino to place it on the board. You can also click the board, and the correct domino will appear.

Final Answer & Complete Solution For Hard Level

The key to solving today's hard puzzle was identifying the placement for the critical dominoes highlighted in the starting grid. Once those were in place, the rest of the puzzle could be solved logically. See the final grid below to compare your solution.

Starting Position & Key First Steps

Pips hint for November 27, 2025 – hard level puzzle grid with critical first placements and strategy

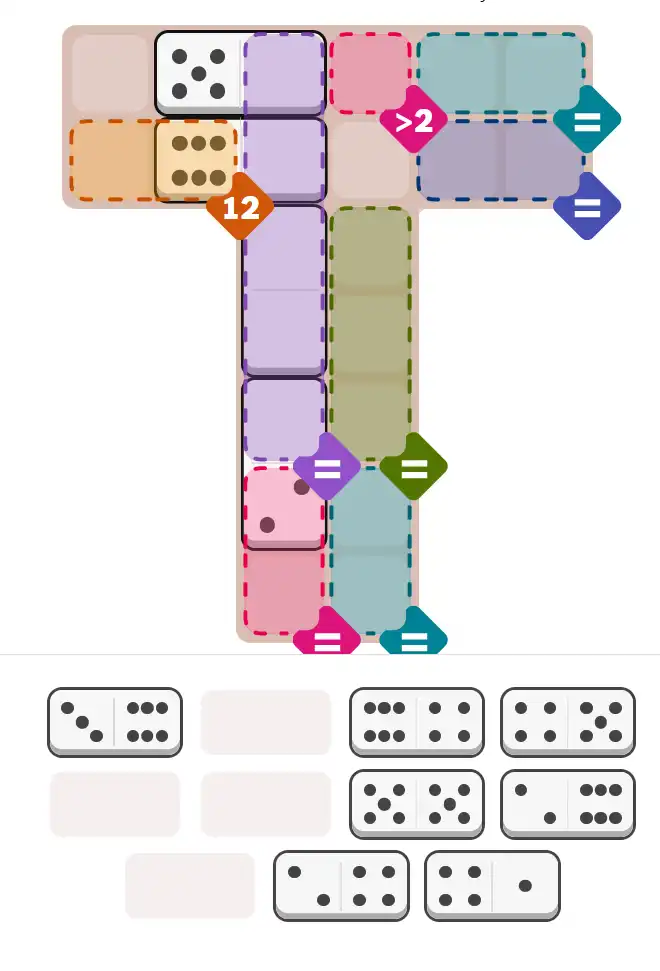
This image shows the initial puzzle grid for the hard level, with a few critical first placements highlighted.

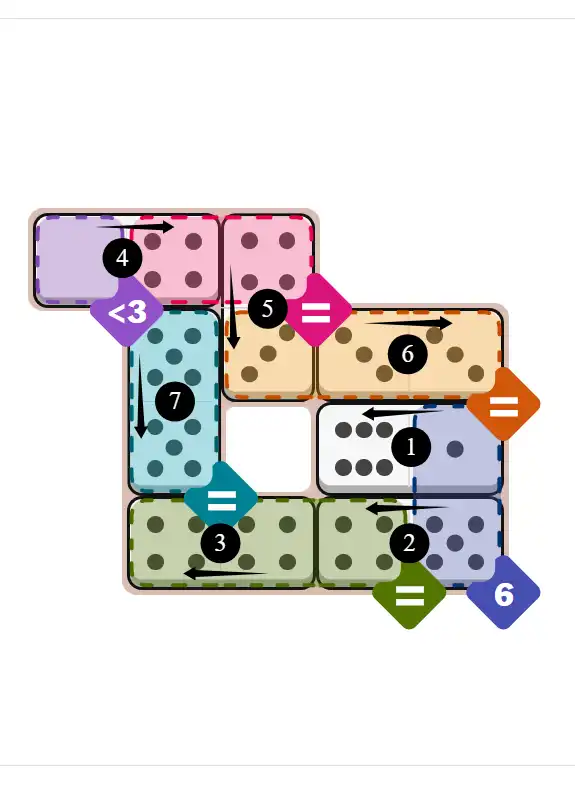
Final Answer: The Solved Grid for Hard Mode

NYT Pips November 27, 2025 hard puzzle full solution grid showing final answer with hints

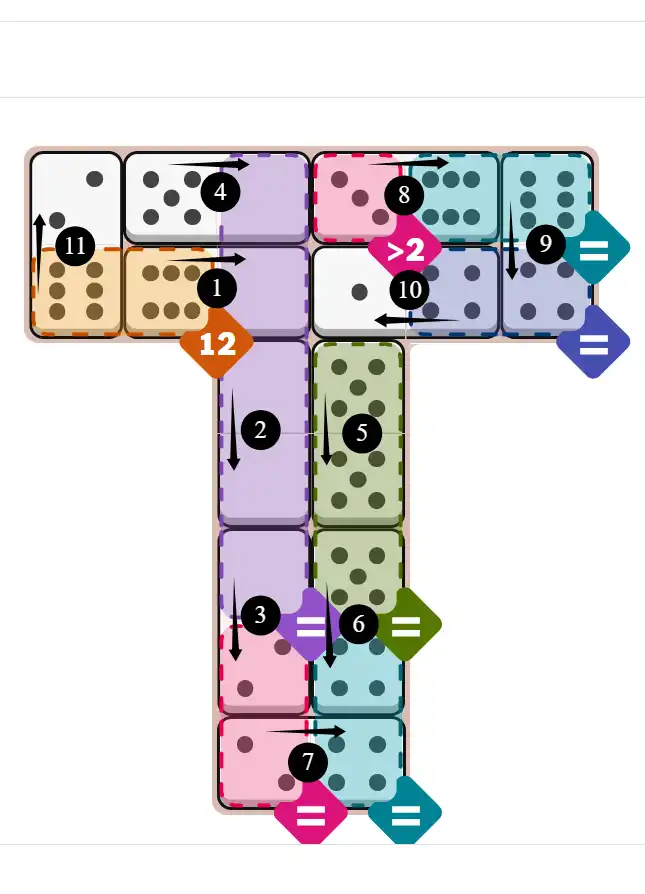
Compare this final grid with your own solution to see the correct placement of all dominoes.

🔧 Step-by-Step Answer Walkthrough For Easy Level

1
Step 1: Horizontal-Only Constraint and the Lonely 6
Dominoes: 6-0, 4-3, 4-2, 1-1, 0-0. Critical constraint: ALL dominoes must be placed horizontally in this puzzle—no vertical placements allowed. This restriction dramatically limits our options and forces specific orientations. Key observation: only ONE domino contains 6-pips (6-0), and examining the board, the 6 cannot fit into any colored constraint region. Looking at the regions: Light Blue 3, Purple 5, Red 1, Yellow 2—none of these values or constraints accommodate a 6. Therefore, the 6 from 6-0 MUST extend into blank space outside any constraint region, while the 0-half serves a colored area. This predetermined orientation anchors our entire solution. Pips Hint: when a pip value appears in only one domino and doesn't match any region constraint, that domino's placement becomes non-negotiable—identify these anchor pieces first before solving anything else.
2
Step 2: Light Blue Number 3 Region - The 0+3 Formula
This region needs exactly 3. From Step 1, we know 6-0 must be placed horizontally with 6 extending into blank space and 0 serving a constraint region. Looking at available dominoes for reaching 3: we need combinations that sum to 3. Testing: 0+3=3 works perfectly. We have 6-0 (providing the 0) and 4-3 (providing the 3). Place 6-0 horizontally with the 0-half in Light Blue 3 region and the 6-half extending LEFT into blank space. Place 4-3 horizontally with the 3-half in Light Blue 3 region and the 4-half extending RIGHT (potentially feeding into Purple 5 region). Light Blue calculation: 0+3=3 ✓. This placement also positions a 4 strategically for Purple 5's needs. Pips Hint: when dominoes must extend into blank space due to incompatible high values, orient them so their compatible half serves the constraint region perfectly—waste nothing.
3
Step 3: Purple Number 5 Region - Simple 4+1 Solution
This region needs exactly 5. From Step 2, we positioned 4-3 with the 4-half potentially contributing to Purple. Remaining dominoes: 4-2, 1-1, 0-0. Testing combinations: 4+1=5 works cleanly. We already have one 4 (from Step 2's 4-3 extending into Purple), so we need just a 1. The 1-1 domino provides two 1-halves. Place 1-1 horizontally with both halves positioned so one 1 contributes to Purple 5. Purple calculation: 4 (from Step 2) + 1 (from 1-1) = 5 ✓. The other 1 from 1-1 extends into Red 1 region, setting up Step 4. Pips Hint: when previous placements already contribute to a sum region, calculate the remaining deficit—then find dominoes that provide exactly that missing value.
4
Step 4: Yellow Number 2 Region - The Final 0+2
This region needs exactly 2. From Step 3, Red 1 region received one 1 (from 1-1), satisfying that constraint ✓. Remaining dominoes: 4-2, 0-0. Yellow needs 2 total. Testing: 0+2=2 works. Place 0-0 horizontally (both 0-halves contribute to Yellow 2... wait, that gives 0+0=0, not 2). Let me reconsider: place 0-0 horizontally with one 0 in Yellow 2 and place 4-2 horizontally with the 2-half in Yellow 2 and the 4-half extending elsewhere. Yellow calculation: 0+2=2 ✓. All regions satisfied: Light Blue 3 ✓, Purple 5 ✓, Red 1 ✓, Yellow 2 ✓. Puzzle complete under the horizontal-only constraint, demonstrating how orientation restrictions create unique solving paths. Pips Hint: final placements under strict orientation rules often feel like puzzle pieces clicking into place—if every domino fits horizontally and satisfies all constraints, your strategic planning from Step 1 was flawless.

🔧 Step-by-Step Answer Walkthrough For Medium Level

1
Step 1: Strategic Inventory - Doubles and the Lonely 6
Dominoes: 6-1, 5-5, 5-4, 4-4, 4-3, 4-0, 3-3. Critical observations: only ONE domino half contains 1-pip (from 6-1), making it irreplaceable wherever 1 is needed. The 6 from 6-1 cannot fit into any colored constraint region visible on the board, meaning it must extend into blank space. Most importantly, we have exactly THREE dominoes with matching halves (5-5, 4-4, 3-3)—these are doubles. Looking at the board, there are multiple equal regions: Green Equal, Light Blue Equal, Red Equal, Yellow Equal. By examining relative positions and region sizes, two of these doubles must be allocated to Green Equal and Light Blue Equal regions specifically. This predetermined allocation of our scarce doubles drives the entire solution strategy. Pips Hint: when you have limited double dominoes and multiple equal regions competing for them, map region sizes to double availability—this pre-allocation eliminates ambiguity before you place a single tile.
2
Step 2: Blue Number 6 Region - The 1+5 Solution
This region (right side) needs exactly 6. From Step 1, the lonely 1-pip must come from 6-1, and the 6 from this domino must extend into blank space. Testing combinations that sum to 6: 1+5=6 works perfectly. We have 6-1 (providing the 1) and multiple dominoes with 5-pips. Place 6-1 horizontally with the 1-half in Blue 6 region and the 6-half extending RIGHT into blank space (as predicted in Step 1). Place 5-4 horizontally with the 5-half in Blue 6 region and the 4-half extending elsewhere. Blue calculation: 1+5=6 ✓. The 4 from 5-4 is now positioned to potentially serve an equal region needing 4s. Pips Hint: when a sum region requires a singleton pip value (like our unique 1), solve that region early to lock in the irreplaceable domino before other regions consume your remaining tiles.
3
Step 3: Green Equal Region - First Double Allocation
From Step 1, we predicted Green Equal would receive one of our three doubles. From Step 2, the 4 from 5-4 extends toward this region. Green Equal demands matching pip values throughout. Checking our doubles: 5-5, 4-4, 3-3. Which fits Green? Looking at the board layout and what's already positioned, Green needs 4s. Place 4-4 horizontally with both 4-halves filling Green Equal perfectly. This locks in the first double allocation from Step 1's strategic plan. Two doubles remain (5-5 and 3-3) for other equal regions. Pips Hint: when executing predetermined double allocations, place the double that matches existing adjacent pip contributions first—this validates your Step 1 prediction and cascades naturally into neighboring placements.
4
Step 4: Purple Less-Than-3 + Red Equal Region - The 0 and 4 Strategy
Two constraints require attention: Purple <3 region (left side) and Red Equal region (center). From Step 3, we've used 4-4. Remaining dominoes: 6-1 (used), 5-5, 4-3, 4-0, 3-3. Red Equal needs matching values. Could it be 4s? We still have 4-3 and 4-0 providing 4-halves. Place 4-0 horizontally (0 in Purple <3 region satisfying 0<3 ✓, 4 in Red Equal). Place 4-3 vertically (4 in Red Equal, 3 extends downward toward Yellow Equal region). Red Equal now has two matching 4s ✓. Purple <3 receives 0 ✓. The 3 from 4-3 extending downward sets up Step 5 perfectly. Pips Hint: when inequality regions neighbor equal regions, position dominoes so low-value halves (like 0) satisfy inequalities while higher-value matching halves (like 4) serve the equal constraint—dual-purpose efficiency at its finest.
5
Step 5: Yellow Equal Region - Second Double Allocation
From Step 1's prediction, Yellow Equal receives one of our remaining doubles. From Step 4, the 3 from 4-3 extends into or near Yellow. Yellow Equal needs matching pips—checking our remaining doubles: 5-5 and 3-3. Which fits Yellow? Given the 3 already positioned nearby from Step 4, Yellow needs 3s. Place 3-3 horizontally with both 3-halves in Yellow Equal. This locks in the second double allocation. One double remains: 5-5 for Light Blue Equal (Step 1's final prediction). Pips Hint: mid-puzzle equal regions often inherit pip values from adjacent placements—when a specific value (like 3) already borders the region, that's your signal to place the matching double there.
6
Step 6: Light Blue Equal Region - Final Double Completes the Puzzle
From Step 1, Light Blue Equal receives the final double. Only 5-5 remains. Place 5-5 vertically with both 5-halves in Light Blue Equal. Puzzle complete—all six steps executed flawlessly. Reviewing: Blue 6 (1+5=6 ✓), Green Equal (all 4s ✓), Red Equal (all 4s ✓), Yellow Equal (all 3s ✓), Light Blue Equal (all 5s ✓), Purple <3 (0<3 ✓). Step 1's strategic double allocation (4-4 to Green, 3-3 to Yellow, 5-5 to Light Blue) proved perfectly accurate, demonstrating how initial inventory analysis drives the entire solution path. Pips Hint: the final double always validates your complete strategy—if it fits perfectly and satisfies the last equal region, every decision from Step 1's pre-allocation through Step 5's placements was logically sound and inevitable.

🔧 Step-by-Step Answer Walkthrough For Hard Level

1
Step 1: Inventory Analysis - The 0-Pip Constraint and Unique Double
Dominoes: 6-4, 6-3, 6-2, 6-0, 5-5, 5-4, 5-0, 4-2, 4-1, 2-0, 0-0. Critical observations: no domino sums to 12 on its own (this matters for Yellow 12 region later). Only 5 domino halves contain 0-pips (from 6-0, 5-0, 2-0, 0-0). Looking at the board, Purple Equal region appears to need multiple matching pips—with exactly 5 zero-halves available and Purple's apparent size, this is a perfect inventory match. Purple MUST use all five 0s. Most importantly, only ONE domino has matching halves: 5-5. All other dominoes are mixed. With multiple equal regions on the board (Purple, Green, Light Blue, Blue, Red), the lone double 5-5 MUST be allocated to Green Equal region based on relative positioning. This predetermined allocation anchors our strategy. Pips Hint: when you have only one double domino and multiple equal regions, relative positioning determines placement—the double goes to the region it naturally borders or aligns with geometrically.
2
Step 2: Purple Equal Region - The 0s Lockdown
From Step 1, Purple Equal needs all five 0-halves. Looking at the board layout, Purple spans a large vertical area down the center-left. We must place all 0-bearing dominoes: 6-0, 5-0, 2-0, 0-0. Here's the strategic analysis: since ALL dominoes except 5-5 are different (mixed values), and 5-5 is reserved for Green Equal, we must use 0-0 and 2-0 to fill Purple's 0 requirement. Place 6-0 horizontally (0 in Purple, 6 extends left into Yellow 12). Place 0-0 vertically (both 0s in Purple). Place 2-0 vertically (0 in Purple, 2 extends into Red Equal region). Place 5-0 horizontally (0 in Purple, 5 extends into blank region). Purple Equal now has all five 0-halves: perfect match ✓. The strategic positioning also feeds neighboring regions—the 5 toward blank, the 2 toward Red. Pips Hint: when equal regions consume scarce pip values, position dominoes so partner halves extend toward adjacent regions that might need those values—maximize multi-region efficiency.
3
Step 3: Green Equal Region - The Double 5 Allocation
From Step 1's prediction, Green Equal receives our only double: 5-5. Green Equal (right-center vertical strip) needs matching pips. Place 5-5 vertically (both 5s in Green Equal). Place 5-4 vertically (5 in Green Equal, 4 extends down into Light Blue Equal region). Green Equal now has three matching 5s (two from 5-5, one from 5-4) ✓. The 4 extending from 5-4 sets up Step 4's Light Blue Equal region perfectly. Step 1's double allocation confirmed accurate. Pips Hint: after placing your lone double in an equal region, immediately place any mixed dominoes that contribute the same matching value—this completes the equal constraint while positioning partner halves for subsequent regions.
4
Step 4: Red Equal + Down Light Blue Equal Regions - The 2 and 4 Bridge
Two equal regions remain partially defined: Red Equal (bottom-center area) and Down Light Blue Equal (bottom-right). From Step 2, the 2 from 2-0 extends into Red Equal. From Step 3, the 4 from 5-4 extends into Down Light Blue Equal. Both regions need more matching pips. Remaining dominoes with 2s: 6-2, 4-2. Remaining dominoes with 4s: 6-4, 4-1. Place 4-2 horizontally (2 in Red Equal, 4 in Down Light Blue Equal). This single domino serves BOTH equal regions simultaneously—the 2 completes Red's matching requirement, the 4 completes Down Light Blue's matching requirement. Brilliant dual-purpose placement ✓. Pips Hint: when two equal regions border each other and both need one more matching value, look for a mixed domino containing both values—one placement satisfies two constraints instantly.
5
Step 5: Red Greater-Than-2 + Up Light Blue Equal + Blue Equal - Triple Constraint
Three constraints remain: Red >2 (top-center), Up Light Blue Equal (top-left horizontal), and Blue Equal (right side). Remaining dominoes: 6-3, 6-4, 4-1, 6-2 (from Step 6). Analyzing: Up Light Blue Equal needs matching pips—checking available values, it must be 6s. Blue Equal needs matching pips—it must be 4s. Red >2 needs any value greater than 2. Place 6-3 horizontally (3 in Red >2 satisfying 3>2 ✓, 6 in Up Light Blue Equal). Place 6-4 vertically (6 in Up Light Blue Equal, 4 in Blue Equal). Place 4-1 horizontally (4 in Blue Equal, 1 extends elsewhere). Up Light Blue has two matching 6s ✓. Blue Equal has two matching 4s ✓. Red >2 receives 3 ✓. Pips Hint: when multiple constraints cluster together, work backward from equal regions to determine which mixed dominoes provide the required matching values while satisfying adjacent inequalities.
6
Step 6: Yellow Number 12 Region - The Final 6+6
From Step 1, we noted no single domino sums to 12. Yellow 12 (top-left) needs exactly 12. From Step 2, the 6 from 6-0 extends into Yellow. Remaining domino: 6-2. Testing: 6+6=12 works perfectly! Place 6-2 vertically (6 in Yellow 12, 2 extends down into Purple or blank area). Yellow calculation: 6 (from Step 2) + 6 (from 6-2) = 12 ✓. Puzzle complete—all six steps executed flawlessly. Step 1's 0-pip and double-5 allocations proved essential, demonstrating how initial scarcity analysis and geometric positioning drive the entire solution path from start to finish. Pips Hint: when sum regions need high values like 12 but no single domino provides it, combine contributions from multiple placements across different steps—the final piece simply completes an accumulation started much earlier.

🎥 Instant Domino Breakthrough! | Pips NYT Puzzle Trick – November 27, 2025

Watch how a single domino placement instantly clears major constraints and reshapes the board logic.

💡 Pro Tips for Similar Puzzles

Start with Constraints
Always begin with the most constrained regions - sum regions with small numbers or tight spaces.
Use Equal Regions
Use "equal" regions as anchors - they eliminate many possibilities quickly.
Work Systematically
Let the rules guide your placement rather than guessing randomly.
Double-Check
Verify each region's rules are satisfied before moving to the next.

🎓 Keep Learning & Improve