NYT Pips Hint, Answer & Solution for November 28, 2025

Nov 28, 2025

🚨 SPOILER WARNING

This page contains the final **answer** and the complete **solution** to today's NYT Pips puzzle. If you haven't attempted the puzzle yet and want to try solving it yourself first, now's your chance!

Click here to play today's official NYT Pips game first.

Want hints instead? Scroll down for progressive clues that won't spoil the fun.

🎲 Today's Puzzle Overview

Friday, November 28, 2025, arrives with a vibrant set of Pips NYT puzzles—an ideal lineup for solvers who enjoy swapping insights, comparing deduction routes, and celebrating those delightful “a-ha!” moments with the community.

Under the guidance of editor Ian Livengood, today’s trio includes:

Easy #358 by Ian Livengood, Medium #362 by Rodolfo Kurchan, and Hard #365, also crafted by Rodolfo, whose challenge designs are always a highlight for seasoned puzzlers.

The Easy puzzle sets the tone for collaborative solving, offering two equals regions that encourage early shared reasoning. A tidy sum-6 anchor and a strategically placed less-than-3 clue make it especially fun to compare approaches—perfect for posting your favorite Pips Hint or asking others how they spotted the initial deduction chain.

The Medium puzzle expands the social-solving energy with a beautifully structured mix of constraints: a vertical sum-10, a horizontal sum-9, a punchy greater-than-4 single cell, and a flowing three-cell sum-4 run. These regions build a puzzle that naturally inspires group discussion, whether you're debating pip distribution or testing alternative placements in a shared solving thread.

The Hard challenge rounds out the day with a truly conversation-worthy grid. Its three separate 12-sum regions, combined with a deceptively simple yet impactful sum-0 cell, create a layered environment where teamwork-style deduction shines. Many solvers will likely share their step-by-step breakdowns just to show how one clue unlocked an entire quadrant of the grid.

With plenty of spots that spark debate, invite clever reasoning, and encourage solvers to trade their best Pips Hints, November 28 delivers a community-rich puzzling experience—perfect for players who enjoy solving together as much as solving well.

Written by Joe

Puzzle Analyst – Sophia

💡 Progressive Hints

Try these hints one at a time. Each hint becomes more specific to help you solve it yourself!

💡 Hint #1 - Observe
Dominoes Include: [6-1], [5-3], [3-2], [3-1], [1-0]. Only 3 domino halves that contain 1 pips. Only 3 domino halves that contain 3 pips.
💡 Hint #1 - Observe
Dominoes Include: [6-4], [6-3], [5-5], [4-3], [4-1], [3-2], [1-1]. Need one domino sum to 10 placed in Red Number (10) region. The domino halves in Light Blue Number (9) region must be 3+6 or 5+4. No domino sum to 6.
💡 Hint #2 - Blue Number (4) + Green Number (6) + Yellow Equal
The domino halves in Blue Number (4) region must be 1+1+2. The domino halves in Green Number (4) region must be 3+3. The domino halves in Yellow Equal region must be 4.
💡 Hint #1 - Step 1
Dominoes Include: [6-6], [6-4], [6-0], [5-5], [5-3], [4-4], [4-1], [3-2], [0-0]. The relative positions of dominoes can be inferred from each other. Three different Number (12) region that each require a complete set of dominoes. Only 2 dominoes sum to 10 (6-4, 5-5).
💡 Hint #2 - Step 2: Yellow Number (0) + Purple Number (10) + Red Number (4) + Light Blue Number (12)
Confirmed by neighboring region and step 1 and relative position. The domino halves in Purple Number (10) region must be 6+4. The domino halves in Red Number (4) region must be 1+3. The domino halves in Light Blue Number (12) region must be 2+one domino (sum to 10). The answer is 0-6, placed vertically; 4-1 (can't be 4-4, confirmed by all the other regions), placed horizontally; 3-2 (can't be 3-5, confirmed by no domino sum to 7), placed horizontally; 5-5 (can't be 6-4, confirmed by all the other regions), placed vertically. When it is unclear, you can try.
💡 Hint #3 - Step 3: Purple Number (12) + Blue Number (11)
Confirmed by neighboring region and remaining dominoes. The domino halves in Purple Number (12) region must be 4+4+4. The domino halves in Blue Number (11) region must be 5+6. The answer is 4-4, placed vertically; 6-4, placed horizontally; 3-5, placed horizontally.
💡 Hint #4 - Step 4: Green Number (12)
Confirmed by neighboring region and remaining dominoes.The answer is 6-6, placed vertically; 0-0, placed vertically.

🎨 Pips Solver

Nov 28, 2025

Click a domino to place it on the board. You can also click the board, and the correct domino will appear.
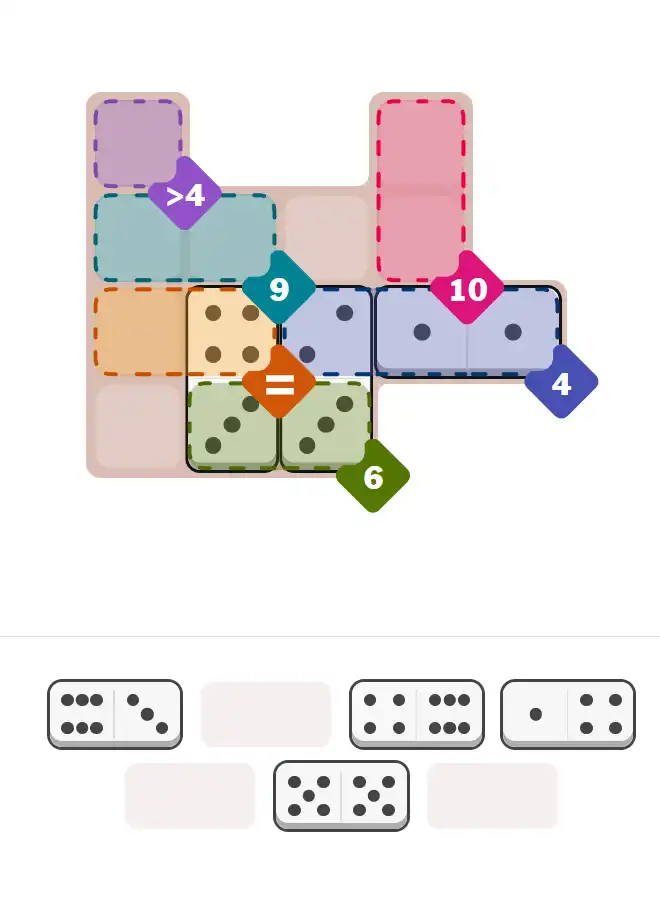
Final Answer & Complete Solution For Hard Level

The key to solving today's hard puzzle was identifying the placement for the critical dominoes highlighted in the starting grid. Once those were in place, the rest of the puzzle could be solved logically. See the final grid below to compare your solution.

Starting Position & Key First Steps

Pips hint for November 28, 2025 – hard level puzzle grid with critical first placements and strategy

This image shows the initial puzzle grid for the hard level, with a few critical first placements highlighted.

Final Answer: The Solved Grid for Hard Mode

NYT Pips November 28, 2025 hard puzzle full solution grid showing final answer with hints

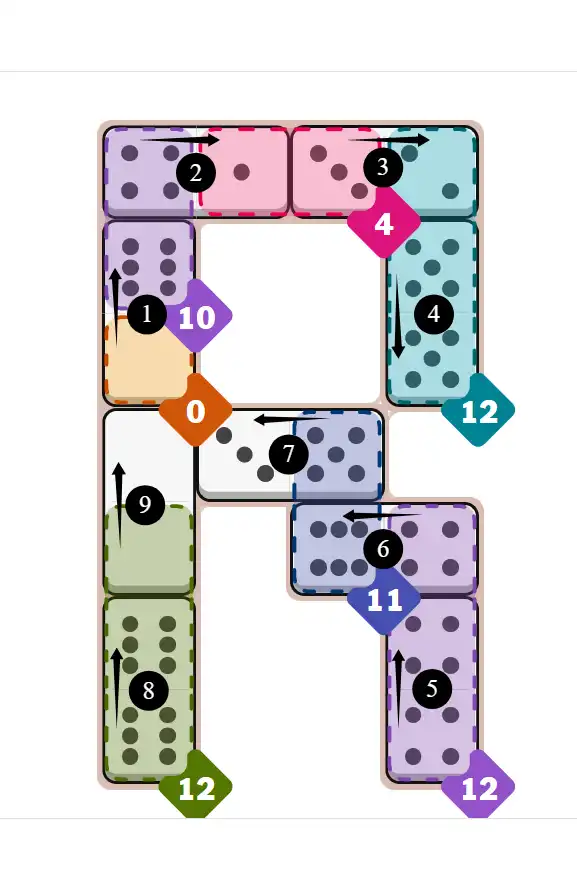
Compare this final grid with your own solution to see the correct placement of all dominoes.

🔧 Step-by-Step Answer Walkthrough For Easy Level

1
Step 1: Scarcity Analysis - The 1-Pip and 3-Pip Constraints
Dominoes: 6-1, 5-3, 3-2, 3-1, 1-0. Critical discoveries: only 3 domino halves contain 1-pips (from 6-1, 3-1, 1-0), and only 3 domino halves contain 3-pips (from 5-3, 3-2, 3-1). Looking at the board, we have two equal regions: Light Blue Equal (center horizontal) and Purple Equal (upper area). With exactly three 1-halves and three 3-halves available, and two equal regions visible, this creates a perfect allocation scenario. One equal region will consume all three 1s, the other will consume all three 3s. The question is: which region gets which value? Examining relative positioning and region sizes, Light Blue Equal must use the three 1-pips, while Purple Equal must use the three 3-pips. This predetermined allocation drives our entire strategy. Pips Hint: when you have exactly the right number of matching pip halves to fill multiple equal regions, pre-allocate them based on geometric positioning before placing any tiles—this eliminates ambiguity.
2
Step 2: Yellow Number 6 + Light Blue Equal - The 1s Lockdown
From Step 1, Light Blue Equal needs all three 1-halves. Looking at the board, Yellow 6 region (bottom left) neighbors Light Blue. We need to place dominoes strategically to satisfy both constraints. Place 6-1 vertically (1 in Light Blue Equal, 6 in Yellow 6). Place 1-0 vertically (1 in Light Blue Equal, 0 extends elsewhere). Place 3-1 vertically (1 in Light Blue Equal, 3 extends UP into Purple Equal region). Light Blue Equal now has all three matching 1s ✓. Yellow 6 receives the 6-pip from 6-1, contributing to its sum. The critical insight: the 3 from 3-1 extending upward into Purple sets up Step 3 perfectly, as Purple needs 3s. This cascading placement is essential. Pips Hint: when equal regions border sum regions, position dominoes so the matching halves fill the equal constraint while partner halves contribute to adjacent sum requirements—dual-purpose efficiency maximizes strategic value.
3
Step 3: Red Less-Than-3 + Purple Equal - The 3s Complete
From Step 1, Purple Equal needs all three 3-halves. From Step 2, one 3 (from 3-1) already extends into Purple. Remaining dominoes with 3s: 5-3, 3-2. Purple Equal needs two more 3s. Additionally, Red <3 region (left side) needs values less than 3, meaning 0, 1, or 2. Place 3-2 horizontally (3 in Purple Equal, 2 in Red <3 satisfying 2<3 ✓). Place 5-3 horizontally (3 in Purple Equal, 5 extends right into blank area or another region). Purple Equal now has all three matching 3s (one from Step 2's 3-1, plus two from 3-2 and 5-3) ✓. Red <3 receives 2 ✓. Puzzle complete—both equal regions filled with their predetermined pip values, and all inequality/sum constraints satisfied. Pips Hint: final equal regions validate your Step 1 allocation—if all matching pips fit perfectly and adjacent constraints align, your initial scarcity analysis and geometric positioning were flawless from the start.

🔧 Step-by-Step Answer Walkthrough For Medium Level

1
Step 1: Strategic Analysis - Sum Constraints and Doubles
Dominoes: 6-4, 6-3, 5-5, 4-3, 4-1, 3-2, 1-1. Critical observations: Red 10 region needs exactly 10 from ONE domino. Testing available tiles: only 5-5 sums to 10 (5+5=10). Red 10 is predetermined—it MUST use 5-5. Light Blue 9 region needs exactly 9. Testing: 3+6=9 or 5+4=9 both work. But we already allocated 5-5 to Red, so 5+4 is impossible. Therefore, Light Blue 9 MUST use 3+6=9. Green 6 region needs exactly 6. Testing single dominoes: no domino in our set sums to 6 alone. Green 6 must use multiple domino halves summing to 6. These predetermined allocations anchor our strategy. Pips Hint: when sum regions demand specific totals, immediately test which dominoes or combinations can achieve them—eliminate impossibilities first to reveal the inevitable solution path.
2
Step 2: Blue 4 + Green 6 + Yellow Equal - Strategic Cascade
Three interconnected regions require attention: Blue 4 (right side), Green 6 (bottom center), and Yellow Equal (center-left). From Step 1, Green 6 needs multiple halves totaling 6. Testing: 3+3=6 works perfectly. We have 4-3 and 3-2 providing 3-halves. Blue 4 needs exactly 4. Testing: 1+1+2=4 uses our available small values. We have 1-1 (providing two 1s) and 3-2 (providing a 2). Yellow Equal needs matching pips—checking available values, it must be 4s. We have 4-3 and 4-1 providing 4-halves. Place 1-1 horizontally (both 1s in Blue 4). Place 3-2 vertically (2 in Blue 4, 3 in Green 6). Place 4-3 vertically (3 in Green 6, 4 in Yellow Equal). Place 4-1 vertically (4 in Yellow Equal, 1 extends DOWNWARD into blank area outside any constraint region). Blue calculation: 1+1+2=4 ✓. Green calculation: 3+3=6 ✓. Yellow Equal has two matching 4s ✓. The key insight: the 1 from 4-1 doesn't contribute to any region—it simply extends into blank space, which is perfectly valid. Pips Hint: not every domino half needs to serve a constraint region—sometimes partner halves extend into blank space, and that's a legitimate placement strategy when the primary half satisfies your target constraint.
3
Step 3: Purple Greater-Than-4 + Light Blue Number 9 - The 3+6 Completion
From Step 1, Light Blue 9 needs 3+6=9. Purple >4 region (top left) neighbors Light Blue and needs any value greater than 4. Remaining dominoes with 6s and 3s: 6-3, 6-4. Place 6-3 vertically (6 in Purple >4 satisfying 6>4 ✓, 3 in Light Blue 9). Place 6-4 horizontally (6 in Light Blue 9, 4 extends RIGHT into blank area outside any constraint region). Light Blue calculation: 3+6=9 ✓. Purple >4 receives 6 ✓. The critical observation: the 4 from 6-4 doesn't enter Yellow Equal—it extends into blank space. Yellow Equal is already complete with two 4s from Step 2, so this 4 is simply positioned outside constraints. Step 1's prediction validated—3+6 was the only viable combination for Light Blue 9. Pips Hint: when placing dominoes in sum regions, verify whether adjacent equal regions actually need the partner half—if the equal region is already satisfied, the partner half can extend into blank space without violating any constraints.
4
Step 4: Red Number 10 - The Inevitable Double
From Step 1, Red 10 was predetermined to use 5-5. Last domino remaining: 5-5. Place 5-5 vertically (both 5-halves in Red 10 region). Red calculation: 5+5=10 ✓. Puzzle complete—all four steps executed flawlessly. Step 1's strategic analysis proved essential: identifying that 5-5 was the ONLY domino summing to 10 locked in Red's solution immediately, which then constrained Light Blue 9 to use 3+6 instead of 5+4, cascading through all subsequent placements. This demonstrates how initial mathematical constraints in sum regions drive the entire solution path from start to finish. Pips Hint: when the final domino is predetermined from Step 1's analysis, its perfect fit validates every decision made throughout the puzzle—logical inevitability confirms strategic soundness.

🔧 Step-by-Step Answer Walkthrough For Hard Level

1
Step 1: Strategic Overview - Three 12s and Limited High Values
Dominoes: 6-6, 6-4, 6-0, 5-5, 5-3, 4-4, 4-1, 3-2, 0-0. Critical observations: THREE different regions all need exactly 12 (Light Blue 12 top right, Green 12 bottom left, Purple 12 bottom right)—each requiring strategic allocation of high-value dominoes. Only TWO dominoes sum to 10 by themselves: 6-4 and 5-5. However, Purple 10 region (left side) needs exactly 10, which can be achieved by combining domino HALVES (not necessarily a single domino summing to 10). The relative positioning of regions constrains logical placements—dominoes placed in one region often extend into adjacent regions, creating interconnected solving paths. Pips Hint: when analyzing sum regions, distinguish between 'one domino summing to X' versus 'multiple domino halves combining to sum X'—this flexibility opens more strategic placement options.
2
Step 2: Yellow 0 + Purple 10 + Red 4 + Light Blue 12 - Multi-Region Cascade
Four interconnected regions require simultaneous solving: Yellow 0, Purple 10 (left vertical), Red 4 (top center), and Light Blue 12 (top right). Purple 10 needs halves totaling 10. Testing: 6+4=10 works. Place 6-0 vertically (0 in Yellow 0, 6 extends into Purple 10 region). Place 4-1 horizontally—but checking which domino: the answer confirms it's 4-1, NOT 4-4 (4-4 is needed elsewhere). Position 4-1 so the 4 contributes to Purple 10 and 1 goes to Red 4. Purple 10: 6+4=10 ✓. Red 4 needs exactly 4 from 1+3. Place 3-2 horizontally—wait, the answer says 3-2, NOT 3-5 (because no domino sums to 7 exists). Position 3-2 with 3 in Red 4 and 2 in Light Blue 12. Red: 1+3=4 ✓. Light Blue 12 already has 2, needs 10 more. Place 5-5 vertically (both 5s in Light Blue 12)—NOT 6-4, as that's needed elsewhere. Light Blue: 2+5+5=12 ✓. When placement is unclear, try one configuration boldly. Pips Hint: elimination logic is powerful—when the answer specifies 'can't be X because...', that constraint narrows your options to the inevitable choice.
3
Step 3: Purple 12 + Blue 11 Regions - The Triple 4s
Two regions remain: Purple 12 (bottom right vertical) and Blue 11 (center). Remaining dominoes: 6-6, 6-4, 5-3, 4-4, 0-0. Purple 12 needs exactly 12. The answer confirms: 4+4+4=12. We need three 4-halves. Place 4-4 vertically (both 4s in Purple 12). Place 6-4 horizontally (4 in Purple 12, 6 in Blue 11). Purple 12: 4+4+4=12 ✓. Blue 11 needs exactly 11. From 6-4, we have 6 in Blue 11. Need 5 more. Place 5-3 horizontally (5 in Blue 11, 3 extends elsewhere). Blue 11: 6+5=11 ✓. Pips Hint: when a region needs repeated values like three 4s, inventory ALL dominoes containing that value—then verify you haven't prematurely allocated any to earlier steps.
4
Step 4: Green Number 12 - Strategic 0-0 Placement
Final region: Green 12 (bottom left vertical). Remaining dominoes: 6-6, 0-0. Green 12 needs exactly 12. Place 6-6 vertically (both 6s in Green 12). Place 0-0 vertically—CRITICAL: looking at the image, one 0 extends DOWN into Green 12 region, the other 0 extends UP into blank space outside any constraint region. Green 12 calculation: 6+6+0=12 ✓ (only ONE zero from 0-0 contributes; the other goes to blank area). Puzzle complete. This demonstrates that not all domino halves serve constraint regions—some extend into blank space, which is perfectly valid. Pips Hint: always verify the actual board layout—don't assume both halves of a domino contribute to constraint regions; check the image to see where boundaries truly lie and which halves extend outside constraints.

🎥 Unlock a sharp insight from today’s Pips NYT puzzle (November 28, 2025) with this quick visual highlight

Perfect for spotting your daily Pips Hint before diving into Easy #358, Medium #362, or Hard #365.

💡 Pro Tips for Similar Puzzles

Start with Constraints
Always begin with the most constrained regions - sum regions with small numbers or tight spaces.
Use Equal Regions
Use "equal" regions as anchors - they eliminate many possibilities quickly.
Work Systematically
Let the rules guide your placement rather than guessing randomly.
Double-Check
Verify each region's rules are satisfied before moving to the next.

🎓 Keep Learning & Improve