NYT Pips Hint, Answer & Solution for November 24, 2025

Nov 24, 2025

🚨 SPOILER WARNING

This page contains the final **answer** and the complete **solution** to today's NYT Pips puzzle. If you haven't attempted the puzzle yet and want to try solving it yourself first, now's your chance!

Click here to play today's official NYT Pips game first.

Want hints instead? Scroll down for progressive clues that won't spoil the fun.

🎲 Today's Puzzle Overview

Start your Monday, November 24, 2025, with a fresh trio of Pips NYT puzzles—a lineup built for solvers who enjoy sharing smart observations, comparing solving paths, and celebrating those clever, collective “we cracked it!” moments.

Edited by Ian Livengood, today’s set brings together three distinctive puzzle voices:

Easy #331 by Ian Livengood, Medium #332 by Rodolfo Kurchan, and Hard #333 also by Rodolfo Kurchan.

Each puzzle offers its own style of community-friendly logic.

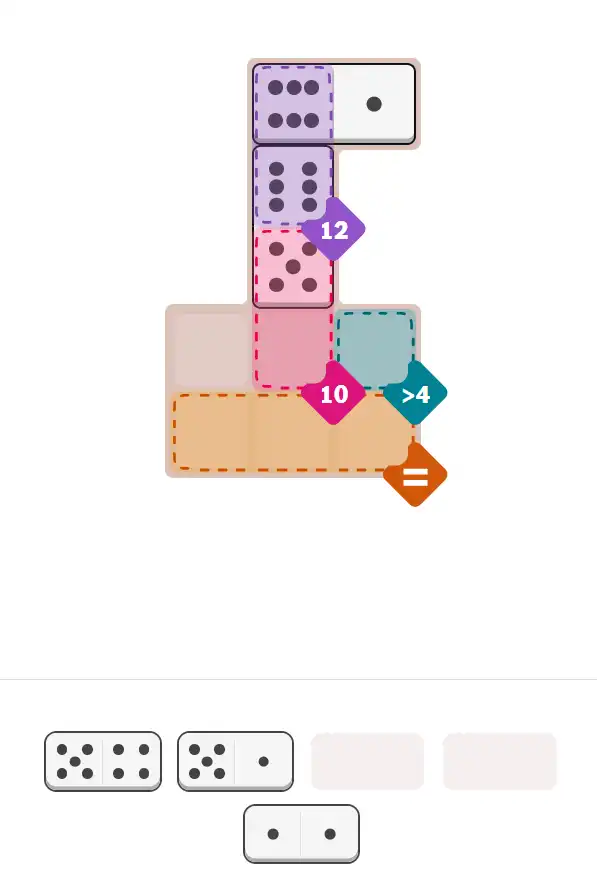
The Easy grid blends a 12-sum region, a 10-sum region, and a compact equals cluster—perfect for quick deduction and collaborative back-and-forth discussions. Its balanced layout makes it ideal for comparing early-route strategies or sharing a clean, elegant Pips Hint with other solvers.

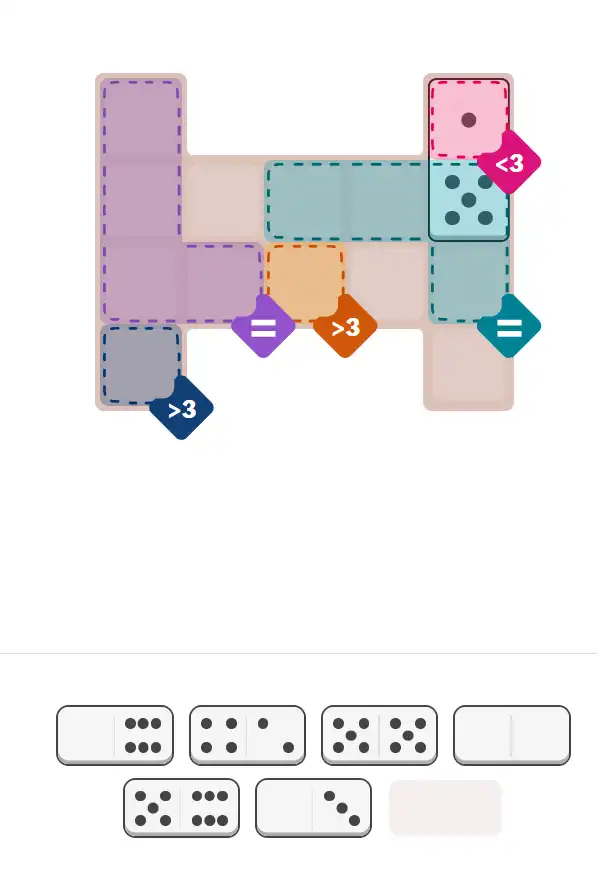
The Medium puzzle expands the reasoning space with multi-cell equals groups, targeted constraints such as less-than-3 and greater-than-3, and several empty cells that encourage debate on optimal domino placement. It’s the kind of grid where strategy conversations naturally form: “Which region anchors the solution first?”

The Hard puzzle closes the trio with layered equals clusters, tightly structured sum-11, sum-10, and sum-12 regions, and an important greater-than-0 constraint that often triggers those memorable “a-ha!” discovery moments—especially when solvers compare how they reached the same insight from different angles.

Whether you're posting your favorite Pips Hint, sharing how you unraveled those equals blocks, or uploading a screenshot of your polished final grid, November 24 delivers a puzzle set rich with talking points, strategy swaps, and satisfying reasoning moments for the entire Pips community.

Written by Joy

Puzzle Analyst – Mark

💡 Progressive Hints

Try these hints one at a time. Each hint becomes more specific to help you solve it yourself!

💡 Hint #1 - Observe
Based on the image, observe the shapes and domino pip counts.
💡 Hint #1 - Observe
Dominoes Include: [6-5], [6-0], [5-5], [5-1], [4-2], [3-0], [0-0]. Only 4 domino halves that contain 5 pips. Only 4 domino halves that contain 0 pips. Key meaning: Less Than (3).
💡 Hint #1 - Observe
Dominoes Include: [6-6], [6-1], [6-0], [5-0], [4-2], [4-1], [4-0], [3-2], [3-1], [2-0], [0-0]. Only one domino with 5 pips (5-0). Only 4 domino halves that contain 6 pips; need 2 domino halves for Red Number (12) region. [6-6] must placed in the boundary between Light Blue Number (11) region and Blue Number (10) region.
💡 Hint #2 - Purple Equal
The domino halves in this region must be 0.

🎨 Pips Solver

Nov 24, 2025

Click a domino to place it on the board. You can also click the board, and the correct domino will appear.

Final Answer & Complete Solution For Hard Level

The key to solving today's hard puzzle was identifying the placement for the critical dominoes highlighted in the starting grid. Once those were in place, the rest of the puzzle could be solved logically. See the final grid below to compare your solution.

Starting Position & Key First Steps

Pips hint for November 24, 2025 – hard level puzzle grid with critical first placements and strategy

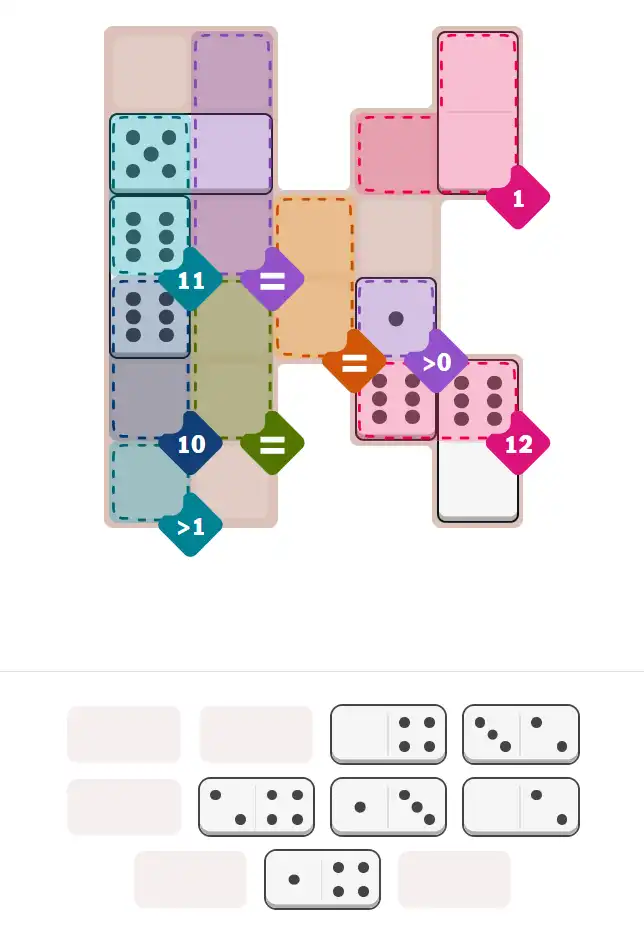
This image shows the initial puzzle grid for the hard level, with a few critical first placements highlighted.

Final Answer: The Solved Grid for Hard Mode

NYT Pips November 24, 2025 hard puzzle full solution grid showing final answer with hints

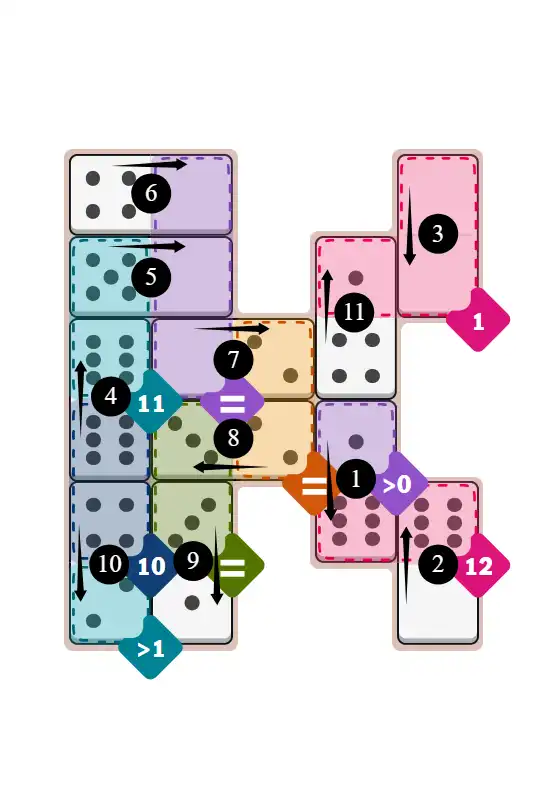
Compare this final grid with your own solution to see the correct placement of all dominoes.

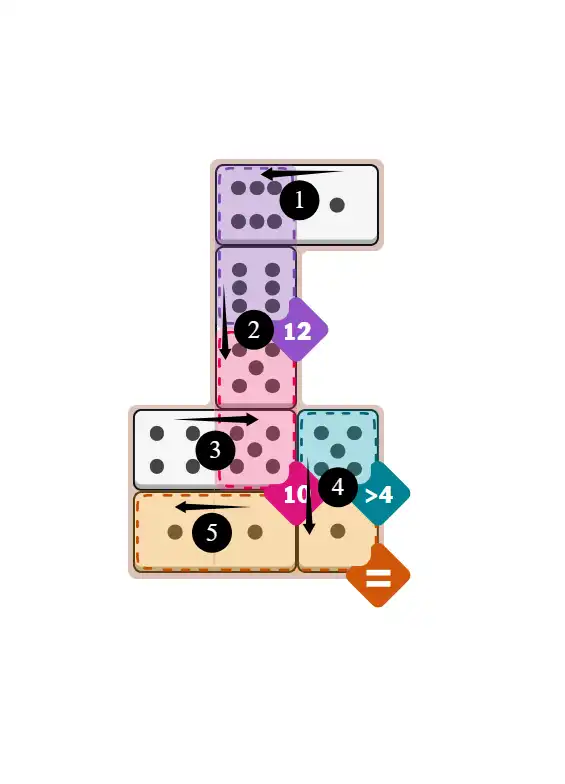
🔧 Step-by-Step Answer Walkthrough For Easy Level

1
Step 1: Identify Available Dominoes
Dominoes: 6-5, 6-1, 5-4, 5-1, 1-1. Key observation: only two dominoes contain 6-pips (6-5 and 6-1), perfect for the Purple 12 region. Three dominoes have 5-pips (6-5, 5-4, 5-1), giving us options for the Red 10 region. The Teal >4 constraint means we need 5 or 6 in that zone. Pips Hint: map high-value pips to high-demand regions first—constraints like >4 and sum=12 limit your flexibility.
2
Step 2: Purple Number 12 Region
This region needs exactly 12. From Step 1, testing: 6+6=12 works perfectly. Place 6-1 horizontally at the top and 6-5 vertically, positioning both 6-pip halves within the purple boundary. The 5 from 6-5 extends downward into the red region—critical for the next step. Pips Hint: when dominoes span multiple regions, visualize which half lands where before committing to placement.
3
Step 3: Red Number 10 Region
This region needs 10 total. From Step 2, we already have one 5-pip (from the 6-5 domino) inside this space. We need another 5 to achieve 5+5=10. Place 5-4 horizontally with the 5-pip half in the red region and the 4-pip half extending LEFT into the blank area—NOT into the teal zone, since teal requires >4 and 4 doesn't qualify. Pips Hint: always check neighboring constraints before placing—one wrong pip can violate adjacent rules.
4
Step 4: Teal Greater-Than-4 and Yellow Equal Regions
The teal region demands any value >4, meaning 5 or 6. All 6s are used, so we need a 5. Remaining dominoes: 5-1, 1-1. Place 5-1 vertically with the 5-pip half in the teal zone (satisfying >4) and the 1 extending down into the yellow region. Finally, place 1-1 horizontally in the yellow equal region—both halves show 1, completing the matching requirement. Pips Hint: save flexible constraints like 'equal' and 'greater-than' for last—they adapt to whatever pips remain after sum regions are solved.

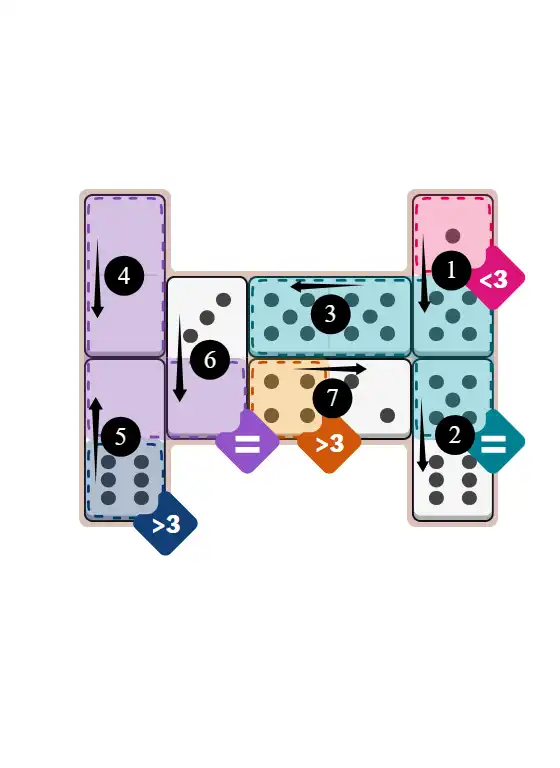
🔧 Step-by-Step Answer Walkthrough For Medium Level

1
Step 1: Inventory Check - The 5s and 0s
Dominoes: 6-5, 6-0, 5-5, 5-1, 4-2, 3-0, 0-0. Critical observation: only 4 domino halves contain 5-pips (from 6-5, 5-5, 5-1), and only 4 halves contain 0-pips (from 6-0, 3-0, 0-0). Spotting the Light Blue Equal region and Purple Equal region on the board, these exact counts are no coincidence—the 5s are destined for Light Blue, and the 0s must fill Purple. Pips Hint: when equal regions perfectly match your pip inventory, they're predetermined—mark them mentally as 'locked' before solving anything else.
2
Step 2: Red Less-Than-3 Region
This region demands any value <3, meaning 0, 1, or 2. From Step 1, we know all four 5-pips are reserved for the Light Blue Equal zone, and all 0-pips go to Purple. Testing remaining options: 1 or 2 work here. Checking neighboring constraints and available dominoes, the answer is 5-1 placed vertically with the 1-pip half in the red region. The 5 extends upward into the Light Blue zone—perfect positioning for Step 3. Pips Hint: solve edge regions with inequality constraints early—they help anchor high-value dominoes that bridge into equal regions.
3
Step 3: Light Blue Equal Region (The 5s)
From Step 1's prediction, all four 5-pips must occupy this region. From Step 2, one 5 (from 5-1 vertical) is already positioned here. Remaining dominoes with 5-pips: 6-5, 5-5. Place 5-5 horizontally (contributing two 5s) and 6-5 vertically (contributing one more 5). Count check: 1+2+1=4 halves total—exactly what we predicted. The 6 from 6-5 extends into the teal equal zone. Pips Hint: when executing Step 1's predictions, count carefully—if the math doesn't match, you either miscounted or misplaced something earlier.
4
Step 4: Purple Equal Region (The 0s)
From Step 1, all four 0-pips belong here. Remaining dominoes: 6-0, 3-0, 0-0. Notice the Purple region spans a large L-shaped area on the left side. Place 0-0 vertically at the bottom (both halves show 0), 6-0 vertically in the middle section (0-half inside Purple, 6 extends right toward teal), and 3-0 vertically at the top (0-half inside Purple, 3 extends right). Relative positioning matters—the 6 from 6-0 must align with the teal equal constraint. Pips Hint: large equal regions require multiple dominoes—visualize the entire shape before committing to orientations.
5
Step 5: Yellow Greater-Than-3 Region
This region demands any value >3, meaning 4, 5, or 6. All 5s and 6s are already used in previous steps. Last domino remaining: 4-2. Place 4-2 horizontally with the 4-pip half satisfying the >3 constraint (4>3 ✓). The 2 extends into a blank area. Puzzle complete—all constraints satisfied. Pips Hint: inequality regions at the end of puzzles are forgiving—they absorb whatever mid-value pips remain after equal and sum regions consume the extremes.

🔧 Step-by-Step Answer Walkthrough For Hard Level

1
Step 1: Strategic Inventory - The 6s and 5s Constraint
Dominoes: 6-6, 6-1, 6-0, 5-0, 4-2, 4-1, 4-0, 3-2, 3-1, 2-0, 0-0. Critical discoveries: only ONE domino contains 5-pips (5-0), making it irreplaceable wherever 5 is needed. Only 4 domino halves contain 6-pips total, and the Red 12 region needs at least two 6s (since 6+6=12 is the only clean solution). Here's the key insight—the 6-6 domino MUST be placed at the boundary between Light Blue 11 and Blue 10 regions to serve both constraints simultaneously. Pips Hint: when a high-value pip appears in only one domino (like our singleton 5), locate all regions that might need it before making any placements.
2
Step 2: Red Number 12 Region - Securing the 6s
This region needs exactly 12. From Step 1, we need two 6-pips here. Testing: 6+6=12 works perfectly. Place 1-6 vertically with the 1-pip in the Purple >0 region (satisfying 1>0 ✓) and the 6-pip in Red 12. Place 6-0 vertically with the 6-pip in Red 12 and the 0-pip extending downward into the blank area below. This gives us 6+6=12 in the red region while simultaneously solving the Purple >0 constraint. Pips Hint: when placing dominoes near inequality regions, position the appropriate pip value to satisfy multiple constraints—one smart placement can solve two problems at once.
3
Step 3: Pink Number 1 Region (Top Right)
This region needs exactly 1, which means the total of all domino halves inside must equal 1. The formula works as 0+0+1=1. We need the 0-0 domino here. Place 0-0 vertically, contributing both 0-halves to this region. The third half (showing 1-pip) will come from a neighboring domino placed in Step 8. Pips Hint: when sum regions seem incomplete, place what you CAN confirm now—trust that neighboring placements in later steps will complete the total.
4
Step 4: Light Blue Number 11 Region - Critical Orientation Decision
This region needs 11 total. From Step 1, place 6-6 vertically at the boundary—one 6 in Light Blue 11, one in Blue 10. Light Blue now needs 5 more (6+5=11). Only 5-0 has the required 5-pip. Here's the critical analysis: WHY must 5-0 be placed horizontally? Look at the Purple Equal region to the right—it demands matching pip values throughout. If we placed 5-0 vertically with 0 going elsewhere, checking our remaining dominoes (4-2, 4-1, 4-0, 3-2, 3-1, 2-0), we'd find insufficient 0-pips to fill Purple's multiple cells. Therefore, 5-0 MUST be horizontal with 0 extending RIGHT into Purple Equal, preserving our other 0-bearing dominoes (4-0, 2-0) for Purple. Place 5-0 horizontally: 5 in Light Blue 11, 0 in Purple Equal. Pips Hint: before committing to orientation, inventory remaining dominoes—verify that your choice leaves enough matching pips to satisfy adjacent equal regions.
5
Step 5: Purple Equal Region - The 0s Take Over
From Step 4, one 0 (from 5-0 horizontal) already sits in this equal region. All pips here must match. Remaining dominoes with 0-pips: 4-0, 2-0—exactly what we reserved in Step 4's analysis. Looking at the board layout, place 4-0 horizontally at the TOP of the Purple region with the 4-pip extending LEFT into the blank area and the 0-pip in Purple. Then place 2-0 horizontally in the middle section with the 0-pip in Purple and the 2-pip extending RIGHT into the Orange Equal region. This is crucial—the 2 now sits in Orange Equal, which will constrain Step 6. Step 4's orientation decision validated—without horizontal 5-0, we'd have been one 0 short. Pips Hint: equal regions often dictate orientation choices several steps earlier—think ahead about pip availability before locking in placements.
6
Step 6: Green Equal Region - Why It Must Be 3s
From Step 5, we placed 2-0 with the 2-pip extending into Orange Equal region. Now let's determine what pip value fills Green Equal. Remaining dominoes: 3-2, 3-1, 4-2, 4-1. Green needs matching pips throughout. Could it be 4s? Looking ahead, Blue 10 region still needs to be completed—it has one 6 (from Step 4's 6-6 boundary), so it needs 4 more (6+4=10). That means one 4-pip is already reserved for Blue 10. Checking our remaining dominoes: 4-2 and 4-1 give us only THREE 4-halves total (one from 4-2, one from 4-1, plus the 4 from used 4-0 is gone). But Blue 10 needs one 4, leaving only TWO 4-halves for Green—insufficient if Green has multiple cells. Could it be 2s or 1s? Similar scarcity issues. Therefore, Green MUST be 3s—we have 3-2 and 3-1, providing exactly the 3-halves needed without conflicting with other regions. Place 3-2 horizontally (3-half in Green, 2 extends toward Orange Equal, providing the matching 2 Orange needs) and 3-1 vertically (3-half in Green, 1 extends downward). Pips Hint: when analyzing equal regions, always check downstream constraints—a pip value might look available until you realize another sum region has already claimed it.
7
Step 7: Blue Number 10 + Teal Greater-Than-1 Regions
Blue needs exactly 10. From Step 4, one 6 (from 6-6 boundary) contributes. Step 6's analysis predicted we'd need a 4 here. Remaining: 4-2, 4-1. Testing: 6+4=10 works perfectly. Place 4-2 vertically with 4-pip in Blue 10 and 2-pip down into Teal >1 region (2>1 ✓). This validates Step 6's reasoning—the 4 was indeed reserved for Blue 10, proving Green couldn't use 4s. Pips Hint: when multiple constraints cluster together, look for dominoes whose halves naturally satisfy both—these dual-purpose placements accelerate solutions.
8
Step 8: Pink Number 1 Region (Bottom)
Final region needs exactly 1. Last domino: 4-1. Place 4-1 vertically with 1-half inside this bottom Pink 1 region, 4 extends into blank space. This 1 also completes the top Pink 1 region from Step 3, contributing to that area's 0+0+1=1 formula. Puzzle complete—every constraint satisfied. Pips Hint: the final piece confirms all prior logic—if it fits perfectly, your strategic decisions throughout were sound.

🎥 Quick Domino Reveal | Pips NYT Puzzle Trick – November 24, 2025

Start solving, share your time in the comments, and tag a puzzle partner who’d love this moment.

💡 Pro Tips for Similar Puzzles

Start with Constraints
Always begin with the most constrained regions - sum regions with small numbers or tight spaces.
Use Equal Regions
Use "equal" regions as anchors - they eliminate many possibilities quickly.
Work Systematically
Let the rules guide your placement rather than guessing randomly.
Double-Check
Verify each region's rules are satisfied before moving to the next.

🎓 Keep Learning & Improve