NYT Pips Hints & Answers for October 8, 2026

Oct 8, 2026

🚨 SPOILER WARNING

This page contains the final answer and the complete solution to today's NYT Pips puzzle. If you haven't attempted the puzzle yet and want to try solving it yourself first, now's your chance!

Click here to play today's official NYT Pips game first.

Want hints instead? Scroll down for progressive clues that won't spoil the fun.

SEE ALSO:

🎲 Today's Puzzle Overview

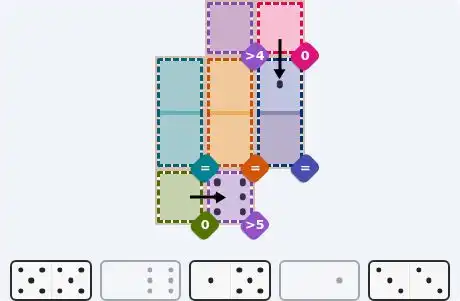
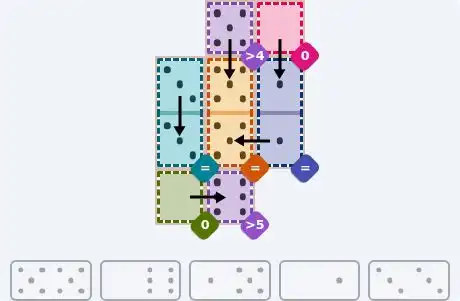
Ian Livengood's easy board is a narrow 3-wide strip: three vertical equals pairs form the spine, with single-cell anchors clipped to the top and bottom edges. Today's NYT Pips easy is really two short chains meeting in the middle. The bottom chain is seeded by the greater-5 cell, a target only one pip in the tray can clear; the top chain is seeded by the top-right sum-0 cell, which pins its region to a single value and hands the other half of its domino to an equals pair. Because almost every domino crosses a region boundary, one placement discharges a single-cell target and half of an equals pair at the same time. Once the two zero cells and the two greater-than cells are spent, three tiles remain and the equals pairs fall out by elimination.

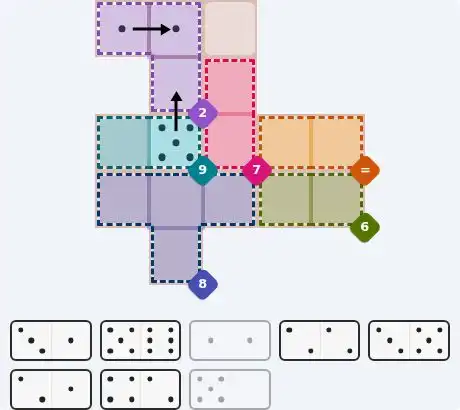
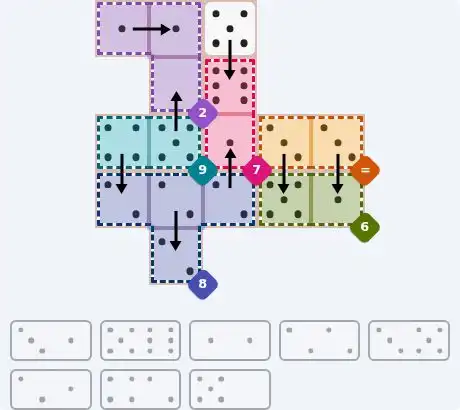
Ian Livengood's medium widens into a 3x5 frame with a four-cell sum block hanging beneath the left flank. The tray holds exactly one zero, and that bottleneck is the engine of the solve: the zero can only live in the three-cell sum-2 block at the top-left, and the partner pip it drags out of that block fixes the sum-9 pair on the left edge. From there the chains radiate in both directions — downward into the sum-8 block through the tray's only four-carrying tile, and rightward through the equals pair, which drains one pip into each half of the sum-6 pair below it. Two structural quirks drive the later steps: a dead-end cell under the sum block with a single domino partner, and the free square at the top, whose value is dictated by what the pink column still needs.

Rodolfo Kurchan's hard is a 6x6 mosaic of 32 single-cell sum targets — no equals pairs, no greater-than cells, nothing but lone numbers. The constraint graph is a matching problem: each of the 16 tiles must satisfy two independent targets at once, and the only certainties are cells whose target admits a single pip in the tray plus adjacent cells whose targets happen to match the two halves of one tile. All three doubles in the tray land on adjacent equal targets, which makes them the earliest forced placements. The solve runs from the edges inward: several cells on the left and bottom borders lose all but one neighbour to earlier tiles, which pins the domino that covers them.

💡 Progressive Hints

Try these hints one at a time. Each hint becomes more specific to help you solve it yourself!

💡 Start with the constraint type
Two of the single-cell regions here are plain sum targets, and they are the strictest things on the board: a sum only one pip can ever satisfy. Find those two cells before you touch the doubles or the greater-than cells — each one tells you which end of its domino is already decided, and the pip they force cannot be used anywhere else.
💡 The two zero corners
Those sum targets sit at opposite ends: the pink cell in the top-right corner and the green cell in the bottom-left. Each must take the same tiny pip, and two tiles in the tray carry one — so both cells are claimed by different tiles at the same moment. Then watch the partner cell of the bottom-left tile: it demands a much bigger pip, which is what settles that domino's direction.
💡 Complete layout
The 0/6 tile lies flat across the bottom-left: 0 in the green sum-0 corner, 6 in the purple greater-5 cell beside it — the greater-5 cell is the reason, since only a 6 clears it. The 0/1 tile stands vertically at the top-right: 0 upper in the pink sum-0, 1 lower in the top cell of the blue equals pair. The purple greater-4 cell takes the upper half of the 5/5 double, whose lower half sits in the top of the orange equals pair; the 1/5 tile then supplies the matching 5 for the orange pair's lower cell (5 on the left) and drops its 1 into the bottom cell of the blue pair, so blue reads 1-1. The 3/3 double fills the teal equals pair on the left edge. Check: greater-4 = 5, both sum-0 cells = 0, orange = 5/5, blue = 1/1, teal = 3/3, greater-5 = 6.
💡 Constraint type first
This tray holds several sum regions and exactly one region of a completely different kind: two neighbouring cells that must carry identical pips. That region is the keystone, because its two cells match — so each one also dictates what its domino partner contributes to the region underneath, and those two contributions still have to add up to a fixed total.
💡 The equals pair and the pair beneath it
The keystone is the orange equals pair on the right-hand side of the middle row, and the region directly below it is the green sum-6 pair. Each orange cell is the upper half of a domino whose lower half lands in green, so the value the orange pair settles on appears twice in the row above, while the two pips arriving in green must total six. Cross-check that against the tray and the dominoes covering the right-hand column are decided.
💡 Complete layout
The tray's only zero belongs to the 5/0 tile and can only live inside the purple sum-2 block at the top-left: a 5 in that block would make a total of two impossible, so the 0 goes in the block's bottom cell and the 5 drops into the right cell of the teal sum-9 pair — the tile stands vertically. The block's top two cells then owe 1 each, so the 1/1 double lies flat across them, 1 in the left cell and 1 beside it. Teal needs a 4 next to its 5, and only the 4/2 tile has one: 4 upper in the teal pair's left cell, 2 lower in the top-left cell of the blue sum-8 block. The pink sum-7 pair can only be completed by a 6 and a 1 now, so the 5/6 tile stands vertically: 5 upper in the uncoloured free square, 6 lower in the pink pair's top cell; pink's bottom cell takes the 1 from the 2/1 tile, whose 2 lands in the top-right cell of the blue block. The blue block's last cell hangs below with a single neighbour, so the 2/2 double stands vertically there (2 upper, 2 lower) and blue totals four 2s. Finally the orange equals pair takes two 3s: the 3/5 tile stands vertically, 3 upper in the left orange cell and 5 lower in the left green cell, and the 3/1 tile stands vertically, 3 upper in the right orange cell and 1 lower in the right green cell — green closes at 6.
💡 Constraint type first
Every region on this board is a single cell with a sum target — no equals pairs, no ranges. So the whole hunt is about targets that admit only one possible pip, and about neighbouring pairs of cells whose targets happen to match the two halves of one tile. Start there; nothing here is solved by arithmetic you cannot see.
💡 Two zeros side by side
The clearest handhold is a pair of adjacent cells on the left-hand side, one row above the bottom-left corner: the blue sum-0 and the green sum-0 beside it. Both demand a zero, and only a double can supply two of them at once. The 0/0 tile is the sole candidate, so it lies flat across those two cells and its position and direction are settled immediately.
💡 The corner and the last row
Below the zeros, the blue sum-4 in the bottom-left corner has only one free neighbour left — the green sum-5 beside it — so a single domino must span the two, and only the 4/5 tile fits: 4 on the left in the blue sum-4, 5 on the right in the green sum-5, lying flat. The last row repeats the trick: the blue sum-3 at the bottom-left loses its upper neighbour to that tile, so the 3/3 double lies flat with 3 in the blue sum-3 and 3 in the green sum-3 beside it.
💡 The six on the left edge
Now look one row below the blue sum-6: the blue sum-4 on the left edge is boxed in, because the zero pair underneath it is already taken, so it can only share a domino with the blue sum-6 above. That forces the 6/4 tile to stand vertically — 6 upper in the blue sum-6, 4 lower in the blue sum-4 — and it spends one of the two six-carrying tiles in the tray.
💡 Complete layout
Left side and bottom: the 6/4 tile stands vertically, 6 upper in the blue sum-6 at the top of the left column, 4 lower in the blue sum-4 beneath it; the 0/0 double lies flat in the blue sum-0 and the green sum-0 beside it; the 4/5 tile lies flat in the bottom-left corner, 4 left in the blue sum-4 and 5 right in the green sum-5; the 3/3 double lies flat along the last row, 3 left in the blue sum-3 and 3 right in the green sum-3. Top band: the 3/2 tile stands vertically, 2 upper in the purple sum-2 at the top-left and 3 lower in the green sum-3 beneath it; the 4/0 tile stands vertically, 4 upper in the pink sum-4 near the top and 0 lower in the purple sum-0 below it; the 1/4 tile lies flat, 4 left in the teal sum-4 at the top and 1 right in the orange sum-1; the 0/3 tile lies flat, 0 left in the teal sum-0 and 3 right in the orange sum-3. Middle band: the 6/3 tile lies flat, 3 left in the green sum-3 and 6 right in the purple sum-6; the 3/4 tile stands vertically, 4 upper in the teal sum-4 on the right and 3 lower in the teal sum-3 beneath it; the 1/0 tile stands vertically, 0 upper in the pink sum-0 and 1 lower in the pink sum-1; the 0/5 tile stands vertically on the right edge, 5 upper in the orange sum-5 and 0 lower in the orange sum-0; the 3/1 tile lies flat, 1 left in the purple sum-1 and 3 right in the pink sum-3. Bottom right: the 0/2 tile lies flat in the fifth row, 2 left in the purple sum-2 and 0 right in the pink sum-0; the 4/4 double lies flat in the bottom-right corner, 4 left in the teal sum-4 and 4 right in the orange sum-4; and the 4/2 tile lies flat on the last row, 2 left in the purple sum-2 and 4 right in the pink sum-4. Every target is met exactly.

🎨 Pips Solver

Oct 8, 2026

Click a domino to place it on the board. You can also click the board, and the correct domino will appear.
✅ Final Answer & Complete Solution For Hard Level

The key to solving today's hard puzzle was identifying the placement for the critical dominoes highlighted in the starting grid. Once those were in place, the rest of the puzzle could be solved logically. See the final grid below to compare your solution.

Starting Position & Key First Steps
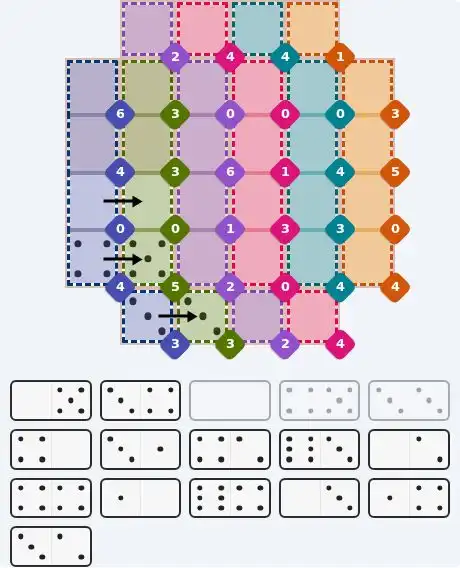
Pips hint for October 8, 2026 – hard level puzzle grid with critical first placements and strategy

This image shows the initial puzzle grid for the hard level, with a few critical first placements highlighted.

Final Answer: The Solved Grid for Hard Mode
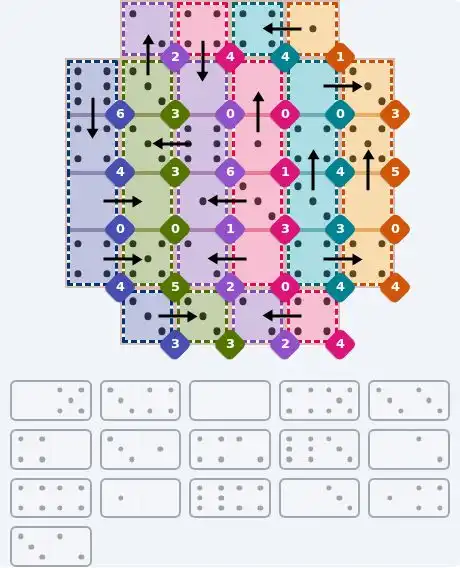
NYT Pips October 8, 2026 hard puzzle full solution grid showing final answer with hints

Compare this final grid with your own solution to see the correct placement of all dominoes.

🔧 Step-by-Step Answer Walkthrough For Easy Level

1
Step 1: The bottom row takes the 0/6
The purple greater-5 cell needs a pip above 5, and only one tile in the whole tray carries such a pip. That same tile holds a 0, and its zero can only reach the neighbouring single cell, the green sum-0. So the tile lies flat across the bottom-left: 0 on the left in the green sum-0, 6 on the right in the purple greater-5. Nothing else on the board can cover that cell.
2
Step 2: The top-right zero claims the 0/1
The pink sum-0 cell in the top-right corner must hold a zero, and the only zero left in the tray belongs to the 0/1 tile. It stands vertically, 0 upper in the pink sum-0 and 1 lower in the top cell of the blue equals pair — so the blue pair's value is already half-decided.
3
Step 3: Greater than four hands the board to the 5/5
With the 6 spent, the purple greater-4 cell can only take a 5, and the 5/5 double satisfies it while also locking the equals pair directly beneath it. The double stands vertically: upper 5 in the purple greater-4, lower 5 in the top cell of the orange equals pair. Orange now needs another 5 in its lower cell.
4
Step 4: Teal and blue close the tray
Three cells and two tiles remain. The teal equals pair on the left edge needs two identical pips, and of the tiles still in hand only the 3/3 double can do that, so it stands vertically there. The 1/5 tile then fills the last pair: 5 on the left in the lower cell of the orange pair, matching the double above it, and 1 on the right in the lower cell of the blue pair, matching the 1 already sitting there. Blue = 1/1, teal = 3/3, and the board is complete.

🔧 Step-by-Step Answer Walkthrough For Medium Level

1
Step 1: The tray's only zero picks the sum-2 block
The medium tray contains exactly one zero, on the 5/0 tile. The purple sum-2 block at the top-left is three cells adding to two, so a 5 can never stand inside it — the 5 has to leave, and its only exit is downward from the block's bottom cell into the right cell of the teal sum-9 pair. The tile stands vertically: 0 upper in the block's bottom cell, 5 lower in the teal pair's right cell.
2
Step 2: The 1/1 fills the rest of the block
The block's two top cells sit side by side, so one domino covers both, and with no zero left available they must contribute two pips between them. That makes them a pair of 1s: the 1/1 double lies flat across the top-left, 1 in the left cell and 1 in the right cell.
3
Step 3: Teal borrows the tray's only four
The teal sum-9 pair already holds 5 on its right, so its left cell needs a 4 — and only the 4/2 tile carries one. That left cell sits directly above the blue sum-8 block, so the tile stands vertically: 4 upper in the teal pair, 2 lower in the top-left cell of the block.
4
Step 4: The pink column and the free square
The pink sum-7 pair is the highest target on the board and it needs the tray's biggest pip. The 5/6 tile stands vertically at the top: 5 upper in the uncoloured free square, 6 lower in the pink pair's top cell. Pink's bottom cell must then be a 1, and the 2/1 tile supplies it — 1 upper in the pink pair, 2 lower in the top-right cell of the blue block.
5
Step 5: The hanging cell pins blue, the 3s finish green
The fourth cell of the blue block hangs below the rest with a single neighbour, so the 2/2 double stands vertically in the block — 2 upper in the top-centre cell, 2 lower in the bottom-centre cell — and blue reads four 2s for a total of 8. The orange equals pair is all that is left and it needs two matching pips, so the 3/5 and 3/1 tiles stand vertically side by side: 3 upper in each orange cell, 5 lower in the left green cell and 1 lower in the right green cell, which brings green to exactly 6.

🔧 Step-by-Step Answer Walkthrough For Hard Level

1
Step 1: The 0/0 double takes the two zeros
The blue sum-0 and the green sum-0 sit side by side on the left, one row above the bottom-left corner, and both demand a zero. Only a double can deliver two zeros at once, so the 0/0 tile must lie flat across them: 0 left in the blue sum-0, 0 right in the green sum-0. This is the first domino on the board because it is the only tile that can be true in both cells.
2
Step 2: The bottom-left corner takes the 4/5
The blue sum-4 in the bottom-left corner has just one free neighbour left, the green sum-5 beside it (the cell above is already covered by the double). One domino must therefore span the pair, and only the 4/5 tile matches both targets: 4 on the left in the blue sum-4, 5 on the right in the green sum-5, lying flat.
3
Step 3: The last row takes the 3/3
The blue sum-3 at the bottom-left of the last row loses its upper neighbour to the 4/5 tile, so it can only pair with the green sum-3 beside it. Both cells need the same pip and only the 3/3 double supplies two of them, so it lies flat along the last row: 3 left in the blue sum-3, 3 right in the green sum-3.
4
Step 4: The left column pins the 6/4
The blue sum-4 on the left edge, one row below the blue sum-6, is now boxed in — its lower neighbour belongs to the zero double, so it can only share a domino with the blue sum-6 above it. A 6 above a 4 is the 6/4 tile, which stands vertically: 6 upper in the blue sum-6, 4 lower in the blue sum-4. One of the tray's two six-carrying tiles is spent.
5
Step 5: The top-left purple sum-2 takes the 3/2
The purple sum-2 at the top-left has only two possible neighbours, and one of them is the green sum-3 directly beneath it. That green cell cannot take its 3 from the double (already spent along the bottom) and cannot take it from a tile whose other half would have to land in a zero cell, so the 3 arrives on the 3/2 tile: 2 upper in the purple sum-2, 3 lower in the green sum-3, standing vertically. That leaves the 6/3 tile as the only six-carrier still unused, and the purple sum-6 in the centre is the only cell still demanding a 6.
6
Step 6: The rest of the board is bookkeeping
Top band: the 4/0 tile stands vertically, 4 upper in the pink sum-4 near the top and 0 lower in the purple sum-0 below it; the 1/4 tile lies flat, 4 left in the teal sum-4 at the top and 1 right in the orange sum-1 beside it; the 0/3 tile lies flat, 0 left in the teal sum-0 and 3 right in the orange sum-3. Middle band: the 6/3 tile lies flat, 3 left in the green sum-3 and 6 right in the purple sum-6; the 3/4 tile stands vertically, 4 upper in the teal sum-4 on the right and 3 lower in the teal sum-3 beneath it; the 1/0 tile stands vertically, 0 upper in the pink sum-0 and 1 lower in the pink sum-1; the 0/5 tile stands vertically on the right edge, 5 upper in the orange sum-5 and 0 lower in the orange sum-0; the 3/1 tile lies flat, 1 left in the purple sum-1 and 3 right in the pink sum-3. Bottom right: the 0/2 tile lies flat in the fifth row, 2 left in the purple sum-2 and 0 right in the pink sum-0; the 4/4 double lies flat, 4 left in the teal sum-4 and 4 right in the orange sum-4; and the 4/2 tile lies flat on the last row, 2 left in the purple sum-2 and 4 right in the pink sum-4. Every target now lands exactly on its number.

💡 Pro Tips for Similar Puzzles

Start with Constraints
Always begin with the most constrained regions - sum regions with small numbers or tight spaces.
Use Equal Regions
Use "equal" regions as anchors - they eliminate many possibilities quickly.
Work Systematically
Let the rules guide your placement rather than guessing randomly.
Double-Check
Verify each region's rules are satisfied before moving to the next.

🎓 Keep Learning & Improve