NYT Pips Hints & Answers for October 5, 2026

Oct 5, 2026

🚨 SPOILER WARNING

This page contains the final answer and the complete solution to today's NYT Pips puzzle. If you haven't attempted the puzzle yet and want to try solving it yourself first, now's your chance!

Click here to play today's official NYT Pips game first.

Want hints instead? Scroll down for progressive clues that won't spoil the fun.

SEE ALSO:

🎲 Today's Puzzle Overview

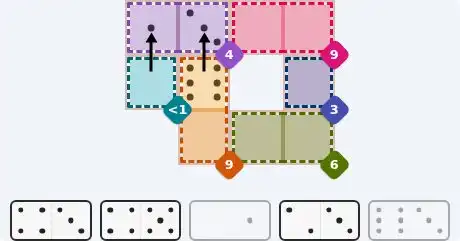
The easy grid gives you two gifts up front: the teal less 1 square and the blue sum 3 square are both single-cell regions, so you can write their values down the moment you read them, with no cross-checking at all. From there, Livengood's chain runs down the left-hand column — the tile that leaves the teal square has to drop its partner into the purple pair above, which in turn demands a specific pip in the orange sum 9 column. With only ten cells and five tiles to place, every move visibly empties the tray, and the pink sum 9 pair across the top-right falls last.

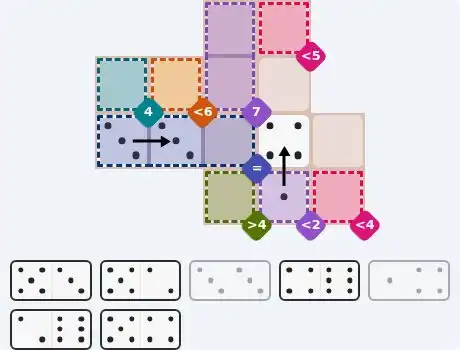
Kurchan's medium board asks you to pick a lane. One lane starts at the right-hand edge, where a less-than-2 cell will only tolerate the smallest pip in the tray; the other runs straight along the middle row, where an equals region insists on the same pip three times over — and there is exactly one double in the tray to help you do it. Work the two lanes together and the three free squares on the right stop being obstacles and start being outlets for tiles that fit nowhere else.

The hard grid is a different animal: eighteen regions, two equals blocks, and a cluster of tight three-cell sums that leave you very little room to guess. Your way in is the sum-0 cell in the top row and the sum-1 block wedged into the corner beside it — together they settle most of that edge before you have placed a single tile. After that, this NYT Pips hard rewards patience: the blue sum 9 column on the left and the blue equals block in the bottom-right both want the same quiet, low pips, and the tray can only supply so many.

💡 Progressive Hints

Try these hints one at a time. Each hint becomes more specific to help you solve it yourself!

💡 Read the constraint types first
Before you touch a tile, notice that this grid contains two single-cell regions — one a bare sum, one a less-than. Single-cell regions are the only places where a constraint fixes a value outright, so sweep those two squares first and leave the pairs alone until they are filled.
💡 The teal square on the left edge
The teal less 1 square is a lone cell on the left, and only one pip in the whole tray can legally sit in it. Whatever tile feeds it must also reach up into the purple sum 4 pair directly above, so the left-hand column hands you two placements at once. The pink sum 9 pair across the top-right and the orange sum 9 column on the left side are the next regions to crack.
💡 The full easy layout
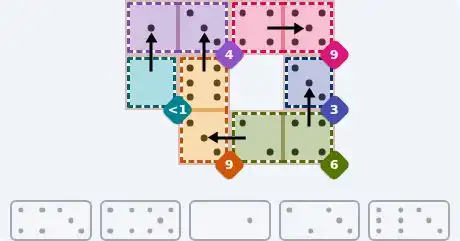
The 0/1 tile stands upright on the left edge: 0 goes down into the teal less 1 square, 1 goes up into the left cell of the purple sum 4 pair. Purple then needs 3 in its right cell, supplied by the 6/3 tile standing in the same column — 6 down into the top cell of the orange sum 9 column, 3 up into purple. Orange now holds 6 and needs 3 below it, so the 2/3 tile lies flat across the bottom of the column: 3 on the left into orange, 2 on the right into the left cell of the green sum 6 pair. Green wants 4 in its right cell, and the 4/3 tile stands in the right-hand column to provide it — 4 down in green, 3 up in the blue sum 3 square. The leftover 4/5 tile lies flat across the top-right, 4 on the left and 5 on the right, completing the pink sum 9 pair.
💡 Two constraint types do the work
Hunt first for a single-cell sum on the left of the middle row — it names its own value — and for an equals region running along the row beneath it, which has to repeat one pip in every cell. The less-than squares can wait until the tray has thinned out.
💡 The equals run and the 1/4 tile
The blue equals run along the left of the third row needs the same pip three times, and the 3/3 double is the only double in the tray — it can claim two of those cells on its own, which pins the run's value quickly. In parallel, the purple less 2 square in the bottom-right corner only accepts the very smallest pips, and the tray holds exactly one 1, riding on the 1/4 tile.
💡 The full medium layout
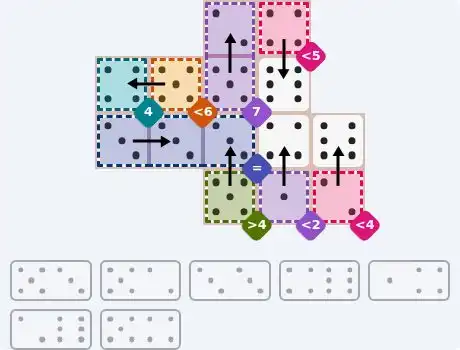
The 1/4 tile stands vertically at the bottom-right: 1 goes down into the purple less 2 square and 4 goes up into the free square above it — the 4 cannot go sideways, since the green greater 4 cell on the left and the pink less 4 cell on the right both reject it. The teal sum 4 cell on the left of the middle row takes the second 4, with the 5/4 tile lying flat beside it: 4 on the left in teal, 5 on the right in the orange less 6 cell. That settles the equals run as three 3s — the 3/3 double lies flat over the two leftmost cells of the run, and the 5/3 tile stands vertically in the third, 3 up into the run and 5 down into the green greater 4 cell. Up top, the purple sum 7 pair is the 5/2 tile standing upright, 2 in the upper cell and 5 in the lower. The last two tiles both carry a 6: the 4/6 stands on the right edge with 4 up in the pink less 5 cell and 6 down in the free square, and the 2/6 stands at the bottom-right with 2 down in the pink less 4 cell and 6 up in the free square above.
💡 Start from constraint types, not tiles
This board leans on two equals blocks, a pile of single-cell sums, and a few tight three-cell sum blocks. The equals blocks are the loudest clues early on; the crowded three-cell sums along the bottom only open up much later in the solve.
💡 The sum-0 cell and the pink corner
The teal sum 0 single cell in the top row is your first foothold — a region that sums to zero with only one cell has nowhere to hide. Its domino partner has to reach into the pink sum 1 block pressed against it in the top-left corner, and that block is the other clue shaping the whole top edge.
💡 Filling the pink block
The 0/1 tile lies flat along the top: 0 on the right in the teal sum 0 cell, 1 on the left in the pink block's top-right cell. The block then needs two more pips that add up to nothing, so both remaining cells are 0 — one from the 0/6 tile standing in the left column, 6 up in the purple sum 6 corner and 0 down in the block, the other from the 3/0 tile standing just to its right, 0 up in the block and 3 down in the teal sum 3 cell.
💡 The top-right cluster
Now the top-right opens up. The orange equals block carries one pip in all three of its cells; the 3/2 tile lies flat along the top row, putting 2 on the left in the block's top-left cell and 3 on the right in the blue sum 3 cell; the 2/4 tile lies flat one row down, 4 on the left in the purple sum 4 cell and 2 on the right in the block; and the 0/2 tile stands vertically to close the block, 2 up in its bottom-right cell and 0 down in the left cell of the orange sum 1 pair.
💡 The full hard layout
The 0/1 tile lies flat at the top (0 right in teal sum 0, 1 left in the pink block's top-right cell); the 0/6 tile stands in the left column (6 up in the purple sum 6 corner, 0 down in the pink block's bottom-left cell); the 3/0 tile stands beside it (0 up in the block's bottom-right cell, 3 down in teal sum 3). Across the top-right: the 3/2 tile lies flat (2 left in the orange equals block's top-left cell, 3 right in blue sum 3), the 2/4 tile lies flat below it (4 left in purple sum 4, 2 right in the block), and the 0/2 tile stands (2 up in the block's bottom-right cell, 0 down in the left cell of the orange sum 1 pair). On the right edge, the 6/1 tile stands vertically (1 up in the orange sum 1 pair's right cell, 6 down in green sum 6) and the 4/4 tile fills the green sum 8 pair, 4 up and 4 down. Down the left: the 6/3 tile stands (6 up in pink sum 6, 3 down in blue sum 9's top cell), the 3/3 tile stands below it (3 in blue sum 9's middle cell, 3 in the bottom cell), the 2/2 tile stands (2 up in purple sum 2, 2 down in green sum 2), the 1/3 tile stands (1 up in the pink sum 1 cell at the bottom, 3 down in teal sum 14's bottom-left cell), the 2/6 tile lies flat (6 left in teal sum 14's top-right cell, 2 right in orange sum 2), the 5/0 tile lies flat (5 left in teal sum 14's bottom-right cell, 0 right in the blue equals block's bottom-left cell), and the 0/0 tile stands at the right end (0 up in the blue equals block's top-right cell, 0 down in its bottom-right cell).

🎨 Pips Solver

Oct 5, 2026

Click a domino to place it on the board. You can also click the board, and the correct domino will appear.
✅ Final Answer & Complete Solution For Hard Level

The key to solving today's hard puzzle was identifying the placement for the critical dominoes highlighted in the starting grid. Once those were in place, the rest of the puzzle could be solved logically. See the final grid below to compare your solution.

Starting Position & Key First Steps
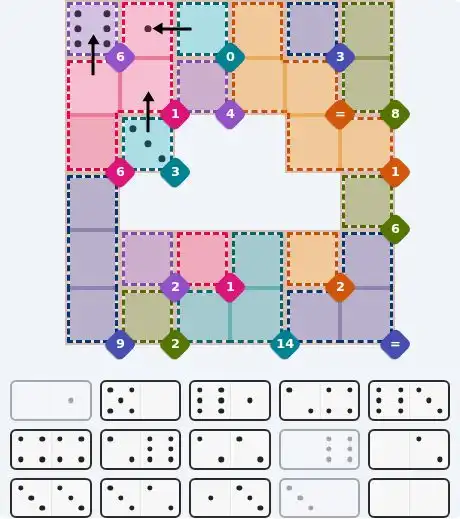
Pips hint for October 5, 2026 – hard level puzzle grid with critical first placements and strategy

This image shows the initial puzzle grid for the hard level, with a few critical first placements highlighted.

Final Answer: The Solved Grid for Hard Mode
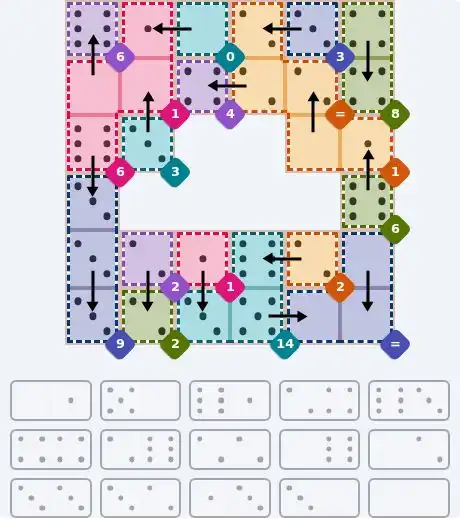
NYT Pips October 5, 2026 hard puzzle full solution grid showing final answer with hints

Compare this final grid with your own solution to see the correct placement of all dominoes.

🔧 Step-by-Step Answer Walkthrough For Easy Level

1
Step 1: The two single cells
Two regions are just one cell each: the teal less 1 square on the left and the blue sum 3 square on the right. A cell that must stay under 1 can only hold 0, and a one-cell sum of 3 simply holds 3. Both values are handed to you with no tray-checking at all, and they become the anchors for the dominoes around them.
2
Step 2: The left column domino
The only tile in the tray carrying a 0 is the 0/1 tile, and the teal square is its natural home. It stands vertically on the left edge, 0 in the teal cell and 1 above it in the left cell of the purple sum 4 pair. Purple now needs 3 in its right cell, and the 6/3 tile supplies it: standing in the second column, its 3 sits up in purple while its 6 drops into the top cell of the orange sum 9 column.
3
Step 3: Finishing the orange column
Orange already holds 6, so its lower cell needs 3. That 3 is the left half of the 2/3 tile, lying flat across the bottom of the column and pushing its 2 into the left cell of the green sum 6 pair.
4
Step 4: The right column and the top-right pair
Green now holds 2 and needs 4, so the 4/3 tile stands in the right-hand column: 4 in green's right cell at the bottom, 3 above it in the blue sum 3 square. That leaves the 4/5 tile lying flat across the top-right, 4 on the left and 5 on the right, which completes the pink sum 9 pair.

🔧 Step-by-Step Answer Walkthrough For Medium Level

1
Step 1: The bottom-right less-than cell
The purple less 2 square in the bottom-right corner can only take 0 or 1, and the tray holds exactly one 1 — on the 1/4 tile. That tile has to stand vertically, because a 4 is barred from both side neighbours (the green greater 4 cell to the left and the pink less 4 cell to the right), so 1 sits in the less 2 square and 4 goes directly above it in the free square.
2
Step 2: The teal four
The teal sum 4 cell on the left of the middle row is a one-cell sum, so it simply holds 4 — the second of the tray's three 4s. That 4 has to pair into an adjacent cell, and a 6 is barred by the orange less 6 square next door, so it takes the 5: the 5/4 tile lies flat, 4 on the left in teal and 5 on the right in the orange less 6 cell.
3
Step 3: The equals run
The blue equals run of three cells along the left of the third row needs one pip three times over. The 4s are down to a single spare and the 5s have only two left after the orange cell, so the run has to be three 3s: the 3/3 double lies flat over the two leftmost cells, and the 5/3 tile stands vertically in the third, putting its 3 in the run and its 5 down into the green greater 4 square below.
4
Step 4: The purple pair at the top
The purple sum 7 pair at the top of the grid needs two pips adding to 7, and only one tile in the tray can manage that split: the 5/2. It stands upright with 2 in the upper cell and 5 in the lower one.
5
Step 5: The two remaining edge tiles
Only two tiles are left and both carry a 6, which means neither 6 can sit in the pink less 5 cell at the top-right or the pink less 4 cell at the bottom-right. So the 4 goes in the pink less 5 cell with its 6 falling into the free square directly below, and the 2 goes in the pink less 4 cell at the bottom-right with its 6 rising into the free square above it.

🔧 Step-by-Step Answer Walkthrough For Hard Level

1
Step 1: The sum-0 cell and the pink block
The teal sum 0 cell in the top row sums to zero on its own, so it can only hold 0. Beside it, the pink sum 1 block tucked into the top-left corner needs three non-negative pips totalling 1 — which means exactly one of its three cells is a 1 and the other two are 0.
2
Step 2: Completing the pink block
The 0/1 tile lies flat along the top: 0 on the right in the teal sum 0 cell, 1 on the left in the pink block's top-right cell. The block's other two cells must both read 0, and each is supplied by a tile standing vertically in the left columns — the 0/6 tile, with 6 up in the purple sum 6 corner cell and 0 down in the block's bottom-left cell, and the 3/0 tile just to its right, with 0 up in the block's bottom-right cell and 3 down in the teal sum 3 cell.
3
Step 3: The top-right cluster
The orange equals block spanning the top-right must repeat one value in all three of its cells. The 3/2 tile lies flat along the top row, 2 on the left in the block's top-left cell and 3 on the right in the blue sum 3 cell. The 2/4 tile lies flat one row lower, 4 on the left in the purple sum 4 cell and 2 on the right in the block. The 0/2 tile stands vertically to close the block, 2 up in its bottom-right cell and 0 down in the left cell of the orange sum 1 pair.
4
Step 4: The right edge
The orange sum 1 pair in the right-middle row already holds 0 on its left, so its right cell needs 1 — and the only 1 left in the tray rides on the 6/1 tile. It stands vertically: 1 up in the orange sum 1 pair, 6 down in the green sum 6 cell below. Above that, the green sum 8 pair takes the tray's double 4/4, 4 in the upper cell and 4 in the lower.
5
Step 5: The blue sum 9 column
The blue sum 9 region is a three-cell column running down the bottom-left edge, and its pips must add to 9. Two of them arrive together, because the 3/3 double stands over its middle and bottom cells. The top cell takes the 3 from the 6/3 tile standing above — 3 down into the column and 6 up in the pink sum 6 cell two rows higher.
6
Step 6: The bottom strip
Everything left lives in the bottom two rows. The 2/2 tile stands in the bottom-left: 2 up in the purple sum 2 cell, 2 down in the green sum 2 cell. The 1/3 tile stands to its right: 1 up in the pink sum 1 cell at the bottom, 3 down in the bottom-left cell of the teal sum 14 block. That block still needs 11 from two cells, and the remaining tiles supply exactly a 6 and a 5 — the 2/6 tile lies flat with 6 on the left in the block's top-right cell and 2 on the right in the orange sum 2 cell, while the 5/0 tile lies flat beneath it with 5 on the left in the block's bottom-right cell and 0 on the right in the blue equals block's bottom-left cell. The last tile, the 0/0 double, stands vertically at the far end, 0 up in the blue equals block's top-right cell and 0 down in its bottom-right cell.

💡 Pro Tips for Similar Puzzles

Start with Constraints
Always begin with the most constrained regions - sum regions with small numbers or tight spaces.
Use Equal Regions
Use "equal" regions as anchors - they eliminate many possibilities quickly.
Work Systematically
Let the rules guide your placement rather than guessing randomly.
Double-Check
Verify each region's rules are satisfied before moving to the next.

🎓 Keep Learning & Improve