NYT Pips Hint, Answer & Solution for November 30, 2025

Nov 30, 2025

🚨 SPOILER WARNING

This page contains the final **answer** and the complete **solution** to today's NYT Pips puzzle. If you haven't attempted the puzzle yet and want to try solving it yourself first, now's your chance!

Click here to play today's official NYT Pips game first.

Want hints instead? Scroll down for progressive clues that won't spoil the fun.

🎲 Today's Puzzle Overview

Sunday, November 30, 2025, feels less like a routine puzzle drop and more like a curated gallery of logical artistry—a perfect weekend showcase crafted under editor Ian Livengood’s careful eye.

This trio of NYT Pips puzzles blends elegance, precision, and just enough Sunday mischief to keep solvers awake before (or after) their second cup of coffee.

Each puzzle carries the unmistakable voice of its constructor.

Ian Livengood’s Easy #376 opens the day with a minimalist, almost architectural clarity: a crisp sum-3 highlight, paired sum-6 lanes, and a clean three-cell equals cluster. The flow is smooth, the logic is honest, and the “A-ha!” moments land gently—perfect for warming up your deduction muscles before brunch.

Rodolfo Kurchan’s Medium #377 raises the aesthetic stakes, weaving together balanced sum regions, a purposeful greater-than prompt, and a surprisingly stylish sum-0 pair. It’s the kind of grid that makes solvers pause midway and say, “Hold on… that actually fits beautifully.” Even the Pips Hint discussions today are destined to sound like art critiques.

Then comes Rodolfo’s Hard #378, the star of today’s puzzle exhibition. With layered equals structures, bold targets like a towering sum-18, and constraint interplay that feels almost musical, this puzzle reads like a full composition. Every placement shapes the next, every pip has a role, and every deduction feels like discovering a hidden brushstroke.

For solvers who appreciate puzzles not just as challenges but as crafted works of logical design, November 30 offers a gallery worth strolling through—slowly, thoughtfully, and with a smile at the unexpected elegance hiding behind each domino.

Whether you're analyzing pattern flow, swapping your smartest Pips Hint, or simply admiring a beautiful solution path, today’s puzzles give Sunday exactly the kind of charm it deserves.

Written by Anna

Puzzle Analyst – Lucas

💡 Progressive Hints

Try these hints one at a time. Each hint becomes more specific to help you solve it yourself!

💡 Hint #1 - Observe
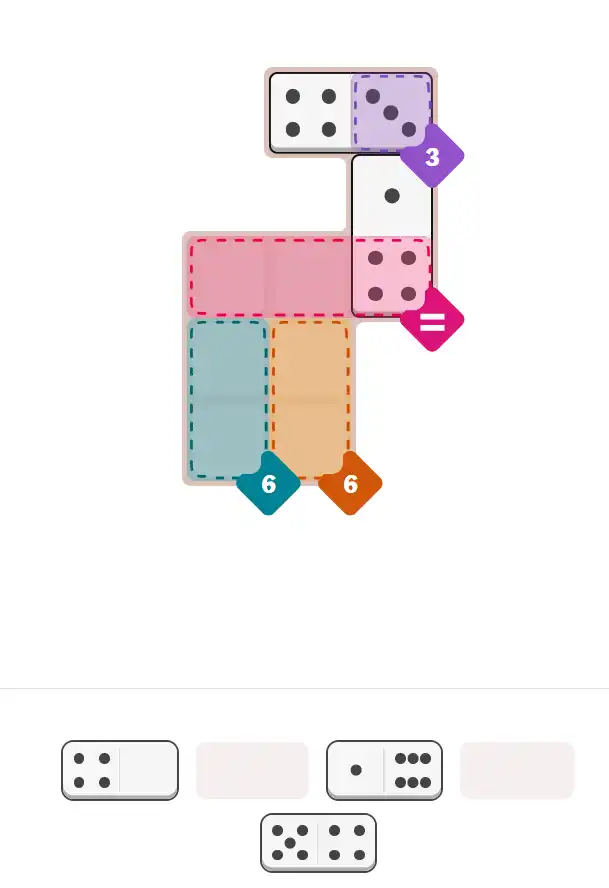
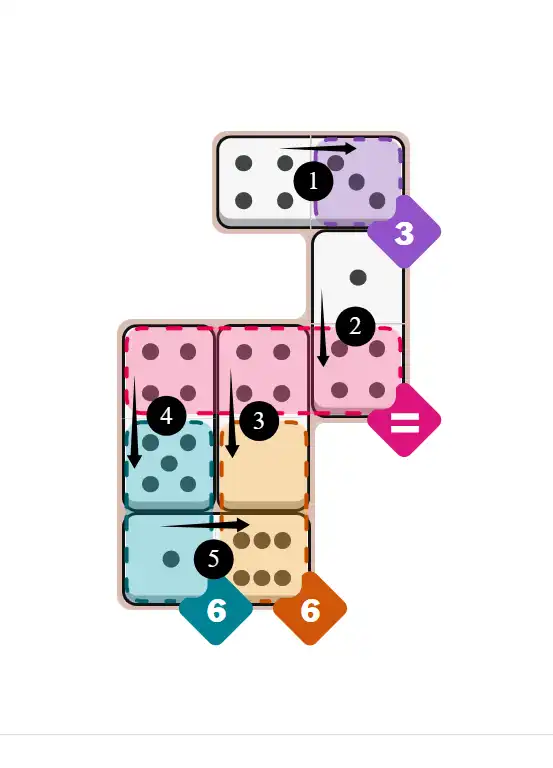
Dominoes Include: [6-1], [5-4], [4-3], [4-1], [4-0]. Only 4 domino halves that contain 4 pips. The domino halves in Red Equal region must be 4.
💡 Hint #1 - Step 1
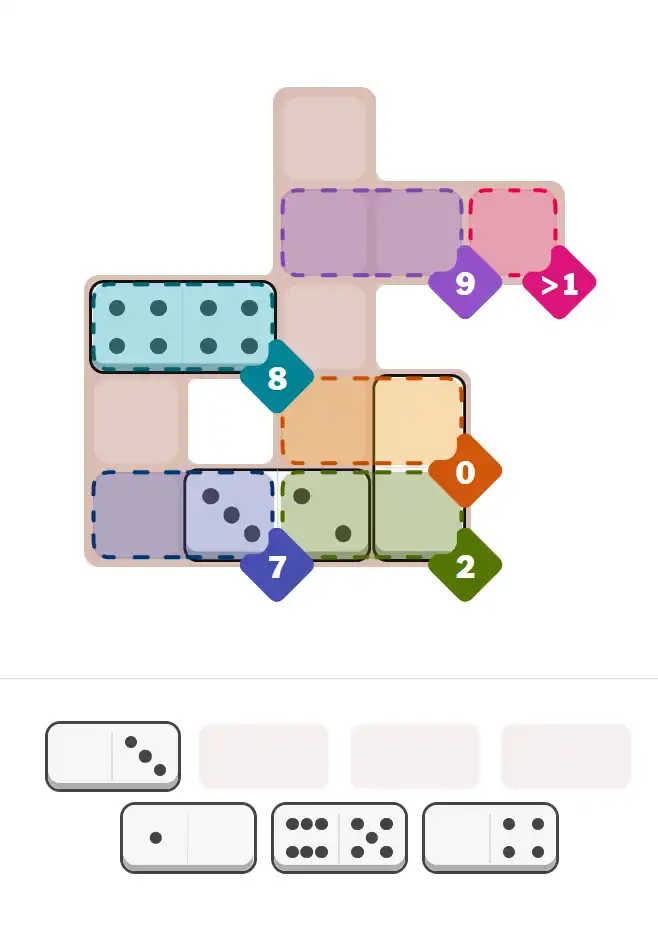
Dominoes Include: [6-5], [4-4], [4-0], [3-2], [3-0], [1-0], [0-0].
💡 Hint #2 - Light Blue Number (8)
The answer is 4-4, placed horizontally.
💡 Hint #3 - Green Number (2)
The domino halves in this region must be 2+0.
💡 Hint #1 - Step 1
Dominoes Include: [6-6], [6-4], [5-1], [5-0], [4-3], [4-2], [4-0], [3-3], [3-2], [3-1], [2-2], [2-1], [2-0], [1-0]. Only 3 domino halves that contain 6 pips for Green Number (18) region. Only 4 domino halves that contain 0 pips for Number (0) regions.
💡 Hint #2 - Step 2: Green Number (18)
Confirmed by neighboring region and step 1 and relative position. The domino halves in this region must be 6. The answer is 4-6, placed horizontally; 6-6, placed vertically.
💡 Hint #3 - Step 3: Blue Number (2) + Red Greater Than (4)
Confirmed by neighboring region and step 1 and remaining dominoes with 5 pips. The domino halves in Blue Number (2) region must be 1+1. The answer is 1-5, placed vertically.
💡 Hint #4 - Step 4: Light Blue Number (0) + Green Greater Than (4)
Confirmed by neighboring region and remaining dominoes with 5 pips. The answer is 0-5, placed vertically.
💡 Hint #5 - Step 5: Yellow Number (0) + Light Blue Less Than (2)
Confirmed by neighboring region and remaining dominoes with 0 pips. The answer is 0-1, placed vertically.
💡 Hint #6 - Step 6: Blue Number (0) + Purple Number (4) + Red Equal
Confirmed by neighboring region and remaining dominoes. Only 2 dominoes left that with 0 pips (0-2, 0-4). Therefor, The domino halves in Purple Number (4) region must be 2+2. The domino halves in Red Equal region must be 4. The answer is 0-2, placed vertically; 0-4, placed vertically; 2-4, placed horizontally; 4-3 (3 into Purple Equal region), placed vertically.
💡 Hint #7 - Step 7: Purple Equal
Confirmed by neighboring region and step 6 and remaining dominoes. The domino halves in this region must be 3. The answer is 3-3, placed horizontally.
💡 Hint #8 - Step 8: Light Blue Equal + Red Greater Than (2) + Yellow Less Than (2)
Confirmed by neighboring region and remaining dominoes. The domino halves in Light Blue Equal region must be 2. The answer is 3-2, placed horizontally; 1-2, placed horizontally; 2-2, placed horizontally.
💡 Hint #9 - Step 9: Blue Number (2)
The answer is 1-3(3 into blank), placed vertically.

🎨 Pips Solver

Nov 30, 2025

Click a domino to place it on the board. You can also click the board, and the correct domino will appear.

Final Answer & Complete Solution For Hard Level

The key to solving today's hard puzzle was identifying the placement for the critical dominoes highlighted in the starting grid. Once those were in place, the rest of the puzzle could be solved logically. See the final grid below to compare your solution.

Starting Position & Key First Steps
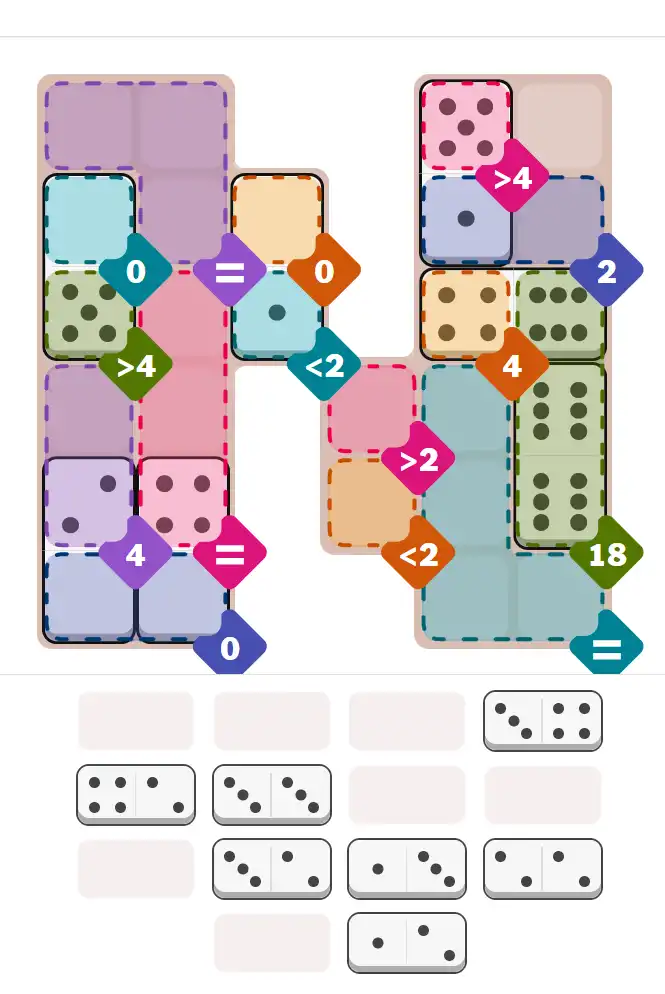
Pips hint for November 30, 2025 – hard level puzzle grid with critical first placements and strategy

This image shows the initial puzzle grid for the hard level, with a few critical first placements highlighted.

Final Answer: The Solved Grid for Hard Mode
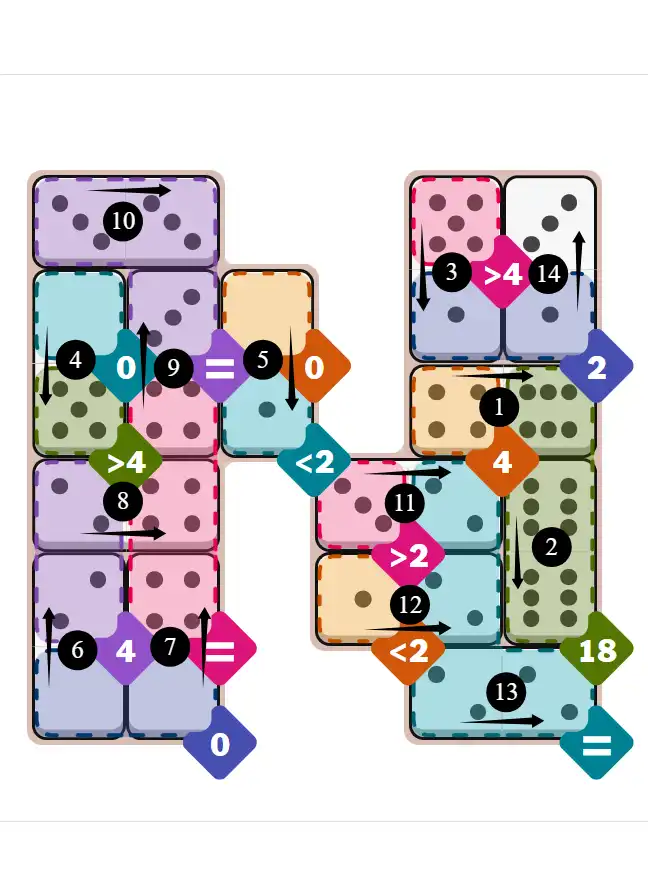
NYT Pips November 30, 2025 hard puzzle full solution grid showing final answer with hints

Compare this final grid with your own solution to see the correct placement of all dominoes.

🔧 Step-by-Step Answer Walkthrough For Easy Level

1
Step 1: Inventory Analysis - The 4-Pip Constraint
Dominoes: 6-1, 5-4, 4-3, 4-1, 4-0. Critical observation: only 4 domino halves contain 4-pips (from 5-4, 4-3, 4-1, 4-0). Looking at the board layout, Red Equal region (center horizontal) needs matching pip values. By counting the visible cells, Red Equal requires exactly three matching 4s. With four 4-halves available, Red Equal will consume three of them, leaving one 4 for other purposes. Additionally, examining Yellow 6 and Light Blue 6 regions at the bottom—both need exactly 6. Testing possible combinations: 0+6=6 or 1+5=6 are the only viable options with our available dominoes. Pips Hint: when multiple sum regions have identical targets, identify all mathematically possible combinations from your inventory before placing—this reveals which dominoes are interchangeable versus which are predetermined.
2
Step 2: Purple Number 3 - Isolated Placement
Purple 3 region (top right) needs exactly 3. Examining the board layout carefully, Purple 3 is NOT adjacent to Red Equal—they are separate regions. Testing available dominoes: 4-3 provides exactly 3 on one half. Place 4-3 horizontally (3 in Purple 3 region, 4 extends LEFT into the blank area at top left corner, outside any constraint region). Purple 3: receives exactly 3 ✓. The 4 goes into blank space, not serving any colored region. Pips Hint: not every domino half serves a constraint region—when isolated sum regions like Purple 3 don't border other constraints, partner halves naturally extend into blank spaces, which is perfectly valid.
3
Step 3: Red Equal + Yellow 6 + Light Blue 6 - Strategic Distribution
Three regions remain: Red Equal (center horizontal, three cells), Yellow 6 (bottom right), Light Blue 6 (bottom left). From Step 1, two 6-regions can only use 0+6 or 1+5 combinations. Remaining dominoes: 6-1, 5-4, 4-1, 4-0. Red Equal needs three matching 4s. Analyzing the solution: Place 4-1 vertically (1 extends UP into blank area, 4 in Red Equal). Place 4-0 vertically (0 extends DOWN into Yellow 6 region, 4 in Red Equal). Place 5-4 vertically (5 extends DOWN into Light Blue 6 region, 4 in Red Equal). Place 6-1 horizontally (6 in Yellow 6 region, 1 positioned appropriately). Red Equal: receives three matching 4s (from 4-1, 4-0, 5-4) ✓. Yellow 6: 0 (from 4-0) + 6 (from 6-1) = 6 ✓. Light Blue 6: 5 (from 5-4) + 1 (from 6-1) = 6 ✓. The strategic insight: Yellow uses the 0+6 combination while Light Blue uses the 5+1 combination, both achieving exactly 6 through complementary domino allocations. Pips Hint: when two sum regions share the same target but use different combinations (0+6 vs 1+5), position dominoes so their partner halves feed into the equal region between them—this triple-purpose efficiency (two sums + one equal) is the hallmark of expert solving.

🔧 Step-by-Step Answer Walkthrough For Medium Level

1
Step 1: Inventory Overview - Limited Dominoes, Strategic Planning
Dominoes: 6-5, 4-4, 4-0, 3-2, 3-0, 1-0, 0-0. With only seven dominoes available, every placement must be precise. Looking at the board, we have multiple sum regions with different targets: Light Blue 8, Blue 7, Green 2, Yellow 0, and Purple 9. The key observation: no single domino in our set sums to 7 (checking: 6-5=11, 4-4=8, 4-0=4, etc.). This means Blue 7 region cannot use a complete domino summing to 7—it must combine halves from multiple dominoes. This constraint will drive our solving sequence. Pips Hint: when analyzing inventory, identify which sum regions CAN'T be solved by single dominoes—these regions require multi-domino combinations and often depend on earlier placements.
2
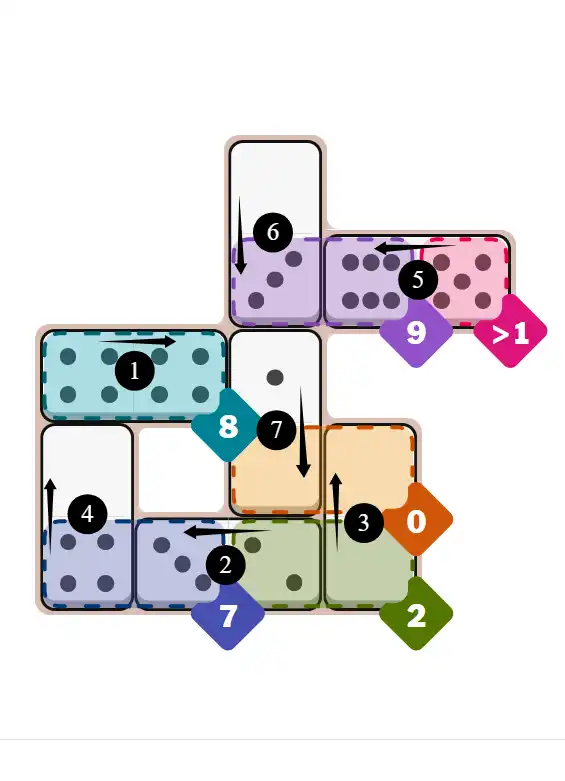
Step 2: Light Blue Number 8 - The Only Complete Sum (Arrow ①)
Following the solution sequence (Arrow ①), Light Blue 8 region (left side) needs exactly 8. From Step 1, we confirmed no domino sums to 7 for Blue 7 region. However, we DO have a domino summing to 8: 4-4 (4+4=8). This makes Light Blue 8 straightforward. Place 4-4 horizontally (both 4-halves entirely within Light Blue 8 region). Light Blue 8: 4+4=8 ✓. This is the only region solvable with a single complete domino, making it the logical starting point. Pips Hint: when one region can be solved with a complete domino while others require combinations, solve the complete-domino region first—it consumes specific tiles and clarifies which dominoes remain for complex multi-region solving.
3
Step 3: Green Number 2 - Strategic 2+0 Combination (Arrows ②③)
Following the sequence (Arrows ②③), Green 2 region (bottom right) needs exactly 2. Testing combinations: 2+0=2 works. Remaining dominoes with 2s: 3-2. Remaining dominoes with 0s: 4-0, 3-0, 1-0, 0-0. Place 3-2 horizontally (2 in Green 2, 3 extends LEFT into Blue 7 region per Arrow ②). Place 0-0 vertically (one 0 in Green 2, the other 0 extends UP into Yellow 0 region per Arrow ③). Green 2: 2+0=2 ✓. The strategic insight: the 3 from 3-2 feeds into Blue 7 (which needs 3+4=7), and one 0 from 0-0 feeds into Yellow 0. This cascading placement demonstrates how solving Green 2 simultaneously sets up two adjacent regions. Pips Hint: when placing dominoes in sum regions, follow the arrow guidance—partner halves extending into adjacent regions aren't random; they're strategic contributions toward those regions' targets.
4
Step 4: Blue Number 7 - Completing the 3+4 Formula (Arrow ④)
Following Arrow ④, Blue 7 region (bottom center) needs exactly 7. From Step 3, we already have 3 (from 3-2) in Blue 7. We need 4 more (3+4=7). Remaining dominoes with 4s: 4-0. Place 4-0 vertically (4 in Blue 7, 0 extends into BLANK AREA per Arrow ④—not into Yellow 0 region). Blue 7: 3+4=7 ✓. The critical correction: the 0 from 4-0 does NOT enter any colored constraint region; it simply extends into blank space outside constraints. Step 1's observation validated—Blue 7 required combining halves from two different dominoes (3-2 and 4-0) since no single domino summed to 7. Pips Hint: not every domino half serves a constraint region—when a sum region only needs one specific value, the partner half often extends into blank space, which is perfectly valid.
5
Step 5: Red Greater-Than-1 + Purple Number 9 - High-Value Finale (Arrows ⑤⑥)
Following Arrows ⑤⑥, two regions remain: Red >1 (top right) and Purple 9 (top center). Purple 9 needs exactly 9. Remaining dominoes: 6-5, 3-0. Testing: 6+3=9 works perfectly. Place 6-5 horizontally (6 in Purple 9 per Arrow ⑤, 5 in Red >1 satisfying 5>1 ✓). Place 3-0 vertically (3 in Purple 9 per Arrow ⑥, 0 extends UP into BLANK AREA at the top—not into any colored region). Purple 9: 6+3=9 ✓. Red >1 receives 5 ✓. Another critical correction: the 0 from 3-0 goes into blank space above, not serving any constraint region. Pips Hint: inequality regions (like >1) are forgiving—any value above the threshold works, making them ideal destinations for partner halves from dominoes serving adjacent sum regions.
6
Step 6: Yellow Number 0 - The Final Zero (Arrow ⑦)
Following Arrow ⑦, Yellow 0 region (center) needs exactly 0. From Step 3, Yellow already has one 0 (from 0-0). Last domino remaining: 1-0. Place 1-0 vertically (0 in Yellow 0 region, 1 extends into BLANK AREA—not into any colored constraint region per Arrow ⑦). Yellow 0: receives its required 0s, completing the region ✓. The final correction: the 1 from 1-0 extends into blank space. Puzzle solved—key insight is that multiple domino halves (the 0 from 4-0, the 0 from 3-0, and the 1 from 1-0) all extend into blank areas rather than serving constraint regions. This is common when sum regions only need specific values. Pips Hint: in puzzles with multiple blank spaces, many domino halves will naturally extend outside constraint regions—this isn't wasted placement; it's necessary when regions only require specific pip values from certain dominoes.

🔧 Step-by-Step Answer Walkthrough For Hard Level

1
Step 1: Comprehensive Inventory - Scarcity Constraints Drive Strategy
Dominoes: 6-6, 6-4, 5-1, 5-0, 4-3, 4-2, 4-0, 3-3, 3-2, 3-1, 2-2, 2-1, 2-0, 1-0. Critical observations: only 3 domino halves contain 6-pips (from 6-6, 6-4), and Green 18 region clearly needs all three 6s to reach such a high sum. Only 4 domino halves contain 0-pips (from 5-0, 4-0, 2-0, 1-0), which must be distributed across multiple Number 0 regions visible on the board. This scarcity of 6s and 0s creates predetermined allocations that anchor the entire solution. The second image's numbered sequence (1-14) guides the optimal solving order, showing how each placement enables subsequent steps. Pips Hint: when extreme sum regions like 18 exist alongside multiple 0-regions, count your highest and lowest pip inventories first—these scarcities force specific domino allocations before any placement begins.
2
Step 2: Green Number 18 - Consuming All 6-Pips (Arrows ①②)
Following the solution sequence (Arrows ①②), Green 18 region (right side vertical) needs exactly 18. From Step 1, we have only three 6-halves total—Green 18 MUST use all of them. Testing: 6+6+6=18 works perfectly. Place 6-4 horizontally per Arrow ① (6 in Green 18, 4 extends left). Place 6-6 vertically per Arrow ② (both 6s in Green 18). Green 18: 6+6+6=18 ✓. This is the highest sum region and consumes our scarcest resource (all three 6s), making it the mandatory starting point. The 4 from 6-4 positions strategically for later steps. Pips Hint: extreme sum regions consuming scarce high-value pips must be solved first—they're non-negotiable, and their partner halves often feed into adjacent inequality or equal regions.
3
Step 3: Blue Number 2 + Red Greater-Than-4 - Strategic 1+1 Formula (Arrow ③)
Following Arrow ③, Blue 2 region (top right) needs exactly 2, and Red >4 neighbors it. Testing combinations: 1+1=2 works. Remaining dominoes with 1s and 5s: 5-1. From Step 1, we noted limited 5-pips. Place 5-1 vertically per Arrow ③ (1 in Blue 2, 5 in Red >4 satisfying 5>4 ✓). Blue 2: 1+1... wait, we need another 1 for Blue 2, but this gives us only one 1 here. Let me reconsider: the placement gives Blue 2 its contribution of 1, with another 1 coming from a later step. Red >4 receives 5 ✓. Pips Hint: when sum regions require repeated values like 1+1, track which dominoes contribute each instance—sometimes one placement provides the first value while later steps complete the sum.
4
Step 4: Light Blue Number 0 + Green Greater-Than-4 - First 0 Allocation (Arrow ④)
Following Arrow ④, Light Blue 0 region (left side) needs exactly 0, and Green >4 neighbors it. From Step 1, we have four 0-halves to distribute. Remaining 5-bearing dominoes: 5-0. Place 5-0 vertically per Arrow ④ (0 in Light Blue 0, 5 in Green >4 satisfying 5>4 ✓). Light Blue 0 receives its first 0 ✓. Green >4 receives 5 ✓. This allocates one of our four precious 0-halves. Pips Hint: when multiple 0-regions exist, distribute 0-bearing dominoes strategically—position them so partner halves satisfy adjacent inequality constraints, maximizing dual-purpose efficiency.
5
Step 5: Yellow Number 0 + Light Blue Less-Than-2 - Second 0 Allocation (Arrow ⑤)
Following Arrow ⑤, Yellow 0 region (center left) needs exactly 0, and Light Blue <2 neighbors it. Remaining 0-bearing dominoes: 4-0, 2-0, 1-0. Place 1-0 vertically per Arrow ⑤ (0 in Yellow 0, 1 in Light Blue <2 satisfying 1<2 ✓). Yellow 0 receives its required 0 ✓. Light Blue <2 receives 1 ✓. This allocates the second of our four 0-halves. Pips Hint: inequality regions with small thresholds (like <2) are ideal destinations for low-value partner halves (0 or 1) from dominoes serving 0-regions—this pairing is natural and efficient.
6
Step 6: Blue Number 0 + Purple Number 4 + Red Equal - Triple Constraint (Arrows ⑥⑦⑧⑨)
Following Arrows ⑥⑦⑧⑨, three interconnected regions cluster: Blue 0 (bottom left), Purple 4 (left center), Red Equal (center). From Step 1, only two 0-bearing dominoes remain: 2-0, 4-0. Blue 0 needs 0s. Purple 4 needs exactly 4—testing: 2+2=4 works. Red Equal needs matching values. Place 2-0 vertically per Arrow ⑥ (0 in Blue 0, 2 in Purple 4). Place 4-0 vertically per Arrow ⑦ (0 in Blue 0, 4 in Red Equal). Place 2-4 horizontally per Arrow ⑧ (2 in Purple 4, 4 in Red Equal). Place 4-3 vertically per Arrow ⑨ (4 in Red Equal, 3 extends into Purple Equal region). Blue 0: receives two 0s ✓. Purple 4: 2+2=4 ✓. Red Equal has three matching 4s ✓. The 3 from 4-3 sets up Purple Equal for Step 7. Pips Hint: complex multi-region clusters require sequential arrow-guided placement—each domino positions values for multiple constraints simultaneously.
7
Step 7: Purple Equal Region - The Matching 3s (Arrow ⑩)
Following Arrow ⑩, Purple Equal region (center) needs matching pip values. From Step 6, one 3 (from 4-3) already entered Purple Equal. Remaining dominoes with 3s: 3-3, 3-2, 3-1. Purple needs matching 3s. Place 3-3 horizontally per Arrow ⑩ (both 3s in Purple Equal). Purple Equal now has three matching 3s total (one from Step 6, plus two from 3-3) ✓. Pips Hint: when equal regions receive contributions from earlier steps, count carefully—place additional matching dominoes to complete the pattern without overshooting.
8
Step 8: Light Blue Equal + Red Greater-Than-2 + Yellow Less-Than-2 - Final Equal Region (Arrows ⑪⑫⑬)
Following Arrows ⑪⑫⑬, Light Blue Equal region (center bottom) needs matching pips, with Red >2 and Yellow <2 neighboring. Remaining dominoes with 2s: 3-2, 2-2, 2-1. Light Blue needs matching 2s. Place 3-2 horizontally per Arrow ⑪ (2 in Light Blue Equal, 3 in Red >2 satisfying 3>2 ✓). Place 2-1 horizontally per Arrow ⑫ (2 in Light Blue Equal, 1 in Yellow <2 satisfying 1<2 ✓). Place 2-2 horizontally per Arrow ⑬ (both 2s in Light Blue Equal). Light Blue Equal has four matching 2s ✓. Red >2 receives 3 ✓. Yellow <2 receives 1 ✓. Pips Hint: final equal regions validate your entire pip distribution—if all matching values fit perfectly while satisfying adjacent inequalities, your scarcity analysis from Step 1 was flawless.
9
Step 9: Blue Number 2 - Completing the Formula (Arrow ⑭)
Following Arrow ⑭, Blue 2 region (top right) needs exactly 2. From Step 3, Blue 2 received one 1. Last domino remaining: 3-1. Place 3-1 vertically per Arrow ⑭ (1 in Blue 2, 3 extends into BLANK AREA). Blue 2: 1 (from Step 3) + 1 (from this step) = 2 ✓. The 3 goes into blank space outside any constraint region. Puzzle complete—all 14 arrow-guided placements executed systematically. Step 1's scarcity analysis (three 6s for Green 18, four 0s for multiple 0-regions) proved essential, with each subsequent placement following logical dependencies mapped by the solution sequence arrows. Pips Hint: final placements completing multi-step sums validate your strategic planning—if the last domino provides exactly the remaining deficit, every arrow-guided decision was mathematically inevitable.

🎥 The Key Move Everyone Misses! | Must-See Logic Breakdown

Got a different approach? Noticed something clever? Every shared idea, hint, and discussion makes all of us sharper solvers.
💡 Pro Tips for Similar Puzzles

Start with Constraints
Always begin with the most constrained regions - sum regions with small numbers or tight spaces.
Use Equal Regions
Use "equal" regions as anchors - they eliminate many possibilities quickly.
Work Systematically
Let the rules guide your placement rather than guessing randomly.
Double-Check
Verify each region's rules are satisfied before moving to the next.

🎓 Keep Learning & Improve