NYT Pips Hint, Answer & Solution for December 1, 2025

Dec 1, 2025

🚨 SPOILER WARNING

This page contains the final **answer** and the complete **solution** to today's NYT Pips puzzle. If you haven't attempted the puzzle yet and want to try solving it yourself first, now's your chance!

Click here to play today's official NYT Pips game first.

Want hints instead? Scroll down for progressive clues that won't spoil the fun.

🎲 Today's Puzzle Overview

Monday, December 1, 2025, arrives with the mathematical crispness of a freshly sharpened pencil, offering a three-tier suite of Pips NYT puzzles perfectly engineered for solvers who adore efficiency charts, constraint mapping, and the occasional self-congratulatory victory lap.

All three challenges come curated under the meticulous editorial hand of Ian Livengood, who seems determined to make your Monday brain work just hard enough to feel clever.

Today’s lineup presents:

• Easy #379 – 5 dominoes

• Medium #380 – 8 dominoes

• Hard #381 – 14 dominoes

Each grid is built with clean, measurable logic architecture—an absolute treat for anyone who enjoys dissecting patterns rather than merely stumbling through them.

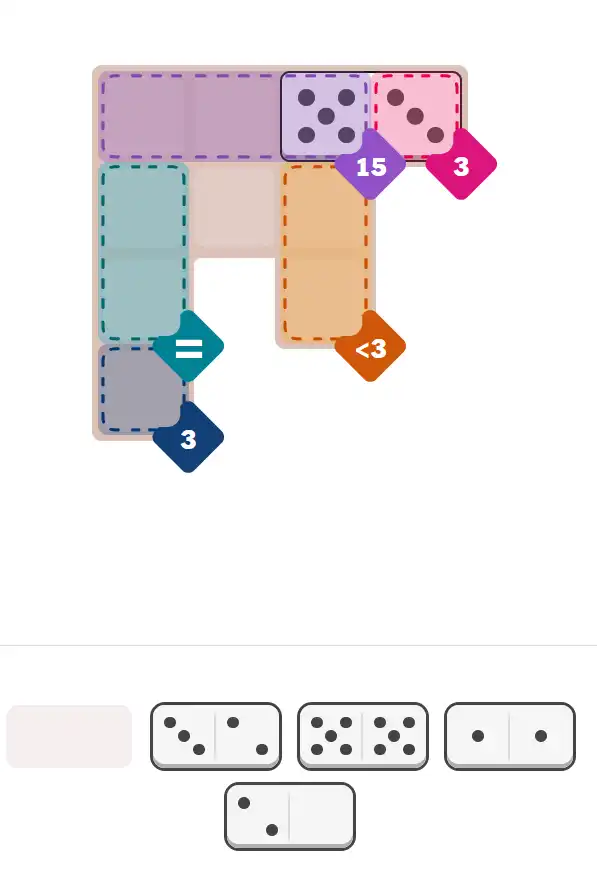
The Easy puzzle opens with a confident 15-sum triple, a compact sum-3 region, and a neatly positioned less-than-3 clue that steers your earliest deductions. It’s the sort of grid that practically begs you to say, “Ah yes, classic Monday warm-up,” while giving your inner analyst something meaningful to chew on.

The Medium puzzle widens the scope: multiple equals clusters, a lone 0-sum cell that creates delightful tension, and two empty tiles that shift the entire grid’s geometry. Add a greater-than-4 constraint into the mix and you’ll find yourself tapping through possibilities while muttering the occasional “This better be the right Pips Hint.”

Then comes the Hard puzzle, which is where the real fun begins. With several 12-sum networks, a 10-sum trail, zero-value chains, and layered inequalities stacked like a logic parfait, this grid feels purpose-built for deep-thinking solvers who track progress the way others track their step count. Perfect for benchmarking, speed-testing, or simply marvelling at how quickly a single domino can ruin your entire hypothesis.

If you enjoy analysing your solving curve, comparing efficiency per puzzle ID, or watching how each domino pair subtly reshapes the structural flow of the grid, December 1 is nothing short of a full-scale logic laboratory.

Bring your notes. Bring your diagrams. And yes—bring your best Pips Hint.

Written by Ander

Puzzle Analyst – Mark

💡 Progressive Hints

Try these hints one at a time. Each hint becomes more specific to help you solve it yourself!

💡 Hint #1 - Observe
Dominoes Include: [5-5], [5-3], [3-2], [2-0], [1-1]. 3 pips is a key factor.
💡 Hint #1 - Observe
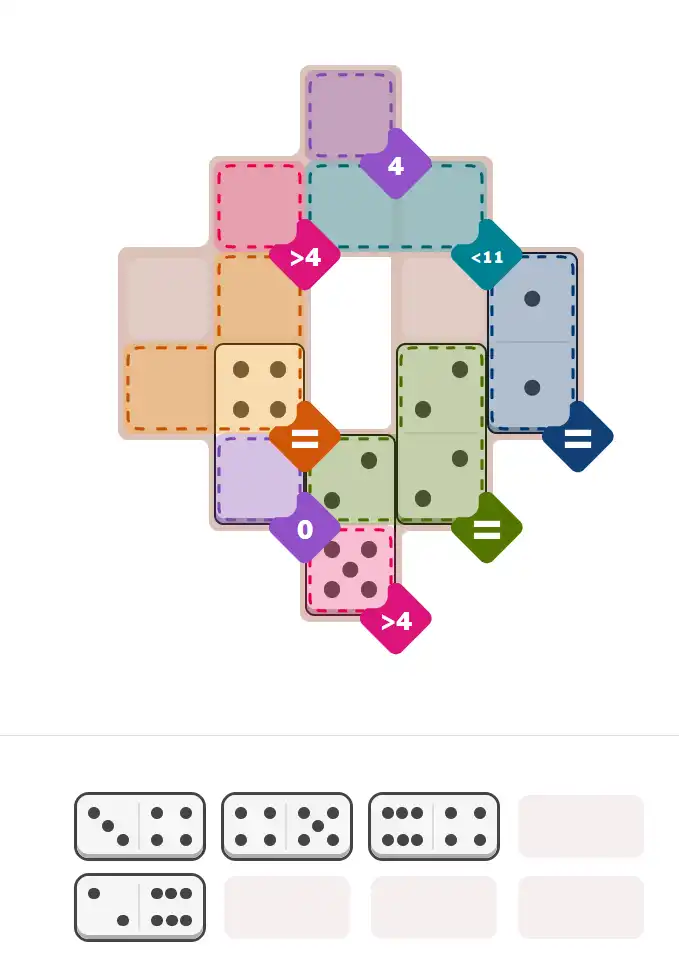
Dominoes Include: [6-4], [6-2], [5-4], [5-2], [4-3], [4-0], [2-2], [1-1]. Need 2 dominoes with the same number placed in Green Equal region and Blue Equal region.
💡 Hint #2 - Green Equal
The domino halves in this region must be 2.
💡 Hint #3 - Yellow Equal
The domino halves in this region must be 4. No single placement to this step.
💡 Hint #1 - Observe
Dominoes Include: [6-6], [6-5], [6-3], [6-2], [6-0], [5-4], [5-1], [4-2], [4-1], [3-2], [3-1], [3-0], [2-2], [2-0]. Only 3 domino halves that contain 0 pips for Red Number (0) region. Only 6 domino halves that contain 6 pips for Purple Number (12) region + Blue Number (12) regions.
💡 Hint #2 - Purple Number (3)
he domino halves in this region must be 1.
💡 Hint #3 - Light Blue Number (12)
he domino halves in this region must be 2.

🎨 Pips Solver

Dec 1, 2025

Click a domino to place it on the board. You can also click the board, and the correct domino will appear.

Final Answer & Complete Solution For Hard Level

The key to solving today's hard puzzle was identifying the placement for the critical dominoes highlighted in the starting grid. Once those were in place, the rest of the puzzle could be solved logically. See the final grid below to compare your solution.

Starting Position & Key First Steps
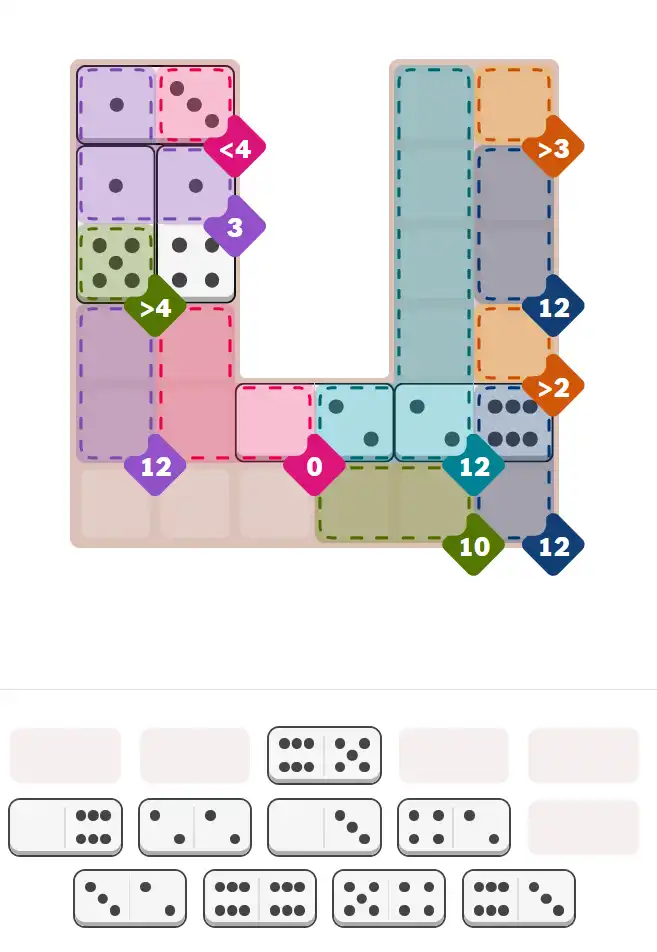
Pips hint for December 1, 2025 – hard level puzzle grid with critical first placements and strategy

This image shows the initial puzzle grid for the hard level, with a few critical first placements highlighted.

Final Answer: The Solved Grid for Hard Mode
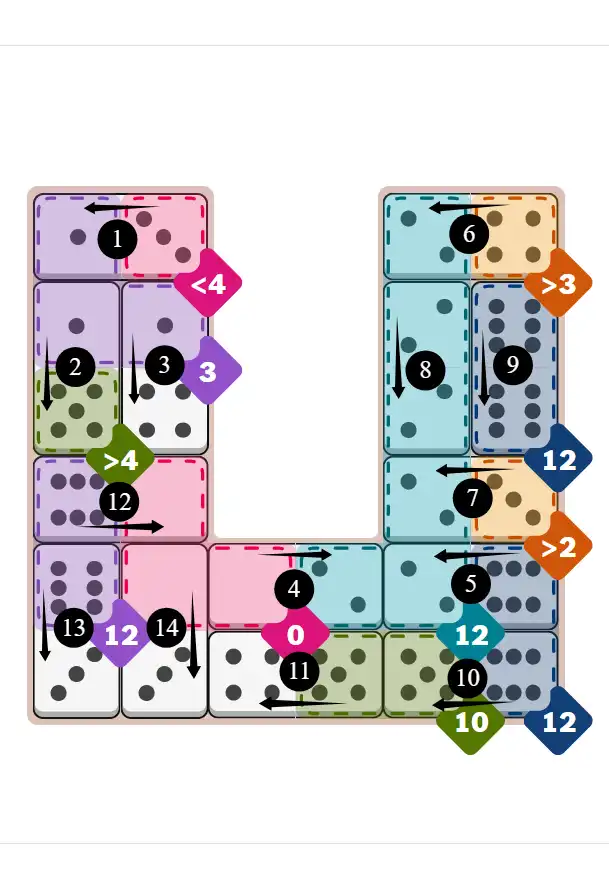
NYT Pips December 1, 2025 hard puzzle full solution grid showing final answer with hints

Compare this final grid with your own solution to see the correct placement of all dominoes.

🔧 Step-by-Step Answer Walkthrough For Easy Level

1
Step 1: Compact Inventory - Five Dominoes, Strategic Precision
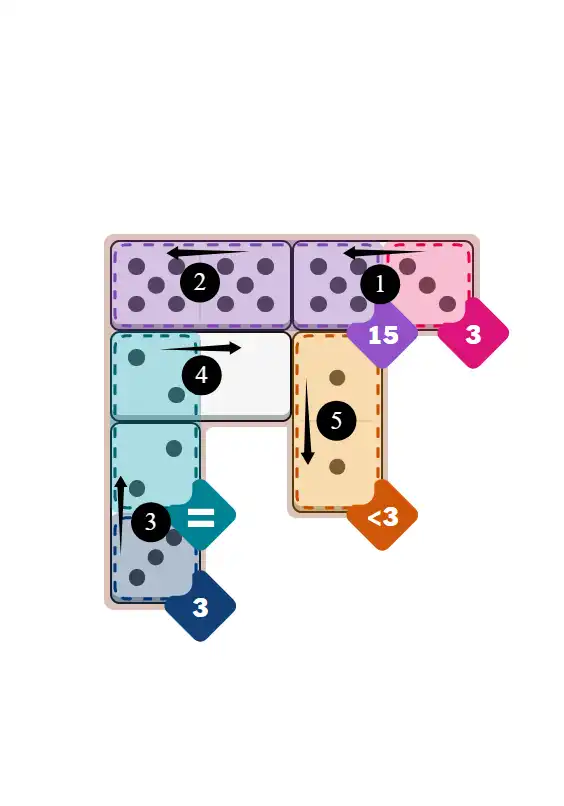
Dominoes: 5-5, 5-3, 3-2, 2-0, 1-1. With only five dominoes available, this puzzle requires maximum efficiency—every placement must be precisely calculated. Looking at the board, Purple 15 region (top horizontal) demands a high sum, while Red 3 and Blue 3 regions need identical lower values. The key observation: we have three 5-halves (from 5-5 and 5-3), perfect for Purple 15's extreme requirement. Light Blue Equal region will need matching pips, and Yellow <3 needs values less than 3. The second image's numbered sequence (①-⑤) maps the optimal solving order. Pips Hint: in minimal-domino puzzles, identify extreme sum regions first—they consume specific high-value tiles, leaving predictable remainders for other constraints.
2
Step 2: Red Number 3 + Purple Number 15 - High-Value Allocation (Arrows ①②)
Following the solution sequence (Arrows ①②), we solve Red 3 (top right) and Purple 15 (top horizontal) simultaneously. Purple 15 needs exactly 15—a very high sum requiring our maximum values. Testing: 5+5+5=15 would be perfect, but we only have three 5-halves total. Using all three: place 5-3 horizontally per Arrow ① (5 in Purple 15, 3 in Red 3). Place 5-5 horizontally per Arrow ② (both 5s in Purple 15). Purple 15: 5+5+5=15 ✓. Red 3: receives exactly 3 ✓. This strategic placement consumes ALL our 5-pips in one decisive move, solving both regions completely while clarifying which dominoes remain for subsequent constraints. Pips Hint: when extreme sum regions like 15 exist with limited high-value inventory, allocate all matching pips immediately—this predetermined move eliminates ambiguity and anchors the entire solution.
3
Step 3: Blue Number 3 + Light Blue Equal - The 3+2 Strategy (Arrows ③④)
Following Arrows ③④, Blue 3 region (bottom left) needs exactly 3, and Light Blue Equal (left vertical) needs matching pip values. Remaining dominoes: 3-2, 2-0, 1-1. Blue 3 requires exactly 3. Light Blue Equal must use matching pips—checking available values, we have two 2-halves (from 3-2 and 2-0), making 2s the perfect match. Place 3-2 vertically per Arrow ③ (3 in Blue 3, 2 in Light Blue Equal). Place 2-0 horizontally per Arrow ④ (2 in Light Blue Equal, 0 extends RIGHT into BLANK AREA outside any constraint region). Blue 3: receives exactly 3 ✓. Light Blue Equal has two matching 2s ✓. The critical detail: the 0 from 2-0 does NOT serve any colored region—it extends into blank space, which is valid when regions only need specific values. Pips Hint: when equal regions consume specific matching values, position dominoes so the matching halves fill the equal constraint while partner halves extend wherever necessary—sometimes that's adjacent constraints, sometimes blank space.
4
Step 4: Yellow Less-Than-3 - The Final Inequality (Arrow ⑤)
Following Arrow ⑤, Yellow <3 region (bottom right) needs any value less than 3 (meaning 0, 1, or 2). Last domino remaining: 1-1. Place 1-1 vertically per Arrow ⑤ (1+1<3 ✓). Yellow <3 receives 2 ✓. Puzzle complete with all five dominoes placed through systematic arrow-guided sequence. Step 2's decisive allocation of all three 5-pips to Purple 15 proved essential—it was the only mathematically viable solution, and every subsequent placement followed inevitably from that foundation. Pips Hint: inequality regions are the most forgiving constraints—they accept ranges of values, making them ideal for final placements where you simply use whatever domino remains, as long as one value falls within the acceptable range.

🔧 Step-by-Step Answer Walkthrough For Medium Level

1
Step 1: Inventory Analysis - Double Dominoes and Equal Regions
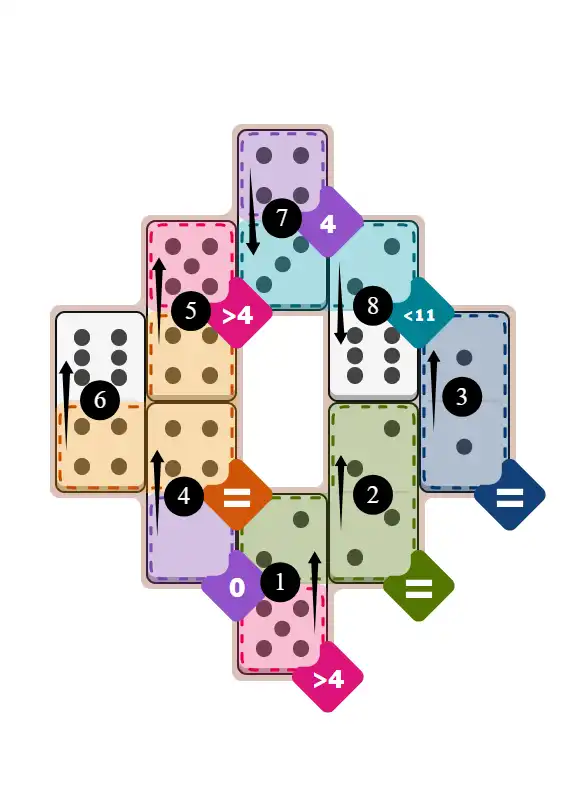
Dominoes: 6-4, 6-2, 5-4, 5-2, 4-3, 4-0, 2-2, 1-1. Critical observation: we have exactly TWO dominoes with matching halves (2-2 and 1-1). Looking at the board, Green Equal region and Blue Equal region both need matching pip values throughout. With only two double dominoes available and two equal regions visible, this creates a perfect allocation—Green Equal and Blue Equal MUST use these two doubles. The question is: which double goes to which equal region? Examining relative positions and neighboring constraints will reveal the inevitable allocation. Pips Hint: when you have exactly as many double dominoes as equal regions, the allocation is predetermined—identify which double serves which equal region based on geometric positioning and adjacent constraint compatibility.
2
Step 2: Down Red >4 + Green Equal + Blue Equal - Strategic Double Allocation (Arrows ①②③)
Following the solution sequence (Arrows ①②③), three regions cluster together: Down Red >4 (bottom center), Green Equal (center-right vertical), Blue Equal (right side vertical). From Step 1, Green and Blue must use our two doubles. Testing allocation: Green Equal uses matching 2s, Blue Equal uses matching 1s. Place 5-2 (or 6-2) vertically per Arrow ① (2 in Green Equal, 5 or 6 in Down Red >4 satisfying value>4 ✓). Place 2-2 vertically per Arrow ② (both 2s in Green Equal). Place 1-1 vertically per Arrow ③ (both 1s in Blue Equal). Green Equal: has two matching 2s ✓. Blue Equal: has two matching 1s ✓. Down Red >4: receives 5 or 6 ✓. This strategic placement locks in both equal regions while satisfying the adjacent inequality. Pips Hint: when placing double dominoes in equal regions, position them so partner halves from mixed dominoes satisfy adjacent inequalities—the doubles instantly provide matching pairs while mixed dominoes bridge into neighboring constraints.
3
Step 3: Purple Number 0 + Yellow Equal + Up Red >4 - The 4-Pip Scarcity (Arrows ④⑤⑥)
Following Arrows ④⑤⑥, three regions require attention: Purple 0 (bottom center), Yellow Equal (center horizontal), Up Red >4 (left side). From the answer, Yellow Equal needs matching 4s. Critical observation: only 4 domino halves contain 4-pips (from 6-4, 5-4, 4-3, 4-0)—NO SINGLE PLACEMENT can complete this step alone because we need to use multiple 4-bearing dominoes strategically. Place 4-0 vertically per Arrow ④ (0 in Purple 0, 4 in Yellow Equal). Place 5-4 vertically per Arrow ⑤ (4 in Yellow Equal, 5 in Up Red >4 satisfying 5>4 ✓). Place 6-4 vertically per Arrow ⑥ (4 in Yellow Equal, 6 extends into BLANK AREA). Purple 0: receives exactly 0 ✓. Yellow Equal: has three matching 4s ✓. Up Red >4: receives 5 ✓. The key insight: with only four 4-halves total and Yellow Equal consuming three of them, this step requires coordinated placement of three separate dominoes—hence 'no single placement' completes this step. Pips Hint: when equal regions need scarce pip values, count your inventory carefully—if an equal region consumes most of a specific value's supply, multiple dominoes must be placed in coordinated sequence to complete the matching pattern.
4
Step 4: Purple Number 4 + Light Blue Less-Than-11 - Final Constraint (Arrows ⑦⑧)
Following Arrows ⑦⑧, two regions remain: Purple 4 (top center) and Light Blue <11 (right side). From Step 3, we used three of our four 4-halves. One 4 remains (from 4-3). Purple 4 needs exactly 4. Light Blue <11 needs values summing to less than 11. Place 4-3 vertically per Arrow ⑦ (4 in Purple 4, 3 in Light Blue <11). Place 6-2 (or 5-2) vertically per Arrow ⑧ (2 in Light Blue <11, 6 or 5 extends into BLANK AREA). Purple 4: receives exactly 4 ✓. Light Blue <11: receives 3+2=5 (which is <11 ✓). The answer notes 'no single placement' again because Light Blue <11's constraint depends on receiving contributions from multiple dominoes across this step. Puzzle complete—Step 3's coordinated use of three 4-bearing dominoes proved essential, demonstrating how scarcity of matching values requires multi-domino sequential placement rather than single decisive moves. There is no single placement to this Puzzle. Pips Hint: inequality regions with high thresholds (like <11) are forgiving—they accept wide ranges of combinations, making them ideal destinations for leftover values once equal and sum regions have consumed specific pip requirements.

🔧 Step-by-Step Answer Walkthrough For Hard Level

1
Step 1: Comprehensive Inventory - Scarcity of 0s and 6s Drives Strategy
Dominoes: 6-6, 6-5, 6-3, 6-2, 6-0, 5-4, 5-1, 4-2, 4-1, 3-2, 3-1, 3-0, 2-2, 2-0. Critical observations: only 3 domino halves contain 0-pips (from 6-0, 3-0, 2-0), which must serve Red 0 region. Only 6 domino halves contain 6-pips (from 6-6, 6-5, 6-3, 6-2, 6-0), and examining the board reveals Purple 12 region plus two Blue 12 regions—these high-sum regions will consume ALL six 6-halves. This extreme scarcity of 0s and concentration of 6s creates predetermined allocations that anchor the entire solution. Pips Hint: in large puzzles with multiple 12-regions and scarce 0s, count your extreme pip values first—the 6s must be strategically distributed across all high-sum regions, while the 0s have zero flexibility in allocation.
2
Step 2: Red <4 + Purple 3 + Green >4 - The Triple 1s Strategy (Arrows ①②③)
Following the solution sequence (Arrows ①②③), three regions cluster: Red <4 (top left), Purple 3 (left center), Green >4 (bottom left). Purple 3 needs exactly 3—testing: 1+1+1=3 works, requiring three 1-halves. We have 5-1, 4-1, 3-1 providing exactly three 1s. Place 1-3 horizontally per Arrow ① (1 in Purple 3, 3 in Red <4 satisfying 3<4 ✓). Place 1-5 vertically per Arrow ② (1 in Purple 3, 5 in Green >4 satisfying 5>4 ✓). Place 1-4 vertically per Arrow ③ (1 in Purple 3, 4 extends into BLANK AREA). Purple 3: 1+1+1=3 ✓. Red <4 receives 3 ✓. Green >4 receives 5 ✓. This strategic opening uses all three 1-halves to solve Purple 3 while simultaneously satisfying two adjacent inequalities. Pips Hint: when sum regions require repeated small values like 1+1+1=3, identify ALL sources of that value and position them so partner halves satisfy adjacent inequality constraints—triple-purpose efficiency from the start.
3
Step 3: Light Blue 12 + Yellow >3 + Yellow >2 - The 2-Pip Dominance (Arrows ④⑤⑥⑦⑧)
Following Arrows ④⑤⑥⑦⑧, Light Blue 12 region (center horizontal) needs exactly 12. From Step 1, we noted only 6 domino halves contain 2-pips remaining. The answer reveals: Light Blue 12 uses ALL remaining 2s. This is extraordinary—an entire region built from one repeated value. Place 2-0 horizontally per Arrow ④ (2 in Light Blue 12, 0 in Red 0 region). Place 6-2 horizontally per Arrow ⑤ (2 in Light Blue 12, 6 in Down Blue 12 region). Place 4-2 horizontally per Arrow ⑥ (2 in Light Blue 12, 4 in Yellow >3 satisfying 4>3 ✓). Place 3-2 horizontally per Arrow ⑦ (2 in Light Blue 12, 3 in Yellow >2 satisfying 3>2 ✓). Place 2-2 vertically per Arrow ⑧ (both 2s in Light Blue 12). Light Blue 12: 2+2+2+2+2+2=12 ✓. Red 0 receives first 0 ✓. Down Blue 12 receives first 6 ✓. Yellow inequalities satisfied ✓. This five-domino cascade demonstrates extreme pip concentration—using every available 2 for one region. Pips Hint: when a sum region can be built entirely from repeated values (like six 2s=12), and you have exactly that many halves available, commit ALL matching dominoes in coordinated sequence—this predetermined solution eliminates alternative paths.
4
Step 4: Up Blue Number 12 - The Double 6s (Arrow ⑨)
Following Arrow ⑨, Up Blue 12 region (top right) needs exactly 12. From Step 1, we're tracking six 6-halves across multiple 12-regions. Remaining high-value dominoes: 6-6, 6-5, 6-3, 6-0. The simplest solution: place 6-6 vertically per Arrow ⑨ (both 6s in Up Blue 12). Up Blue 12: 6+6=12 ✓. This double-six placement is clean and efficient, consuming two of our six 6-halves instantly. Three 6-halves remain for other regions. Pips Hint: when multiple 12-regions compete for limited 6-pips, prioritize placing double-sixes (6-6) in isolated regions first—they provide exact sums without requiring strategic partner-half positioning, simplifying subsequent placements.
5
Step 5: Down Blue 12 + Green 10 - The 5+5 Formula (Arrows ⑩⑪)
Following Arrows ⑩⑪, Down Blue 12 region (right side) already has one 6 (from Step 3's 6-2). Green 10 region (bottom center) needs exactly 10. Testing: 5+5=10 works. Place 6-5 horizontally per Arrow ⑩ (6 in Down Blue 12, 5 in Green 10). Place 5-4 horizontally per Arrow ⑪ (5 in Green 10, 4 extends into BLANK AREA). Down Blue 12: 6 (from Step 3) + 6 (from this step) = 12 ✓. Green 10: 5+5=10 ✓. This completes both regions through strategic 5-pip allocation while consuming another 6 for Down Blue 12. Two 6-halves remain for final regions. Pips Hint: when sum regions share borders and have complementary needs (one needs 6s, one needs 5s), use mixed dominoes like 6-5 to serve both—one placement satisfies two constraints efficiently.
6
Step 6: Purple 12 + Red 0 - Final 6s and 0s Allocation (Arrows ⑫⑬⑭)
Following Arrows ⑫⑬⑭, two final regions: Purple 12 (left vertical) and Red 0 (center bottom). From Step 1, we have two 6-halves left and two 0-halves left (from 6-0 and 3-0). Purple 12 needs 6s. Red 0 needs 0s. Place 6-0 horizontally per Arrow ⑫ (6 in Purple 12, 0 in Red 0). Place 6-3 vertically per Arrow ⑬ (6 in Purple 12, 3 extends into BLANK AREA). Place 3-0 vertically per Arrow ⑭ (0 in Red 0, 3 extends into BLANK AREA). Purple 12: 6+6=12 ✓. Red 0: 0+0+0=3 total 0s ✓. Puzzle complete—Step 1's scarcity analysis (three 0-halves, six 6-halves) proved perfectly accurate, with Red 0 consuming all three 0s and the four 12-regions consuming all six 6s through systematic arrow-guided placement. Pips Hint: final placements validate your entire scarcity strategy—if extreme pip values (0s and 6s) fit perfectly into their predetermined regions, every allocation decision from Step 1 forward was mathematically inevitable and necessary.

🎥 Catch the clever move that unlocks today’s Pips NYT puzzle (December 1, 2025) in this quick clip!

If this helped, drop a comment or share with a fellow puzzler — every shared insight makes our community sharper.
💡 Pro Tips for Similar Puzzles

Start with Constraints
Always begin with the most constrained regions - sum regions with small numbers or tight spaces.
Use Equal Regions
Use "equal" regions as anchors - they eliminate many possibilities quickly.
Work Systematically
Let the rules guide your placement rather than guessing randomly.
Double-Check
Verify each region's rules are satisfied before moving to the next.

🎓 Keep Learning & Improve