🚨 SPOILER WARNING
This page contains the final **answer** and the complete **solution** to today's NYT Pips puzzle. If you haven't attempted the puzzle yet and want to try solving it yourself first, now's your chance!
Click here to play today's official NYT Pips game first.
Want hints instead? Scroll down for progressive clues that won't spoil the fun.
🎲 Today's Puzzle Overview
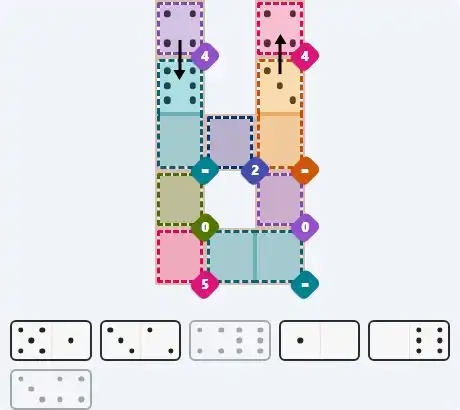
Ian Livengood's easy grid for April 5 looks almost like two narrow columns stitched together by a single cell in the middle. The puzzle opens with two single-cell sum clues across the top, both naming the same pip value. That immediately points to one shared high-value domino face, and from there the two vertical equals regions settle into matching stacks: sixes on the left, threes on the right, and finally ones across the bottom.
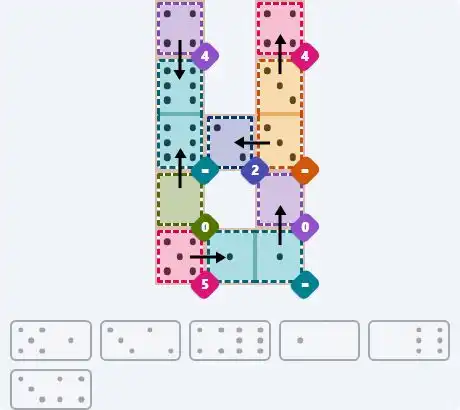
Livengood's medium puzzle has a different rhythm. Three separate clues each fix a single cell exactly: one 4, one 3, and another 3. Those anchors are spread across the board, but together they determine the two top-row sum regions and force a zero into the center column. Once that zero lands, the lower equals region turns into a 6-pair, and the last horizontal domino drops into place almost by itself.
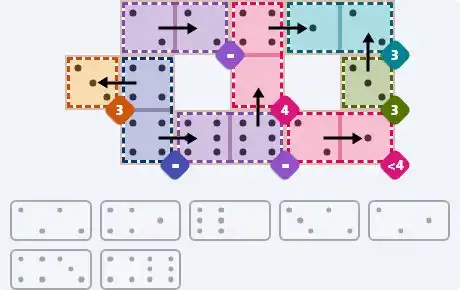
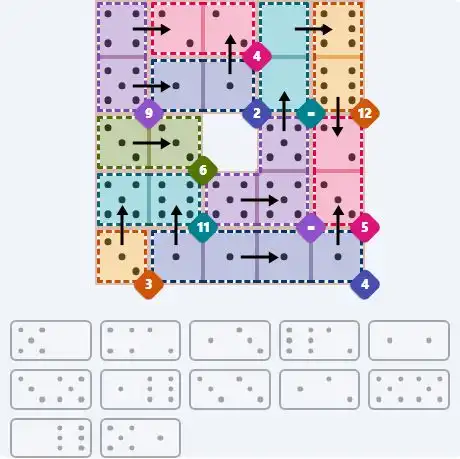
Rodolfo Kurchan's hard puzzle for today is compact but tightly chained. Nearly every region is either a two-cell sum or a small equals group, so one placement tends to feed the next immediately. The top row already tells a strong story: a sum of 4, an equals pair, and a sum of 12 sit side by side, and the domino set only supports one clean arrangement. By the time the middle row locks a three-cell equals region at value 5, the entire bottom row is reduced to a neat 3-1-1-1 pattern.
💡 Progressive Hints
Try these hints one at a time. Each hint becomes more specific to help you solve it yourself!
🎨 Pips Solver
Click a domino to place it on the board. You can also click the board, and the correct domino will appear.

✅ Final Answer & Complete Solution For Hard Level
The key to solving today's hard puzzle was identifying the placement for the critical dominoes highlighted in the starting grid. Once those were in place, the rest of the puzzle could be solved logically. See the final grid below to compare your solution.
Starting Position & Key First Steps
This image shows the initial puzzle grid for the hard level, with a few critical first placements highlighted.
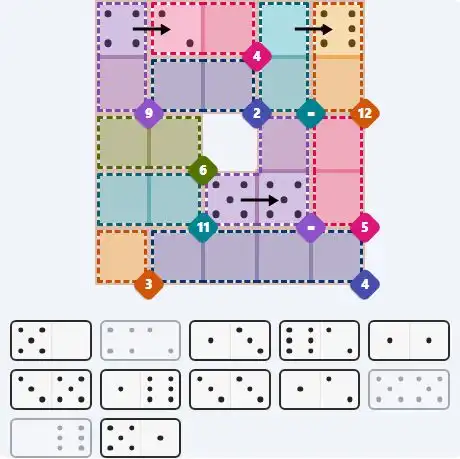
Final Answer: The Solved Grid for Hard Mode
Compare this final grid with your own solution to see the correct placement of all dominoes.
💬 Community Discussion
Leave your comment