NYT Pips Hints & Answers for April 7, 2026

Apr 7, 2026

🚨 SPOILER WARNING

This page contains the final **answer** and the complete **solution** to today's NYT Pips puzzle. If you haven't attempted the puzzle yet and want to try solving it yourself first, now's your chance!

Click here to play today's official NYT Pips game first.

Want hints instead? Scroll down for progressive clues that won't spoil the fun.

🎲 Today's Puzzle Overview

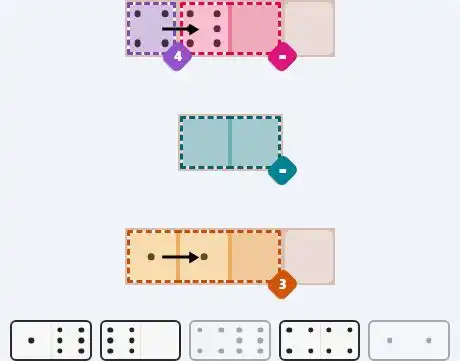
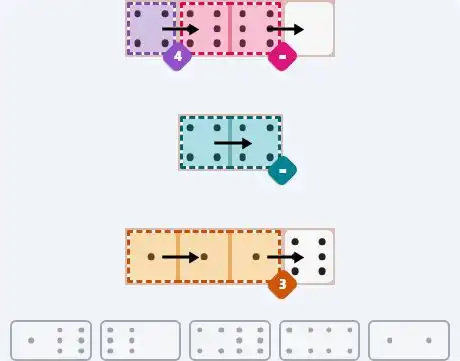
Ian Livengood's easy grid for April 7th is symmetric in a quiet way: two equals regions, two doubles, and a single-cell anchor in the corner that names your opening move. The sum=4 constraint at the top-left corner pins exactly one domino in today's set — only one tile carries a 4-pip face that can reach that position. From there a cascading equals chain fills the top row, a second double drops neatly into the center, and the bottom three-cell sum=3 closes the puzzle with a twist: both of today's doubles contribute to that region, but they only account for two of the three required pips. The last 1-pip has to come from somewhere else.

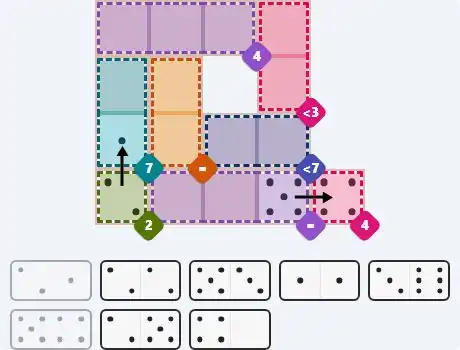
Ian Livengood's medium for today anchors from the bottom row out. Two isolated single-cell constraints — sum=2 on the left and sum=4 on the right — each demand a specific pip face and immediately name their domino. Those two placements squeeze the three-cell equals region in between them: once one end is fixed at 5, all three cells lock in, and the chain climbs upward through an equals pair, a sum=7 column, and a pair of tight less-than ceilings at the top. The two doubles in today's set play a supporting role rather than a starring one — they fill in the top block only after every other constraint has spoken.

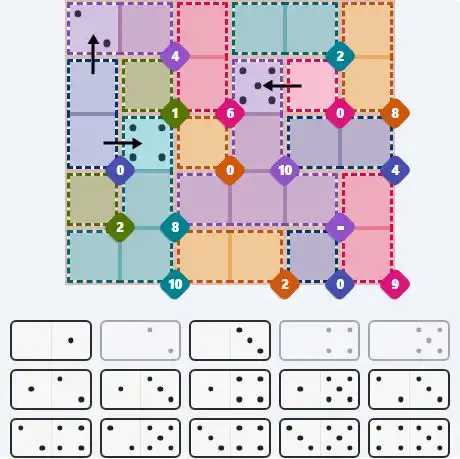
Rodolfo Kurchan's hard puzzle for April 7th is built from the complete set of fifteen non-double dominoes — every possible pairing of two distinct pip values from 0 through 5, used exactly once. That structural fact is the key to the whole puzzle: there are exactly five dominoes that carry a zero-pip face, and the board has exactly five cells that require a pip count of zero. Matching each zero-bearing domino to its cell is the first order of business. Once those five tiles are seated, their non-zero faces hand off specific values to adjacent cells, and a long chain of sum constraints — running across the top row, down both sides, and through the center — resolves every remaining domino without any backtracking.

💡 Progressive Hints

Try these hints one at a time. Each hint becomes more specific to help you solve it yourself!

💡 The corner sum points to a single domino
The top-left cell carries a sum=4 constraint — only one pip value is valid there. Check today's easy set: exactly one domino has a 4-pip face, and its orientation into that corner is forced. Place it and the top row begins to resolve immediately.
💡 Two doubles, two equals regions — and a three-cell sum that needs one more pip
Once the top row is settled, the two doubles in today's set each drop into an equals region. One fills the center, locking both cells to the same value. The other helps satisfy the three-cell sum=3 at the bottom — but the double alone only supplies two of the three required pips. Look at what's left to find the domino that provides the third.
💡 Full solution
Place [4|6] horizontally: 4 at (0,0) — sum=4 ✓ — and 6 at (0,1). Equals region at (0,1),(0,2): (0,1)=6, so (0,2)=6. The [6|0] domino covers (0,2) and (0,3): 6 at (0,2) ✓, 0 at (0,3) (empty ✓). Equals region at (2,1),(2,2): the [4|4] double placed horizontally — 4 at (2,1) and 4 at (2,2) ✓. Sum=3 at (4,0)+(4,1)+(4,2)=3: the [1|1] double covers (4,0) and (4,1) — 1+1=2, so (4,2) must be 1. The [1|6] domino orients with 1 at (4,2) and 6 at (4,3) (empty ✓). Total: 1+1+1=3 ✓. Puzzle complete.
💡 Two single-cell anchors at the bottom row open everything
Before touching any inequality or equals constraint, look at the bottom row: one cell carries an exact sum=2 and another carries an exact sum=4. Each of those names a single pip value, and with only one domino available per slot, both placements are forced. Those two dominoes set the edge values of the three-cell equals region between them.
💡 The equals region cascades upward through three more constraints
Once the bottom row is fixed, the three-cell equals region is determined by one of the anchors — all three cells share the same value. From those placements, an equals pair one row up resolves, then a sum column, then the two less-than regions at the top narrow the final two dominoes to one valid arrangement each.
💡 Full solution
Sum=2 at (3,0): only pip 2 works; [2|1] places 2 at (3,0) and 1 at (2,0). Sum=4 at (3,4): only pip 4 works; [5|4] places 4 at (3,4) and 5 at (3,3). Equals region at (3,1),(3,2),(3,3): (3,3)=5, so all three cells must equal 5. [5|3] covers (3,1) and (2,1): 5 at (3,1) ✓, 3 at (2,1). [2|5] covers (2,2) and (3,2): 2 at (2,2), 5 at (3,2) ✓. Equals at (1,1),(2,1): (2,1)=3, so (1,1)=3. [3|6] covers (1,1) and (1,0): 3 at (1,1) ✓, 6 at (1,0). Sum=7 at (1,0)+(2,0)=6+1=7 ✓. Less-than-7 at (2,2)+(2,3): (2,2)=2; [4|0] covers (2,3) and (1,3): 4 at (2,3), 0 at (1,3). 2+4=6<7 ✓. Less-than-3 at (0,3)+(1,3): (1,3)=0; [2|2] covers (0,2) and (0,3): 2 at (0,2), 2 at (0,3). 2+0=2<3 ✓. Sum=4 at (0,0)+(0,1)+(0,2): (0,2)=2; [1|1] covers (0,0) and (0,1): 1+1+2=4 ✓. Puzzle complete.
💡 Five zeros, five cells — match them up first
Today's hard set is the complete collection of fifteen non-double dominoes from a six-pip set. Five of those tiles carry a zero-pip face: [0|1], [0|2], [0|3], [0|4], and [0|5]. The board has exactly five cells that require a zero: four single-cell exact-value constraints and one two-cell sum=0 region. Matching each zero-bearing domino to its zero-required cell is the entire first phase of the puzzle.
💡 The non-zero faces hand off values to the sum chain
Once each zero-bearing domino is placed, its non-zero half drops into an adjacent cell and anchors a sum constraint. That anchored value triggers the next sum along the row or column, which triggers the one after — a cascade that flows across the top row from left to right, down the right edge, and back across the center. By the time it's done, only a handful of dominoes remain for the lower-left and bottom sections.
💡 Full solution
Five zero cells to fill first. (4,4)=0: [0|1] places 0 at (4,4), 1 at (4,3). (1,4)=0: [0|5] places 0 at (1,4), 5 at (1,3). (2,2)=0: [0|3] places 0 at (2,2), 3 at (1,2). (1,0)+(2,0)=0: [0|2] places 0 at (1,0), 2 at (0,0); [0|4] places 0 at (2,0), 4 at (2,1). Now the sum chain: sum=4 at (0,0)+(0,1): (0,0)=2, so (0,1)=2. [1|2] covers (1,1) and (0,1): 1 at (1,1) — sum=1 ✓ — and 2 at (0,1) ✓. Sum=6 at (0,2)+(1,2): (1,2)=3, so (0,2)=3. [1|3] covers (0,3) and (0,2): 1 at (0,3), 3 at (0,2) ✓. Sum=2 at (0,3)+(0,4): (0,3)=1, so (0,4)=1. [1|4] covers (0,4) and (0,5): 1 at (0,4) ✓, 4 at (0,5). Sum=8 at (0,5)+(1,5): (0,5)=4, so (1,5)=4. [2|4] covers (2,5) and (1,5): 2 at (2,5), 4 at (1,5) ✓. Sum=4 at (2,4)+(2,5): (2,5)=2, so (2,4)=2. [2|3] covers (2,4) and (3,4): 2 at (2,4) ✓, 3 at (3,4). Equals region (3,2),(3,3),(3,4): (3,4)=3, so all three equal 3. [3|4] covers (3,2) and (3,1): 3 at (3,2) ✓, 4 at (3,1). [3|5] covers (3,3) and (2,3): 3 at (3,3) ✓, 5 at (2,3). Sum=10 at (1,3)+(2,3): (1,3)=5, (2,3)=5 → 5+5=10 ✓. Sum=8 at (2,1)+(3,1): (2,1)=4, (3,1)=4 → 4+4=8 ✓. Sum=2 at (3,0)=2: [2|5] covers (3,0) and (4,0): 2 at (3,0) ✓, 5 at (4,0). Sum=10 at (4,0)+(4,1): (4,0)=5, so (4,1)=5. [1|5] covers (4,2) and (4,1): 1 at (4,2), 5 at (4,1) ✓. Sum=2 at (4,2)+(4,3): (4,2)=1, (4,3)=1 → 1+1=2 ✓. Sum=9 at (3,5)+(4,5): [4|5] covers (4,5) and (3,5): 4 at (4,5), 5 at (3,5) → 4+5=9 ✓. Puzzle complete.

🎨 Pips Solver

Apr 7, 2026

Click a domino to place it on the board. You can also click the board, and the correct domino will appear.

Final Answer & Complete Solution For Hard Level

The key to solving today's hard puzzle was identifying the placement for the critical dominoes highlighted in the starting grid. Once those were in place, the rest of the puzzle could be solved logically. See the final grid below to compare your solution.

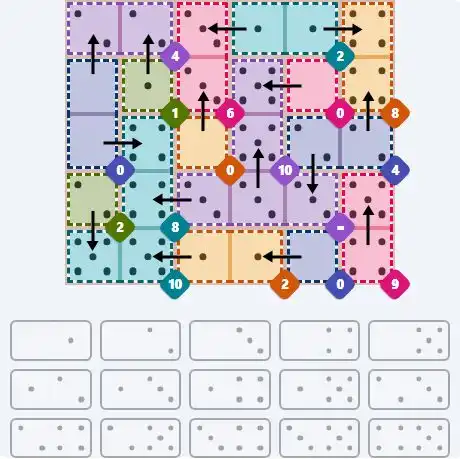
Starting Position & Key First Steps

Pips hint for April 7, 2026 – hard level puzzle grid with critical first placements and strategy

This image shows the initial puzzle grid for the hard level, with a few critical first placements highlighted.

Final Answer: The Solved Grid for Hard Mode

NYT Pips April 7, 2026 hard puzzle full solution grid showing final answer with hints

Compare this final grid with your own solution to see the correct placement of all dominoes.

🔧 Step-by-Step Answer Walkthrough For Easy Level

1
Step 1: Sum=4 at the corner names your only option
Cell (0,0) must show exactly 4 pips. Scan today's easy set — only one domino carries a 4-pip face: [4|6]. It must be placed horizontally with 4 at (0,0) and 6 at (0,1). No other orientation or tile can satisfy the constraint.
2
Step 2: The equals region at the top locks the second domino
The equals region spans (0,1) and (0,2). Cell (0,1)=6 is now fixed, so (0,2) must also equal 6. The [6|0] domino covers (0,2) and (0,3): 6 at (0,2) ✓, 0 at (0,3). Cell (0,3) carries an empty constraint — any pip value is accepted.
3
Step 3: The center equals region takes the [4|4] double
The equals region at (2,1) and (2,2) requires both cells to match. The [4|4] double is the natural fit — both faces are identical — and no other arrangement is possible without violating the constraint. Place [4|4] horizontally: 4 at (2,1), 4 at (2,2) ✓.
4
Step 4: Sum=3 at the bottom needs one pip from outside the double
The three-cell region at (4,0), (4,1), and (4,2) must total exactly 3. The [1|1] double covers (4,0) and (4,1): 1+1=2. That leaves (4,2) needing exactly 1 more pip to reach the target. The [1|6] domino supplies that 1-pip face at (4,2), with 6 at (4,3) — which carries an empty constraint ✓. Final sum: 1+1+1=3 ✓. All six constraints satisfied. Puzzle complete.

🔧 Step-by-Step Answer Walkthrough For Medium Level

1
Step 1: Sum=2 at (3,0) names the first domino
Cell (3,0) must show exactly 2 pips. Only one domino in today's medium set has a 2-pip face that can fill a single bottom-left cell: [2|1]. Place it vertically: 2 at (3,0) ✓, 1 at (2,0). This also fixes the lower half of the sum=7 column.
2
Step 2: Sum=4 at (3,4) names the second domino
Cell (3,4) must show exactly 4 pips. The only remaining domino with a 4-pip face that reaches this position is [5|4]. Place it vertically: 4 at (3,4) ✓, 5 at (3,3). That sets the rightmost cell of the three-cell equals region.
3
Step 3: The three-cell equals region resolves all at once
The equals region spans (3,1), (3,2), and (3,3). Cell (3,3)=5 is now fixed, so all three cells must equal 5. The [5|3] domino covers (3,1) and (2,1) vertically: 5 at (3,1) ✓, 3 at (2,1). The [2|5] domino covers (2,2) and (3,2) vertically: 2 at (2,2), 5 at (3,2) ✓. Three cells locked in one step.
4
Step 4: The equals pair and the sum=7 column resolve together
The equals region at (1,1) and (2,1): (2,1)=3 is fixed from Step 3, so (1,1) must also equal 3. The [3|6] domino covers (1,1) and (1,0) horizontally: 3 at (1,1) ✓, 6 at (1,0). Sum=7 at (1,0)+(2,0): (1,0)=6 and (2,0)=1 from Step 1 → 6+1=7 ✓. Two constraints resolved from one placement.
5
Step 5: Less-than-7 and less-than-3 close the top half
Less-than-7 at (2,2)+(2,3): (2,2)=2 is fixed. The [4|0] domino covers (2,3) and (1,3): 4 at (2,3), 0 at (1,3). Sum 2+4=6<7 ✓. Less-than-3 at (0,3)+(1,3): (1,3)=0 is now set. The [2|2] double covers (0,2) and (0,3): 2 at (0,2), 2 at (0,3). Sum 2+0=2<3 ✓. Sum=4 at (0,0)+(0,1)+(0,2): (0,2)=2 is confirmed. The [1|1] double covers (0,0) and (0,1): 1+1+2=4 ✓. All eight constraints satisfied. Puzzle complete.

🔧 Step-by-Step Answer Walkthrough For Hard Level

1
Step 1: Recognize the complete non-double set and count the zeros
Today's fifteen dominoes are every possible pairing of two distinct pip values from 0 to 5 — a complete non-double set. Five of those tiles carry a zero face: [0|1], [0|2], [0|3], [0|4], [0|5]. The board has four single-cell sum=0 constraints — at (1,1), (1,4), (2,2), and (4,4) — plus a two-cell sum=0 region at (1,0) and (2,0). That accounts for exactly five zero slots. Each zero-bearing domino goes to exactly one of these slots.
2
Step 2: Place the four single-cell zero dominoes
Sum=0 at (4,4): [0|1] places 0 at (4,4) and 1 at (4,3). Sum=0 at (1,4): [0|5] places 0 at (1,4) and 5 at (1,3). Sum=0 at (2,2): [0|3] places 0 at (2,2) and 3 at (1,2). Sum=1 at (1,1)=1 is a separate constraint — not zero. So [0|1] is correctly assigned to (4,4), not (1,1).
3
Step 3: Sum=0 at (1,0)+(2,0) fills the remaining two zero faces
Both cells must be zero. The remaining zero-bearing dominoes are [0|2] and [0|4]. [0|2] places 0 at (1,0) and 2 at (0,0). [0|4] places 0 at (2,0) and 4 at (2,1). The sum=0 region is satisfied ✓, and cells (0,0)=2 and (2,1)=4 are now fixed.
4
Step 4: Sum=4 at (0,0)+(0,1) and sum=1 at (1,1)
Cell (0,0)=2, so (0,1) must be 2 to reach the sum=4 target. The [1|2] domino covers (1,1) and (0,1): 1 at (1,1) — satisfying the sum=1 constraint ✓ — and 2 at (0,1) ✓.
5
Step 5: Sum=6 at (0,2)+(1,2) and sum=2 at (0,3)+(0,4)
Cell (1,2)=3 from Step 2. Sum=6 requires (0,2)=3. The [1|3] domino covers (0,3) and (0,2): 1 at (0,3), 3 at (0,2) ✓. Sum=2 at (0,3)+(0,4): (0,3)=1, so (0,4)=1. The [1|4] domino covers (0,4) and (0,5): 1 at (0,4) ✓, 4 at (0,5).
6
Step 6: Sum=8 at (0,5)+(1,5) and sum=4 at (2,4)+(2,5)
Cell (0,5)=4. Sum=8 requires (1,5)=4. The [2|4] domino covers (2,5) and (1,5): 2 at (2,5), 4 at (1,5) ✓. Sum=4 at (2,4)+(2,5): (2,5)=2, so (2,4)=2. The [2|3] domino covers (2,4) and (3,4): 2 at (2,4) ✓, 3 at (3,4).
7
Step 7: The three-cell equals region and the two large sum constraints
Cell (3,4)=3. Equals region at (3,2),(3,3),(3,4): all must equal 3. The [3|4] domino covers (3,2) and (3,1): 3 at (3,2) ✓, 4 at (3,1). The [3|5] domino covers (3,3) and (2,3): 3 at (3,3) ✓, 5 at (2,3). Sum=10 at (1,3)+(2,3): (1,3)=5 (from Step 2), (2,3)=5 → 5+5=10 ✓. Sum=8 at (2,1)+(3,1): (2,1)=4 (from Step 3), (3,1)=4 → 4+4=8 ✓.
8
Step 8: The bottom-left section and sum=9 close the board
Sum=2 at (3,0)=2: the [2|5] domino covers (3,0) and (4,0): 2 at (3,0) ✓, 5 at (4,0). Sum=10 at (4,0)+(4,1): (4,0)=5, so (4,1)=5. The [1|5] domino covers (4,2) and (4,1): 1 at (4,2), 5 at (4,1) ✓. Sum=2 at (4,2)+(4,3): (4,2)=1, (4,3)=1 (from Step 2) → 1+1=2 ✓. Sum=9 at (3,5)+(4,5): the [4|5] domino covers (4,5) and (3,5): 4 at (4,5), 5 at (3,5) → 4+5=9 ✓. All seventeen constraints satisfied. Puzzle complete.

💡 Pro Tips for Similar Puzzles

Start with Constraints
Always begin with the most constrained regions - sum regions with small numbers or tight spaces.
Use Equal Regions
Use "equal" regions as anchors - they eliminate many possibilities quickly.
Work Systematically
Let the rules guide your placement rather than guessing randomly.
Double-Check
Verify each region's rules are satisfied before moving to the next.

🎓 Keep Learning & Improve