NYT Pips Hints & Answers for September 24, 2026

Sep 24, 2026

🚨 SPOILER WARNING

This page contains the final answer and the complete solution to today's NYT Pips puzzle. If you haven't attempted the puzzle yet and want to try solving it yourself first, now's your chance!

Click here to play today's official NYT Pips game first.

Want hints instead? Scroll down for progressive clues that won't spoil the fun.

SEE ALSO:

🎲 Today's Puzzle Overview

Easy (Ian Livengood). The deduction graph opens not on arithmetic but on the two cells with the tightest numeric demands on the board — a pair of isolated 'greater than' singles tucked into the top-right corner. Both sit directly above the teal equals run of three that fills the right-hand end of the next row, so the chain is short and directional: each large pip that climbs into a greater-than cell drags its small partner down into the equals run, and the run's shared value is set by whichever partners those tiles carry. Once the trio is pinned, the graph travels left along the same row — the neighbouring free squares absorb the leftovers — and the bottom-left corner closes on a sum-2 single that forces the blue equals pair beneath it. There is hardly any branching; nearly every region is downstream of those two corner cells.

Medium (Ian Livengood). Here the architecture flips from magnitude to multiplicity. Three separate regions demand equal pips — a vertical pair hugging the top-left corner, an L-shaped equals block of three against the right edge, and a horizontal pair in the middle of the board — while the arithmetic is confined to a two-cell sum of 2 on the left and an 8-pair along the bottom. Because duplicates are the currency, the tray's two doubles are the load-bearing pieces, and the low pips are the scarce resource: an equals block of three cannot be answered by a single tile, so it drains every tile on which the same small value appears. The middle equals pair is the natural terminus, since the tray carries only two tiles with a 6 and both have to land there. The rest of this NYT Pips medium then unwinds as subtraction — the sum-2 pair, the sum-8 pair and a 'less than 2' single all read as remainders once the equals regions have claimed their values.

Hard (Rodolfo Kurchan). Eighteen regions on a nine-row board, and the whole thing is a bookkeeping exercise: single-cell sums of 0, 1, 2, 3 and 4 line the top and left edges, while equals blocks of three, a sum-4 column and a sum-15 run sit lower down. The chain starts at the extreme end of the arithmetic — a cell that must hold nothing at all sits directly under a cell that must hold exactly 1, and the tile that satisfies both is the seed for the top-right cluster. From there the deduction alternates between two registers: totals that leave no room, where the sum-4 column collapses to one large pip plus a double zero and the sum-15 run resolves from its two ends inward, and parity, where three separate equals blocks each consume a double. With fifteen tiles and almost no slack, one wrong direction early costs the whole solve.

💡 Progressive Hints

Try these hints one at a time. Each hint becomes more specific to help you solve it yourself!

💡 Hunt the greater-than singles
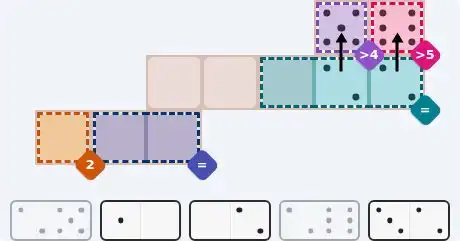
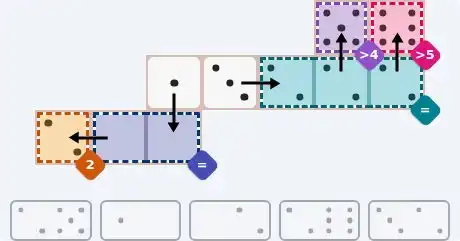
This grid is won or lost in its single-cell numerical constraints rather than its sums. Two 'greater than' cells sit along the top-right edge, and both of them touch the same repeated-value region. Start there — a cell that has to beat a high number has almost nowhere to hide.
💡 Read the equals run under them
Look at the teal equals run across the right-hand end of the second row — three cells that must all end up holding the same pip. Sitting directly above its middle and right cells are the purple greater-4 and pink greater-5 singles. Those two cells can only swallow the largest pips in the tray, and the tiles carrying them have small partners, so the equals run gets dragged down to that same modest value.
💡 Full solution: the teal run and the bottom-left corner
Lock the teal equals run to 2. The 2/5 tile stands vertically: 5 up in the purple greater-4 cell, 2 down in the run's middle cell. The 2/6 tile stands vertically to its right: 6 up in the pink greater-5 cell in the corner, 2 down in the run's right cell. The 3/2 tile lies horizontally at the left end of that row, 3 in the free square at the centre of the board and 2 in the run's left cell, completing three 2s. Below, the 0/2 tile lies horizontally across the bottom-left: 2 in the orange sum-2 cell in the corner, 0 in the left cell of the blue equals pair. Finally the 1/0 tile stands vertically, 1 in the free square on the left and 0 in the blue pair's right cell, so the pair reads 0 and 0.
💡 Equals regions carry this grid
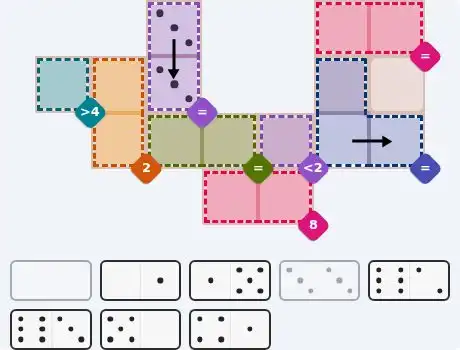
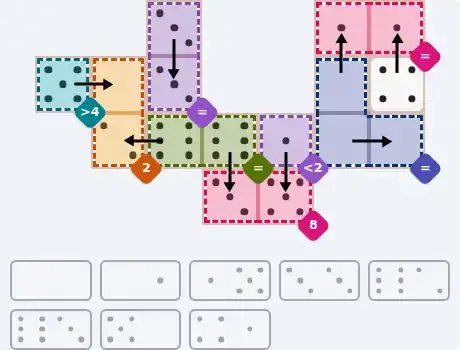
This board is dominated by 'equals' regions rather than arithmetic. Three separate areas insist that their cells match each other — a stacked pair at the top-left, an L-shaped block of three on the right, and a pair in the middle. So the dominoes that can hand out identical pips are the real currency here, and the numeric regions are what tidy up afterwards.
💡 Both doubles go straight to work
Begin with the two doubles in the tray, the 0/0 and the 3/3, because they are the only tiles that put identical pips into two cells at once. The purple equals pair stacked at the top-left takes the 3/3, standing vertically with 3 in the upper cell and 3 in the lower. The 0/0 lies flat across the two bottom cells of the blue equals block on the right, giving that block two of its three matching pips; the block's third cell, the one at the top-left of the shape, takes the remaining 0.
💡 Full solution: every tile placed
The 3/3 fills the purple equals pair at the top-left (3 over 3) and the 0/0 lies flat across the blue equals block's two bottom cells. The 0/1 stands vertically, 0 down in the block's top-left cell and 1 up in the left cell of the pink equals pair; the pink pair's right cell takes the 1 from the 4/1 tile, which stands vertically with its 4 below it in the free square. The green equals pair in the middle holds 6s: the 6/2 lies horizontally, 6 as its right half in the green pair's left cell and 2 as its left half in the lower cell of the orange sum-2 pair, while the 6/3 stands vertically, 6 up in the green pair's right cell and 3 down in the left cell of the pink sum-8 pair. The 1/5 stands vertically, 1 up in the purple less-2 cell and 5 down as the sum-8 pair's right cell. Last, the 5/0 lies horizontally on the left, 5 in the teal greater-4 cell and 0 in the upper cell of the orange sum-2 pair.
💡 Find the most absolute single cells
Every tight grid has a cell that admits exactly one pip. Sweep the small single-cell arithmetic regions first — a sum of 0 and a sum of 1 near the top of the board are the most absolute constraints on the page, and the equals blocks on either side of them will not resolve until those two are settled.
💡 The sum-0 / sum-1 stack
Focus on the purple sum-0 cell in the top area and the teal sum-1 cell directly above it. A total of zero leaves no room for argument: that lower cell is a 0. Because the two cells are stacked, the natural tile to cover both is the 0/1 — 0 low in the purple cell, 1 high in the teal cell. That single placement is the seed for the whole top-right cluster.
💡 Follow the top edge rightwards
Step right along the same row to the orange sum-2 single. It must hold a 2, and the tile that fits carries a 1 as its partner — that 1 lands in the cell immediately to its right, the upper cell of the blue sum-3 vertical pair. The pair's lower cell is therefore a 2, so the tile filling it puts a 2 on top and drops its partner straight down into the blue equals pair in the row below.
💡 The blue pair and the zero column
The blue equals pair on the right — two cells side by side — must match, and one of them already reads 3, so the other becomes 3 too. That 3 arrives with a 4 attached, and the 4 slots into the top cell of the orange sum-4 column in the centre of the board. A three-cell column totalling 4 with a 4 already sitting in it means both lower cells are 0 — precisely what the 0/0 double is for.
💡 Full solution: the complete layout
The 0/1 stands vertically near the middle of the top: 0 in the purple sum-0 cell, 1 in the teal sum-1 cell above it. The 2/1 lies horizontally to the right: 2 in the orange sum-2 single, 1 in the upper cell of the blue sum-3 pair; that pair's lower cell takes the 2 from the 2/3 tile, which drops its 3 into the blue equals pair below. The 4/3 lies horizontally beside it, 3 in the blue pair's left cell and 4 in the top cell of the orange sum-4 column, whose two lower cells are filled by the 0/0 double standing vertically. The purple greater-10 pair in the top-left corner beats 10 only as 6 and 6: the 4/6 lies horizontally, 6 in its right cell and 4 in the pink sum-4 at the top-left, and the 6/0 stands vertically, 6 in its left cell and 0 below in the green less-3 cell. Lower down, the 5/2 lies horizontally, 5 in the pink greater-3 cell and 2 in the top cell of the teal equals block, whose other two cells are the vertically laid 2/2 double. The green equals block on the left is all 5s: the 5/5 double stands vertically through its two right-hand cells, and the 5/3 lies horizontally, 5 in the block's bottom-left cell and 3 in the teal sum-3 cell. For the right edge: the 6/6 stands vertically, 6 in the purple sum-6 cell and 6 in the left cell of the orange sum-15 run; the 4/4 stands vertically, 4 in the pink sum-4 on the right and 4 in the run's right cell; the 0/5 stands vertically between them, 5 in the run's middle cell and 0 below in the upper cell of the blue sum-1 pair; and the 6/1 stands vertically, 1 in that pair's lower cell and 6 in the green greater-4 cell.

🎨 Pips Solver

Sep 24, 2026

Click a domino to place it on the board. You can also click the board, and the correct domino will appear.
Final Answer & Complete Solution For Hard Level

The key to solving today's hard puzzle was identifying the placement for the critical dominoes highlighted in the starting grid. Once those were in place, the rest of the puzzle could be solved logically. See the final grid below to compare your solution.

Starting Position & Key First Steps
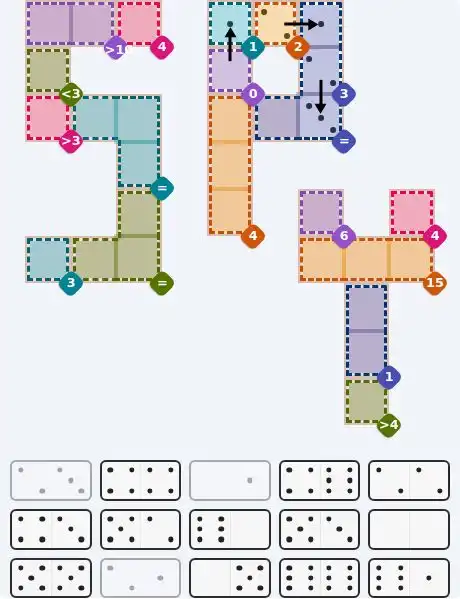
Pips hint for Sept 24, 2026 – hard level puzzle grid with critical first placements and strategy

This image shows the initial puzzle grid for the hard level, with a few critical first placements highlighted.

Final Answer: The Solved Grid for Hard Mode
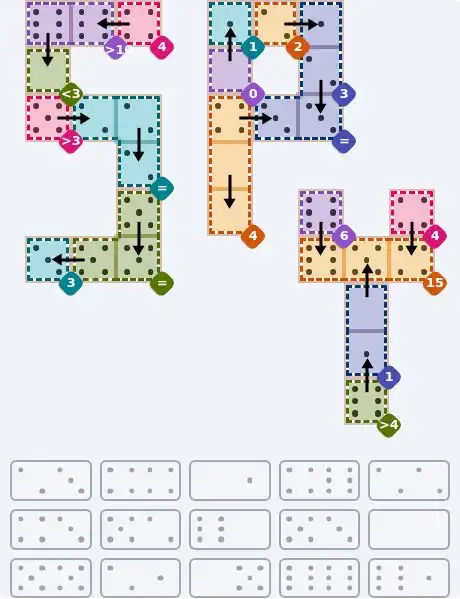
NYT Pips Sept 24, 2026 hard puzzle full solution grid showing final answer with hints

Compare this final grid with your own solution to see the correct placement of all dominoes.

🔧 Step-by-Step Answer Walkthrough For Easy Level

1
Step 1: The corner that gives itself away
The pink greater-5 cell in the top-right corner has to beat 5, so it can only take a 6 — and the 2/6 tile is the only domino in the tray carrying one. Stand it vertically: 6 up in the pink cell, 2 down in the right-hand cell of the teal equals run below.
2
Step 2: The purple 4 next door
The purple greater-4 cell just to the left of the pink one needs 5 or 6. The 6 is already spent, so it takes the 5 from the 2/5 tile, standing vertically with its 2 dropping into the teal run's middle cell. Two cells of the run now read 2, and because the region is an equals, the run's third cell must be a 2 as well.
3
Step 3: Filling the two free squares
The 3/2 tile lies horizontally at the left end of the teal run: its 2 goes into the run's left cell, completing three 2s, and its 3 goes into the free square at the centre of the board. The other free square, on the left, is filled by the 1/0 tile standing vertically — 1 in the free square, 0 dropping into the right cell of the blue equals pair below.
4
Step 4: Closing the bottom-left corner
The blue equals pair needs two matching pips, and its right cell now holds the 0 from the 1/0 tile, so its left cell must be 0 too. The 0/2 tile lies horizontally, 0 right in the blue pair's left cell and 2 left in the orange sum-2 cell that finishes the corner — the lone cell's total is met by exactly that 2.

🔧 Step-by-Step Answer Walkthrough For Medium Level

1
Step 1: Two doubles, two equals regions
The tray holds exactly two doubles, the 0/0 and the 3/3, and the grid has three regions wanting matching cells. Take the quickest wins first: the 3/3 stands vertically in the purple equals pair at the top-left, putting 3 in both of its cells, and the 0/0 lies flat across the two lower cells of the blue equals block on the right, giving that block a pair of 0s.
2
Step 2: The block's third cell and the pink pair
The blue block is an L of three cells and now needs its top-left cell to match the two 0s, so a 0-bearing tile goes there vertically: the 0/1, with its 0 down in the block and its 1 up in the left cell of the pink equals pair at the top-right. That pink pair must match, so its right cell reads 1 as well — the 4/1 tile stands vertically to supply it, 1 up in the pink pair and 4 down in the free square beneath.
3
Step 3: The green pair takes the 6s
The tray carries exactly two tiles with a 6, the 6/2 and the 6/3, and the green equals pair in the middle of the board needs two matching pips, so both 6s land there. The 6/2 lies horizontally, 6 as its right half in the green pair's left cell and 2 as its left half in the lower cell of the orange sum-2 pair. The 6/3 stands vertically, 6 up in the green pair's right cell and 3 down in the left cell of the pink sum-8 pair.
4
Step 4: The orange pair and the teal single
The orange sum-2 vertical pair already holds a 2 in its lower cell from the 6/2, so its upper cell has to be 0. The tile that supplies it lies horizontally: the 5/0, with 0 as its right half in the orange pair and 5 as its left half in the teal greater-4 cell on the left edge.
5
Step 5: Finishing the bottom row
The pink sum-8 pair has a 3 in its left cell from the 6/3, so its right cell needs 5. The 1/5 tile stands vertically there: 5 down in the sum-8 pair's right cell and 1 up in the purple less-2 cell next door, which satisfies that 'less than 2' single. Every cell is now accounted for.

🔧 Step-by-Step Answer Walkthrough For Hard Level

1
Step 1: The sum-0 cell opens everything
The purple sum-0 single in the top area can only hold a 0, and the teal sum-1 cell directly above it can only hold a 1. The 0/1 tile covers both at once: stand it vertically with 0 in the lower purple cell and 1 in the upper teal cell.
2
Step 2: Sliding right along the top edge
The orange sum-2 single further right must be 2. The 2/1 tile lies horizontally, 2 as its left half in that cell and 1 as its right half in the upper cell of the blue sum-3 vertical pair at the top-right. The pair must total 3, so its lower cell is 2, supplied by the 2/3 tile standing vertically — 2 up in the pair and 3 down in the right cell of the blue equals pair beneath.
3
Step 3: The blue pair and the orange column
The blue equals pair now holds a 3 in its right cell, so its left cell also reads 3. That 3 arrives with a 4 on the other half of the 4/3 tile, which lies horizontally with 4 as its left half in the top cell of the orange sum-4 column in the centre of the board. With a 4 already in the column, both lower cells must be 0, and the 0/0 double stands vertically to fill them.
4
Step 4: The six-and-six pair in the corner
The purple greater-10 pair at the top-left needs two cells that beat 10 together, which forces 6 and 6. The 4/6 tile lies horizontally, 6 as its right half in the pair's right cell and 4 as its left half in the pink sum-4 single at the top-left. The 6/0 tile stands vertically at the very corner, 6 up in the pair's left cell and 0 down in the green less-3 cell below it, where the smallest pip is exactly what the constraint allows.
5
Step 5: The pink 3 and the two equals blocks
The pink greater-3 single on the left must be 5, and the 5/2 tile lies horizontally, 5 as its left half there and 2 as its right half in the top-left cell of the teal equals block. That block needs three matching cells, so the 2/2 double stands vertically through the other two. The green equals block lower down is all 5s: the 5/5 double stands vertically through its two right-hand cells, and the 5/3 tile lies horizontally, 5 as its right half in the block's bottom-left cell and 3 as its left half in the teal sum-3 single.
6
Step 6: Closing the right edge
The purple sum-6 single and the orange sum-15 run share the right side. The 6/6 tile stands vertically, 6 up in the purple sum-6 cell and 6 down in the run's left cell; the 4/4 tile stands vertically at the far right, 4 up in the pink sum-4 single and 4 down in the run's right cell. The run's middle cell is therefore 5, which the 0/5 tile supplies from below — 5 up in the run and 0 down in the upper cell of the blue sum-1 pair. That pair needs 1 in its lower cell, and the 6/1 tile stands vertically to give it: 1 up in the pair, 6 down in the green greater-4 cell that ends the grid.

💡 Pro Tips for Similar Puzzles

Start with Constraints
Always begin with the most constrained regions - sum regions with small numbers or tight spaces.
Use Equal Regions
Use "equal" regions as anchors - they eliminate many possibilities quickly.
Work Systematically
Let the rules guide your placement rather than guessing randomly.
Double-Check
Verify each region's rules are satisfied before moving to the next.

🎓 Keep Learning & Improve