NYT Pips Hints & Answers for September 18, 2026

Sep 18, 2026

🚨 SPOILER WARNING

This page contains the final answer and the complete solution to today's NYT Pips puzzle. If you haven't attempted the puzzle yet and want to try solving it yourself first, now's your chance!

Click here to play today's official NYT Pips game first.

Want hints instead? Scroll down for progressive clues that won't spoil the fun.

SEE ALSO:

🎲 Today's Puzzle Overview

Easy — Ian Livengood builds a cosy 3×4 grid that is really a lesson in doubles. A sum region that can only be met one way sits in the centre of the board, an equals pair sits above and to the left of it, and between them the tray's two doubles are fixed before you ever glance at the single-cell clues. Nothing here is decorative: every region is a hinge, which is exactly the economy Livengood is known for. Medium — the same constructor takes that idea and multiplies it. Six regions all ask for the same total, so the board turns into an exercise in allocating pips rather than adding them, and the lone 'less than' cell on the left edge plus the single-cell sum pocket are the only asymmetry he allows himself. It is a very Livengood move — one quiet exception doing an enormous amount of work. Hard — Rodolfo Kurchan goes the opposite way entirely. Where Livengood leans on totals, Kurchan's grid is built around two equal-value shapes, a run of five cells and a block of four, which swallow most of the tray's repeated pips; everything else is a ring of single-cell inequalities that only resolve once those shapes are committed. Solve the equals shapes first and this NYT Pips hard unspools in a straight line toward the bottom-right corner.

💡 Progressive Hints

Try these hints one at a time. Each hint becomes more specific to help you solve it yourself!

💡 Start with the constraint types
This grid mixes equals pairs with sum regions. The sum regions each carry one fixed total, so scan their targets from smallest upward — the tightest one leaves the tray no choice at all.
💡 The sum pair in the centre
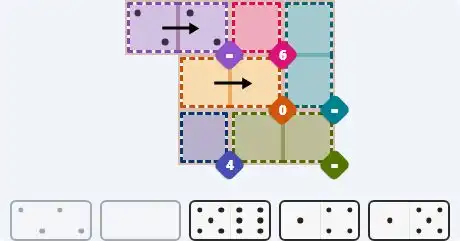
The orange sum 0 pair in the middle of the board is that spot: two cells that must total nothing can only be 0 and 0, so the 0/0 double lies flat there, 0 in the left cell and 0 in the right.
💡 The full solution
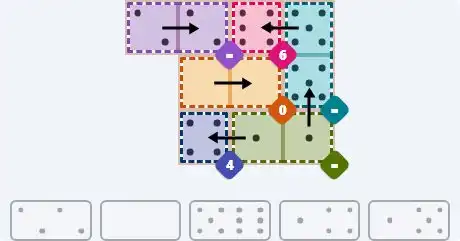
Complete layout: the 2/2 lies flat across the purple equals pair in the top-left corner, 2 in each cell. The 0/0 lies flat across the orange sum 0 pair in the centre. The 6/5 lies flat along the top edge, 6 in the pink sum 6 cell and 5 as the upper half of the teal equals on the right. The 1/5 stands vertically down the right edge, 5 as its upper half in the teal equals (so both teal cells read 5) and 1 as its lower half in the right cell of the green equals. The 1/4 lies flat along the bottom, 4 in the blue sum 4 cell and 1 in the left cell of the green equals, completing green's pair of 1s.
💡 Count the repeated targets
Almost every region on this board aims at the same total, and two lone single-cell clues break the pattern: one demands a sum, one demands a value below a limit. Start with the single-cell sum that sits next to another sum region.
💡 The top-right corner cell
The orange sum 3 cell in the top-right corner can only hold 3, and the 3/4 tile stands vertically to serve it: 3 as the upper half in the orange cell, 4 as the lower half in the pink sum 8 pair directly below. That pink pair now needs 4 in its left cell too, so the 4/5 lies flat with 4 on the right and 5 to the left in the upper cell of the purple sum 8 near the bottom centre.
💡 The full solution
Complete layout: 3 in the orange sum 3 cell with 4 below it in the right-hand cell of the pink sum 8 on the right; the 4/5 lies flat with 4 in that pink pair's left cell and 5 to the left in the upper cell of the purple sum 8 below the centre. The 2/1 lies flat on the left edge, 1 in the blue less 2 cell and 2 to the right in the upper cell of the green sum 8 at the bottom; the 3/6 lies flat beneath it with 6 in the green's lower cell and 3 to the right in the purple sum 8's lower cell, making 5+3. The 0/4 stands vertically in the top-left purple sum 8 block, 0 in its top cell and 4 below, and the 6/4 lies flat with 4 in the block's bottom-right cell and 6 to the right in the left cell of the teal sum 8; the 5/2 stands vertically with 2 in the teal's right cell and 5 up in the uncoloured free square at the top-right. Finally the 2/6 stands vertically down the left side, 6 in the upper cell of its pink sum 8 and 2 in the lower.
💡 Two equal shapes and one big target
This board leans on equal-value shapes rather than sums — a run of five cells and a block of four — plus a greater-than pair in the bottom-right corner whose target is the highest on the grid. Before placing anything, count how often each pip repeats in the tray.
💡 The greater-10 pair
The teal greater 10 pair in the bottom-right corner is the tightest clue: its two cells must add to more than ten, and only the tray's sixes get there. Both cells read 6 — the 3/6 stands vertically with 6 as its lower half in the pair's upper cell and 3 up in the free square above, and the 0/6 stands directly below with 6 as its upper half in the pair's lower cell and 0 down in the purple less 2 corner.
💡 The five-cell run of zeros
The blue equals run of five across the upper left is the spine of the board: all five cells identical. The tray holds six 0-halves, and five of them fill this row, each arriving on a vertical tile whose partner pokes into a neighbouring clue — 3 up into the pink less 4 at the left end, 2 up into the teal less 3, 1 up into the orange less 2, while 5 drops into the green less 6 and 4 drops into the purple less 5 in the centre.
💡 The two remaining equals shapes
The pink equals block of four near the bottom reads 3 throughout: the 3/1 puts 3 in the block's top-left cell with 1 rising into the free square above it, the 3/3 double fills the block's vertical step with 3 top-centre and 3 bottom-centre, and the 4/3 puts 3 in the block's bottom-right cell as its upper half, 4 dropping below into the green greater 3. Meanwhile the purple equals column of three in the top-right corner reads 1 from top to bottom: the 1/1 double covers its top two cells and the 2/1 supplies the third 1 as its upper half, 2 falling into the free square beneath.
💡 The full solution
Complete layout: the purple equals column of three in the top-right corner reads 1/1/1 — the 1/1 double stands vertically across its top two cells, and the 2/1 stands vertically beneath with 1 as its upper half in the column's lowest cell and 2 as its lower half in the free square below. The blue equals run of five across the upper left reads 0 from end to end, fed by five vertical tiles: the 0/3 at the left end (0 as its lower half in the row, 3 up in the pink less 4), the 5/0 (0 as its upper half in the row, 5 down in the green less 6), the 0/2 (0 as its lower half in the row, 2 up in the teal less 3), the 4/0 (0 as its upper half in the row, 4 down in the purple less 5) and the 0/1 at the right end (0 as its lower half in the row, 1 up in the orange less 2). The pink equals block of four near the bottom reads 3 throughout: the 3/1 puts 3 in its top-left cell with 1 rising into the free square above it, the 3/3 double fills the block's vertical step (3 at top-centre, 3 at bottom-centre), and the 4/3 puts 3 in its bottom-right cell as its upper half with 4 dropping below into the green greater 3. Along the bottom strip the 6/2 stands with 6 in the blue greater 3 at the bottom-left and 2 above it in the orange less 3, the 3/6 stands with 3 up in the right-hand free square and 6 down in the upper cell of the teal greater 10, and the 0/6 stands with 6 up in the lower cell of that same pair and 0 down in the purple less 2 at the bottom-right corner.

🎨 Pips Solver

Sep 18, 2026

Click a domino to place it on the board. You can also click the board, and the correct domino will appear.

Final Answer & Complete Solution For Hard Level

The key to solving today's hard puzzle was identifying the placement for the critical dominoes highlighted in the starting grid. Once those were in place, the rest of the puzzle could be solved logically. See the final grid below to compare your solution.

Starting Position & Key First Steps

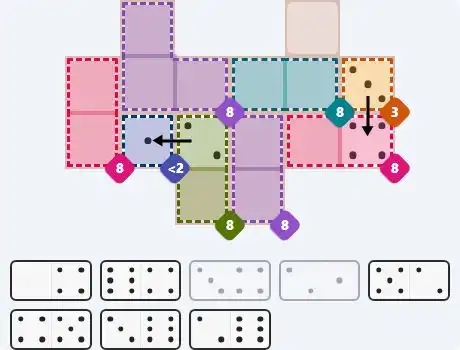
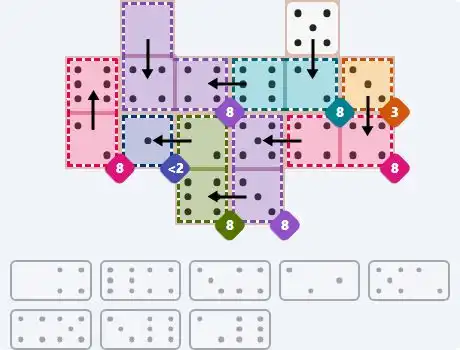
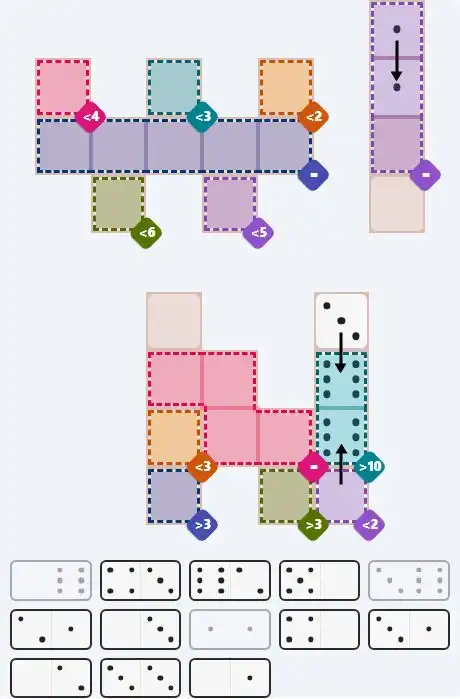
Pips hint for Sept 18, 2026 – hard level puzzle grid with critical first placements and strategy

This image shows the initial puzzle grid for the hard level, with a few critical first placements highlighted.

Final Answer: The Solved Grid for Hard Mode

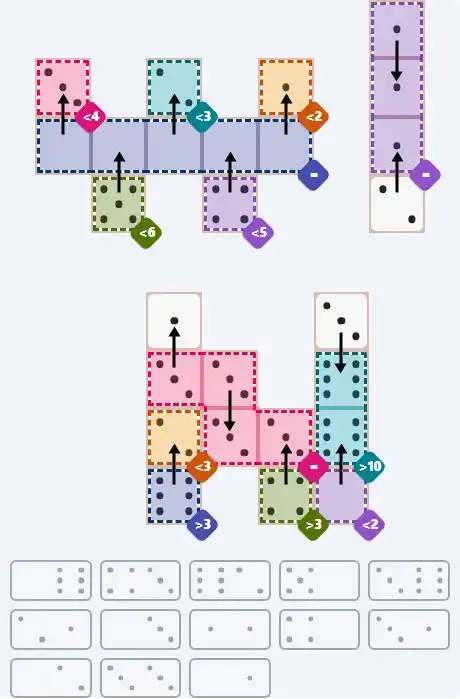
NYT Pips Sept 18, 2026 hard puzzle full solution grid showing final answer with hints

Compare this final grid with your own solution to see the correct placement of all dominoes.

🔧 Step-by-Step Answer Walkthrough For Easy Level

1
Step 1: The sum-zero pair in the middle
The orange sum 0 pair — two cells in the centre of the board — has to total nothing at all, and only 0 and 0 can do that. The 0/0 double lies flat across it, 0 in the left cell and 0 in the right.
2
Step 2: The top-left equals pair
The purple equals pair in the top-left corner needs two matching pips. The tray holds just two doubles — the 0/0 and the 2/2 — and the 0/0 is already spoken for, so the 2/2 lies flat across the corner, 2 in each cell.
3
Step 3: The pink cell takes the lone 6
The pink sum 6 single cell along the top is the only place a 6 can go, and the board carries exactly one 6: the 6/5 tile. It lies flat with 6 in the pink cell and 5 as the upper half of the teal equals pair to its right. Teal now needs 5 below as well, and only the 1/5 tile can supply it — that tile stands vertically, 5 as its upper half completing the teal pair and 1 as its lower half falling into the right cell of the green equals at the bottom-right.
4
Step 4: Bottom row finish
Two clues remain: the blue sum 4 single cell on the bottom left and green's still-empty cell. Blue must be 4, and green must join its partner as a 1, so the 1/4 tile lies flat along the bottom with 4 in the blue cell and 1 in the left cell of the green equals. Green now reads 1 and 1, and every region on the board is satisfied.

🔧 Step-by-Step Answer Walkthrough For Medium Level

1
Step 1: The lone 3 in the orange cell
The orange sum 3 single cell at the top-right corner must hold 3. The 3/4 tile serves it, standing vertically with 3 as the upper half in the orange cell and 4 as the lower half in the pink sum 8 pair just below. That pink pair is now one 4 short of eight, so its left cell also takes 4 — the 4/5 lies flat, 4 on the right in the pink pair and 5 to the left in the upper cell of the purple sum 8 near the bottom centre.
2
Step 2: The left edge opens up
The blue less 2 single cell on the left must hold 0 or 1, and the 2/1 tile fits it: 1 in the blue cell and 2 to the right in the upper cell of the green sum 8 below. Green now needs 6 underneath, which is the 3/6 tile lying flat — 6 in green's lower cell and 3 to the right in the lower cell of the purple sum 8, finishing 5+3 and confirming the 5 that the 4/5 planted there a step ago.
3
Step 3: The three-cell block up top
The purple sum 8 block in the top-left has three cells. Its top cell touches nothing but the cell beneath it, so the vertical 0/4 tile must stand there — 0 in the upper cell, 4 below. That leaves the block needing 4 in its third cell, and the 6/4 supplies it: 4 in the block's bottom-right cell and 6 to the right in the left cell of the teal sum 8 at the top-right.
4
Step 4: Teal and the free square
Teal already holds 6, so it needs 2 beside it. The 5/2 tile stands vertically, 2 as its lower half in the teal pair's right cell and 5 as its upper half in the uncoloured free square at the top-right corner — an empty square, so the 5 simply parks there.
5
Step 5: The last pair on the left
Only the pink sum 8 running down the left side remains. It needs 6 and 2, and the 2/6 tile stands vertically to deliver them: 6 as its upper half in the pair's top cell, 2 as its lower half in the cell below. All nine regions now read exactly as their targets demand.

🔧 Step-by-Step Answer Walkthrough For Hard Level

1
Step 1: The greater-10 pair claims the sixes
Two cells in the bottom-right corner must add to more than ten, so the tray's highest pips are the only route. The 3/6 stands vertically with 6 as its lower half in the pair's upper cell and 3 up in the free square above it, and the 0/6 stands directly below with 6 as its upper half in the pair's lower cell and 0 down in the purple less 2 corner.
2
Step 2: The equals run of five
The blue equals run of five across the upper left needs five identical pips. The tray holds six 0-halves — plenty of material — and the row reads 0 from its left end to its right, each 0 arriving on a vertical tile whose partner lands in a neighbouring clue: the 0/3 puts 3 up in the pink less 4, the 0/2 puts 2 up in the teal less 3, the 0/1 puts 1 up in the orange less 2, while the 5/0 sends 5 down into the green less 6 and the 4/0 sends 4 down into the purple less 5 in the centre.
3
Step 3: The four-cell block of threes
The pink equals block near the bottom needs four matching pips, and the 3s are the only family with that much supply. The 3/1 puts 3 in the block's top-left cell with 1 rising into the free square above it; the 3/3 double fills the block's vertical step, 3 at top-centre and 3 at bottom-centre; and the 4/3 puts 3 in the block's bottom-right cell as its upper half, 4 dropping below into the green greater 3.
4
Step 4: The equals column of one
The purple equals column of three in the top-right corner reads 1 the whole way down. The 1/1 double stands vertically across its top two cells, and the 2/1 stands beneath, its 1 as the upper half in the column's lowest cell and its 2 as the lower half in the free square below. The three single-cell inequalities at the top now agree: 3 in the pink less 4, 2 in the teal less 3, 1 in the orange less 2.
5
Step 5: The last tile at the bottom-left
One domino is unplaced: the 6/2. It stands vertically at the bottom-left of the board, 2 as its upper half in the orange less 3 cell and 6 as its lower half in the blue greater 3 cell beneath it — the only pairing that sits under 3 above and over 3 below. With that, the run of five all read 0, the block of four all read 3, the column of three all read 1, and the greater-10 pair finishes 6 over 6.
💡 Pro Tips for Similar Puzzles

Start with Constraints
Always begin with the most constrained regions - sum regions with small numbers or tight spaces.
Use Equal Regions
Use "equal" regions as anchors - they eliminate many possibilities quickly.
Work Systematically
Let the rules guide your placement rather than guessing randomly.
Double-Check
Verify each region's rules are satisfied before moving to the next.

🎓 Keep Learning & Improve