NYT Pips Hints & Answers for September 23, 2026

Sep 23, 2026

🚨 SPOILER WARNING

This page contains the final answer and the complete solution to today's NYT Pips puzzle. If you haven't attempted the puzzle yet and want to try solving it yourself first, now's your chance!

Click here to play today's official NYT Pips game first.

Want hints instead? Scroll down for progressive clues that won't spoil the fun.

SEE ALSO:

🎲 Today's Puzzle Overview

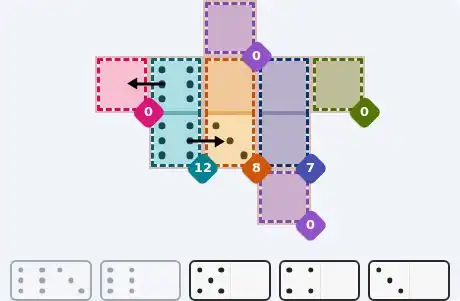
Easy is a five-tile confidence-builder from Ian Livengood. Four single-cell sum regions sit around the rim — two of them purple, one up top and one down in the bottom-right corner — and between them they hand you almost half the board before you place a single domino. The only real decision is the teal sum 12 column across the middle, which no zero can help with. Call it five minutes, no forks. Medium, also Livengood, is a different shape: three equals pairs along the top, two 'less than' pairs flanking them, and a small sum 3 pair on the left that acts as the one bottleneck. The tray carries no doubles at all, so every equals pair has to be assembled from halves of two separate tiles — that's the insight that unlocks the whole row. A single uncoloured free square at the bottom mops up whatever is left. Expect a few minutes and one satisfying click. Hard is Rodolfo Kurchan's 15-tile construction, and today's NYT Pips hard is the real test on the page: nineteen regions, a three-cell equals column near the top-left, a three-cell equals run along the bottom, and a scatter of greater-than and less-than singletons guarding the edges. The column is the lock; commit the right pair of tiles to it and the left flank unravels in one long chain. Budget plenty of time.

💡 Progressive Hints

Try these hints one at a time. Each hint becomes more specific to help you solve it yourself!

💡 Start with the lone cells
Count how many regions on this board hold a single square and carry a sum target — there are four, dotted around the rim. A sum over one cell is simply that cell's value, so they cost nothing to fill in and they'll give you free pips before you've paired anything up.
💡 Then the mid-board columns
Three slim vertical pairs sit side by side across the middle of the board — the teal sum 12 on the left, the orange sum 8 in the centre and the blue sum 7 on the right. Teal is the key: no small pip can reach twelve, so it eats the tallest tiles in the tray. Work out which two tiles those are before you spend them anywhere else.
💡 Full solution
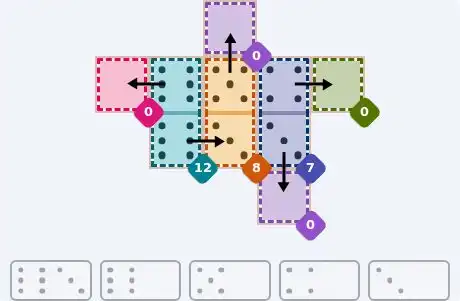
The 6/3 tile lies flat across the two lower cells of the middle column — 6 on the left in the teal sum 12 column, 3 on the right in the orange sum 8 column. The 6/0 lies flat above it, 6 on the right in the upper teal cell and 0 on the left in the top-left pink sum 0 square. The 5/0 stands upright, 5 as the lower half in the orange sum 8 region and 0 as the upper half in the top purple sum 0 square. The 4/0 lies flat, 4 on the left in the upper blue sum 7 cell and 0 on the right in the green sum 0 square at the top-right. The 3/0 stands upright below it, 3 up in the lower blue sum 7 cell and 0 down in the bottom-right purple sum 0 square.
💡 Which constraints to read first
Three of the regions here are 'equals' pairs and two more are 'less than' pairs. Begin with the equals ones: the moment you can pin a single cell inside an equals region you get its partner free. The less-than regions are there to eliminate options, not to hand you answers.
💡 The left-hand bottleneck
Now find the orange sum 3 pair pinning the left side of the middle row. It's a two-cell region, so its split has to come from low pips — and the tray is short on those. Whichever tile supplies its larger half has its other half needed elsewhere on the board, so trace both ends of that tile before committing.
💡 Full solution
The 6/0 stands vertically on the left edge — 6 up in the left cell of the purple equals pair along the top, 0 down in the left cell of the orange sum 3. The 3/5 lies flat across the middle of the row: 3 on the left in the orange sum 3 (giving it 0+3=3) and 5 on the right in the left cell of the blue equals pair. The 5/0 lies flat just to its right: 5 on the left in blue's right cell, 0 on the right in the left cell of the green less 6 pair. The 6/5 lies flat along the top, 6 on the left in the purple equals pair's right cell and 5 on the right in the left cell of the pink equals pair. The 5/1 lies flat further along the top row: 5 on the left in pink's right cell, 1 on the right in the left cell of the teal less 3. The 3/0 stands vertically at the far right of the middle row — 3 as the lower half in the right cell of the green less 6, 0 as the upper half in the right cell of the teal less 3. Finally the 5/2 lies flat along the bottom: 5 on the right in the purple sum 5 square, 2 on the left in the uncoloured free square.
💡 Hunt the triple-equals
Begin with the equals constraints — but not the pairs. Two regions on this board stretch across three cells instead of two, one running vertically near the top-left and one running horizontally along the bottom. A region that must repeat the same pip three times is the tightest thing in Pips, so identify those runs first and work out which pip on the tray can appear three times.
💡 The sum 4 above the column
The vertical run is the purple equals column in the top-left, and the cell directly above its top cell is the teal sum 4 square. A single-cell sum simply holds its target, so that square reads 4 — which means the tile feeding the column from above carries a 4, and only two tiles on the tray do.
💡 Count the sixes
Both three-cell runs end up repeating the largest pip on the board. Count them: the dominoes contain seven 6s in total, and every single one gets used — three down the purple column, three along the bottom teal run, and one more in the purple sum 11 pair up in the top-left corner.
💡 The far-right edge
Now the top right. The orange sum 0 pair can only be two zeros, and they arrive from different tiles. The 3/0 slots in along the right edge with its 0 finishing that pair and its 3 landing in the blue less 4 square beside it, while the 0/4 stands upright with 0 up in the sum 0 pair and 4 down in the top cell of the pink equals pair.
💡 Full solution
Purple equals column down the top-left: the 6/4 stands vertically with 4 up in the teal sum 4 square and 6 down in the column's top cell; the 6/6 double stacks vertically beneath it, filling the middle and lower cells with 6s — three sixes in a row. Top-left corner: the 5/2 lies flat, 5 on the left in the purple sum 11 and 2 on the right in the pink sum 2 square. The 6/3 stands vertically just beneath it, 6 up in the lower cell of the purple sum 11 pair and 3 down in the upper cell of the green sum 8 pair; the 5/3 stands vertically under that, 5 up completing green sum 8 and 3 down in the top cell of the orange equals pair. The 3/1 lies flat across the next row down, 3 on the left in the lower cell of the orange equals pair and 1 on the right in the green sum 1 square; the 0/0 double stands vertically lower still in the purple less 2 pair, both halves 0. Top right: the 0/4 stands vertically with 0 up in the left cell of the orange sum 0 pair and 4 down in the top cell of the pink equals pair; the 4/5 lies flat with 4 on the left completing that pink equals pair and 5 on the right in the teal sum 5 square; the 3/0 lies flat at the very edge, 0 on the left in the right cell of the orange sum 0 pair and 3 on the right in the blue less 4 square. Centre: the 1/1 double stands vertically in the blue equals pair. Bottom row: the 1/6 stands vertically, 6 up in the left cell of the teal equals run and 1 down in the blue greater 0 square; the 6/0 stands vertically beside it, 0 up in the uncoloured free square and 6 down in the middle cell of the teal run; the 6/2 stands vertically at the right end, 6 up in the right cell of the teal run and 2 down in the green greater 1 square; and the 5/1 stands vertically last, 1 up in the pink less 3 square and 5 down in the orange greater 3 square.

🎨 Pips Solver

Sep 23, 2026

Click a domino to place it on the board. You can also click the board, and the correct domino will appear.

Final Answer & Complete Solution For Hard Level

The key to solving today's hard puzzle was identifying the placement for the critical dominoes highlighted in the starting grid. Once those were in place, the rest of the puzzle could be solved logically. See the final grid below to compare your solution.

Starting Position & Key First Steps

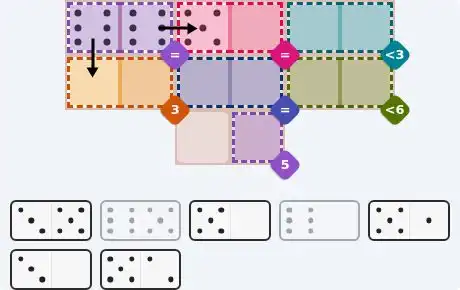
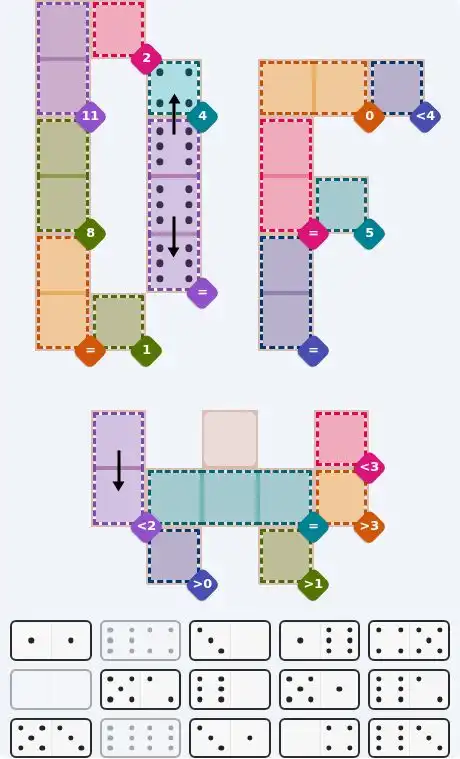
Pips hint for Sept 23, 2026 – hard level puzzle grid with critical first placements and strategy

This image shows the initial puzzle grid for the hard level, with a few critical first placements highlighted.

Final Answer: The Solved Grid for Hard Mode

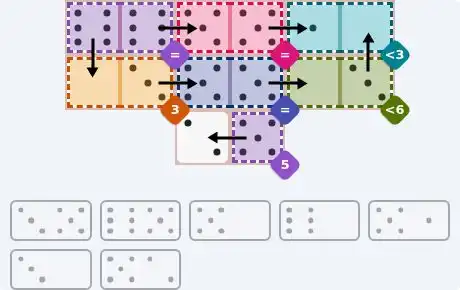
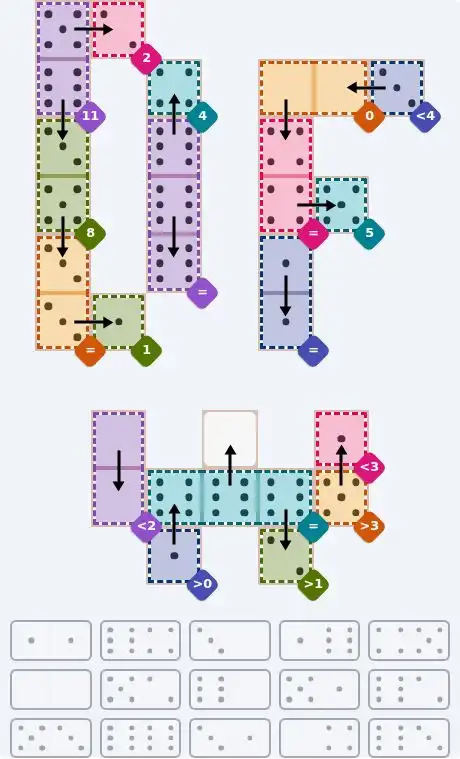
NYT Pips Sept 23, 2026 hard puzzle full solution grid showing final answer with hints

Compare this final grid with your own solution to see the correct placement of all dominoes.

🔧 Step-by-Step Answer Walkthrough For Easy Level

1
Step 1: Fill the four single-cell sums
Four regions here are one square wide and carry a sum target: purple at the top, pink down the top-left, green at the top-right, and purple again in the bottom-right corner. A sum printed over one cell is just that cell's value, so all four read straight off the board with no reasoning at all. That's four cells locked before you place a single tile.
2
Step 2: Teal 12 needs both sixes
Four of the five tiles in the tray carry a zero, and the sum 0 regions can only be fed by those. That leaves the teal sum 12 column on the left as the one region no zero can help — it needs two sixes, and the tray holds exactly two, the 6/3 and the 6/0. Both of those tiles are now spoken for.
3
Step 3: Lay the middle row flat
Teal must be all sixes, so the 6/0 can't send its 0 sideways into teal — instead the tile lies flat, 6 on the right in teal's upper cell and 0 on the left in the pink sum 0 square on the outer edge. The 6/3 covers teal's lower cell the same way, lying flat with 6 on the left and its 3 spilling right into the orange sum 8 column. Orange now needs 5 above the 3, and the 5/0 is the only tile holding a 5, so it stands upright — 5 as the lower half in orange, 0 as the upper half in the purple sum 0 square at the top.
4
Step 4: Blue 7 and the last zeros
Only the 4/0 and the 3/0 remain, and together they own the blue sum 7 column on the right. The 4/0 lies flat across the top of it, 4 on the left in blue's upper cell and 0 on the right in the green sum 0 square. The 3/0 stands vertically underneath, 3 up in blue's lower cell to complete 4+3=7, and 0 down in the purple sum 0 square at the bottom right. Board closed, every target met.

🔧 Step-by-Step Answer Walkthrough For Medium Level

1
Step 1: The bottom island
Look at the bottom of the board: the uncoloured free square and the purple sum 5 square sit side by side as a two-cell island with nothing touching them. The printed 5 is the value of the right-hand half, so one tile lies flat there with a 5 on the right and its partner in the free square.
2
Step 2: There are no doubles in the tray
Three of the regions are equals pairs across the top and centre — purple, pink and blue. Run your eye over the tray: it contains no double at all, so no equals pair can be filled by a single tile. Each one has to be assembled from halves of two different tiles that happen to carry the same pip.
3
Step 3: Sort the top row
The tray's two 6s sit on the 6/5 and the 6/0, and the purple equals pair needs one of them while pink must take 5s. So the 6/5 lies flat along the top edge, 6 on the left in purple's right cell and 5 on the right in pink's left cell — it cannot stand upright, because an upright 6/5 would drop its 5 into the orange sum 3 pair just below and wreck the total. The 6/0 then stands vertically on the left edge, since laying it flat would push a 0 into pink where a 5 is required: 6 up in the top-left corner for purple, 0 down in the left cell of the orange sum 3.
4
Step 4: Finish the top row and the right column
Pink's second 5 comes from the 5/1, lying flat further along the row — 5 on the left completing pink, 1 on the right in the left cell of the teal less 3 pair. Teal's two cells must both come in under 3, so the second one is a 0, supplied by the 3/0 standing vertically at the far right: 0 as the upper half in teal's right cell, 3 as the lower half in the right cell of the green less 6 pair. Green already holds a 0 on its left, so it reads 0 and 3.
5
Step 5: Close the middle and the bottom
Blue's equals pair needs two matching pips and the tray allows a pair of 5s. The 3/5 lies flat across the middle of the row, its 3 on the left in the orange sum 3 cell (0+3=3) and its 5 on the right in blue's left cell. The 5/0 lies flat beside it, 5 on the left in blue's right cell and 0 on the right in green's left cell. Last of all the 5/2 lies flat along the bottom island — 5 on the right in the purple sum 5 square, 2 on the left in the uncoloured free square.

🔧 Step-by-Step Answer Walkthrough For Hard Level

1
Step 1: The three-cell equals column
Start top-left. The purple equals column is three cells tall, so it has to repeat one single pip three times — the strongest constraint on the board. The cell directly above its top cell is the teal sum 4 square, and a one-cell sum simply holds its target, so that cell reads 4. The tile bridging the two therefore carries a 4, and only two tiles in the tray do.
2
Step 2: The column repeats 6
Good news for the repeated pip: the tray is deep in 6s and thin in small values. The 6/4 stands vertically with its 4 up in the teal sum 4 square and its 6 down in the column's top cell, and the 6/6 double stacks directly beneath it, filling the middle and lower cells with 6s. Three sixes locked in a row.
3
Step 3: The top-left corner
The purple sum 11 pair up in the corner needs a 6 and a 5, and the 5/2 supplies them: it lies flat along the top edge, 5 on the left in the sum 11 pair and 2 on the right in the pink sum 2 square. The 6/3 stands vertically just beneath it — 6 up in the lower cell of the sum 11 pair to complete the eleven, and 3 down in the upper cell of the green sum 8 pair.
4
Step 4: Down the left flank
Green sum 8 already holds a 3 up top, so it needs 5 more: the 5/3 stands vertically with 5 up completing the green pair and 3 down in the top cell of the orange equals pair. That pair repeats 3, so its lower cell takes the 3 half of the 3/1, which lies flat with 1 on the right in the green sum 1 square. Further down, the 0/0 double settles into the purple less 2 pair, both halves 0.
5
Step 5: The top right
The orange sum 0 pair can only read 0 and 0, and its two zeros come from different tiles. The 0/4 stands vertically, 0 up in the pair's left cell and 4 down in the top cell of the pink equals pair. The 3/0 lies flat along the right edge, 0 on the left finishing the sum 0 pair and 3 on the right in the blue less 4 square. Pink repeats 4, so its lower cell takes the 4 half of the 4/5, which lies flat with 5 on the right in the teal sum 5 square.
6
Step 6: Along the bottom
The teal equals run repeats three times, and it's the same pip as the purple column — 6. The 1/6 stands vertically with 6 up in the run's left cell and 1 down in the blue greater 0 square; the 6/0 puts 0 up in the uncoloured free square and 6 down in the run's middle cell; the 6/2 adds the run's right cell with 6 above and 2 below in the green greater 1 square. The 5/1 stands vertically at the right end, 1 up in the pink less 3 square and 5 down in the orange greater 3 square, and the 1/1 double sits in the blue equals pair at the centre. That closes all nineteen regions.
💡 Pro Tips for Similar Puzzles

Start with Constraints
Always begin with the most constrained regions - sum regions with small numbers or tight spaces.
Use Equal Regions
Use "equal" regions as anchors - they eliminate many possibilities quickly.
Work Systematically
Let the rules guide your placement rather than guessing randomly.
Double-Check
Verify each region's rules are satisfied before moving to the next.

🎓 Keep Learning & Improve