🔧 Step-by-Step Answer Walkthrough For Easy Level
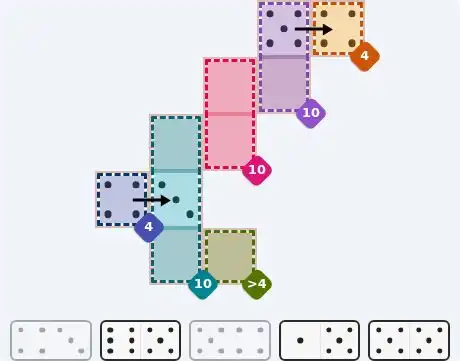
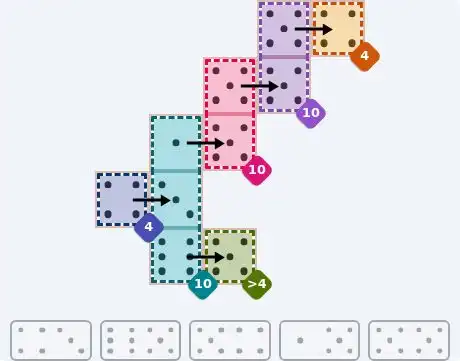
Two single-cell sum regions give themselves away at once. A lone square that must sum to 4 can only hold a 4, so the orange square in the top-right corner and the blue square in the bottom-left corner are both 4. Neither is a double, so each brings a partner: the blue corner's tile lies flat and drops a 3 to its right, into the middle cell of the teal sum-10 column, and the orange corner's tile lies flat with a 5 stepping left to the top of the purple sum-10 pair.
The purple pair is a two-cell sum of 10, and its upper cell now holds 5 — so the lower cell must also be 5. That 5 is the right half of the 5/5 double, which lies flat with its left half seated in the top cell of the pink sum-10 pair, just to the left.
The pink pair is also a two-cell sum of 10 with a 5 already in its upper cell, so its lower cell is 5 as well. That 5 comes from the 1/5 tile, lying flat, whose other half — a 1 — steps left into the top cell of the teal sum-10 column.
The teal column now reads 1 in its top cell and 3 in its middle cell, which is 4 of the 10 it needs, so the bottom cell must be 6. Only the 6/5 tile supplies it: it lies flat along the bottom of the board, 6 on the left in the teal column's lowest cell and 5 on the right in the green greater-4 square, which a 5 happily satisfies. Every region is complete.
🔧 Step-by-Step Answer Walkthrough For Medium Level
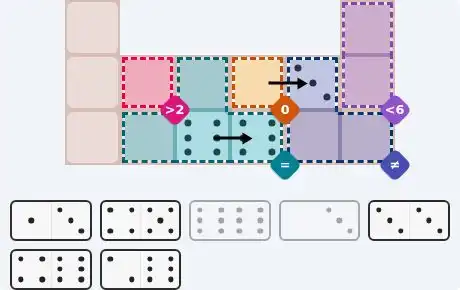
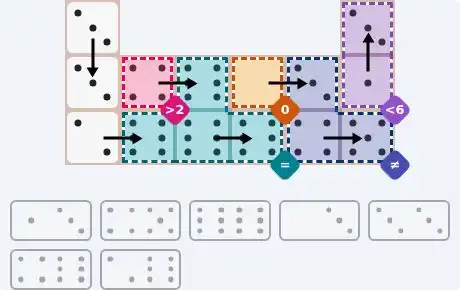
The orange sum-0 square at the centre of the board is the most absolute clue on the grid — a single cell summing to zero can only hold a 0. That 0 is the left half of the 0/3 tile, which lies flat so its 3 sits in the top-left cell of the blue unequal block immediately to the right.
The teal block is four cells that all have to match. Matching four cells needs a repeated value, and the repeated value here is 6: the 6/6 double covers two of the cells, and the 4/6 and 2/6 tiles each contribute a 6 alongside a partner that goes elsewhere. Start by laying the 6/6 double flat across the bottom-centre and bottom-right cells of the block.
The blue unequal block holds three cells that must all differ, and its top-left cell is already a 3. The two remaining cells sit side by side along the bottom-right. Every 6 in the tray is spoken for by the teal block, so the only tile that can fill two adjacent cells with distinct pips here is the 4/5 — laid flat, 4 in the block's bottom-left cell and 5 in its bottom-right cell.
The teal block still has two empty cells, and geometry decides how they are fed. Its top-centre cell has only one free neighbour, the pink greater-2 square to its left, so the 4/6 tile lies flat there: 6 on the right in teal, 4 on the left in pink. The bottom-left cell of the block is fed the same way by the 2/6 tile, lying flat, 6 on the right in teal and 2 on the left in the uncoloured square at the bottom-left corner.
Only the 3/3 double and the 1/3 tile remain, and the only empty cells are two vertical pairs: the uncoloured squares down the left column and the purple less-6 pair on the right edge. The 3/3 double stands vertically in the left column, 3 in the top-left square and 3 directly beneath it; the 1/3 tile stands vertically on the right edge, 3 in the upper half of the purple pair and 1 in the lower half, both comfortably under 6.
🔧 Step-by-Step Answer Walkthrough For Hard Level
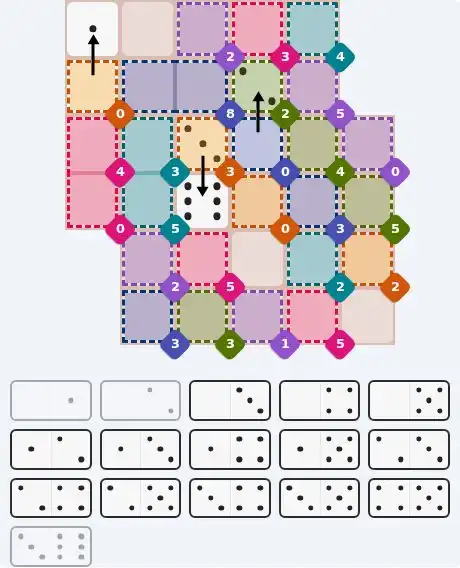
Only the 3/6 tile in the tray carries a 6, and no single-cell target on the board is 6 or more — every target is 5 or lower. So the 6 has to occupy one of the five uncoloured squares, and its 3 must land in a neighbour that can legally accept a 3. The top-left pair of uncoloured squares, the unconstrained square low in the centre and the bottom-right corner square all fail, because none of their neighbours is a sum-3 cell. Only the uncoloured square in the middle of the board works: the orange sum 3 sits directly above it. Lay the 3/6 vertically, 3 up in that orange region and 6 down in the free centre square.
Now the other extreme. Five squares demand a sum of zero — the orange sum 0 on the left edge, the blue sum 0 at the centre, the lower orange sum 0 in the middle of the board, the pink sum 0 on the left and the purple sum 0 on the right edge. The tray holds exactly five tiles with a 0 on them: 0/1, 0/2, 0/3, 0/4 and 0/5. The match is perfect, so all five are used here and every partner pip has to sit in a cell touching its zero.
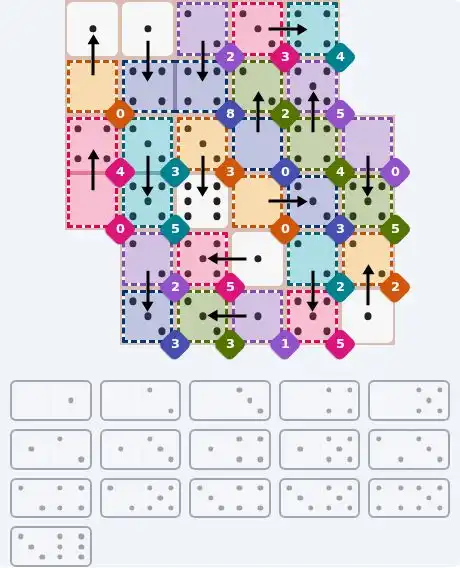
Because nearly every region is a one-cell sum, each zero's partner wants a neighbour whose target equals the partner. Work round the board: the orange sum 0 on the left edge sends a 1 up into the uncoloured top-left square; the blue sum 0 at the centre sends a 2 up into the green sum 2; the lower orange sum 0 in the middle sends a 3 right into the blue sum 3; the pink sum 0 sends a 4 up into the pink sum 4 above it; and the purple sum 0 on the right edge sends a 5 down into the green sum 5 beneath it. The zero tiles are done — 0/1, 0/2, 0/3, 0/4 and 0/5 all placed.
The blue sum-8 pair near the top-left is the sole multi-cell sum on the board, which makes it a landmark. Its two cells are fed from above, and the pips that arrive are 4 and 4: the 1/4 tile stands vertically with its 4 down in the left cell of the pair and its 1 up in the uncoloured square, while the 2/4 tile stands vertically with its 4 down in the right cell and its 2 up in the purple sum 2 on the top edge. With those in place, the top strip closes: the 3/4 tile lies flat with 3 in the pink sum 3 and 4 in the teal sum 4 beside it, and the 4/5 tile stands vertically with 5 up in the purple sum 5 and 4 down in the green sum 4.
What is left is a run of single-cell targets that each take the pip matching their own target. The 3/5 tile stands vertically with 3 up in the teal sum 3 and 5 down in the teal sum 5 below it. In the bottom-left, the 2/3 tile stands vertically, 2 up in the purple sum 2 and 3 down in the blue sum 3. The 1/5 tile lies flat with 5 in the pink sum 5 and 1 in the uncoloured square to its right. The 2/5 tile stands vertically, 2 up in the teal sum 2 and 5 down in the pink sum 5 at the bottom-right. The 1/3 tile lies flat along the bottom row, 3 in the green sum 3 and 1 in the purple sum 1. Finally the 1/2 tile stands vertically in the bottom-right corner, 2 up in the orange sum 2 and 1 down in the uncoloured corner square.
Everything together. 3/6 vertical in the centre: 3 up in the orange sum 3, 6 down in the uncoloured centre square. 0/1 vertical on the left edge: 1 up in the uncoloured top-left square, 0 down in the orange sum 0. 0/2 vertical: 2 up in the green sum 2, 0 down in the blue sum 0. 0/3 flat: 0 left in the lower orange sum 0, 3 right in the blue sum 3. 0/4 vertical on the left: 4 up in the pink sum 4, 0 down in the pink sum 0. 0/5 vertical on the right edge: 0 up in the purple sum 0, 5 down in the green sum 5. 1/4 vertical: 1 up in the uncoloured square, 4 down in the left cell of the blue sum 8. 2/4 vertical: 2 up in the purple sum 2 on the top edge, 4 down in the right cell of the blue sum 8. 3/4 flat along the top: 3 in the pink sum 3, 4 in the teal sum 4. 4/5 vertical on the right: 5 up in the purple sum 5, 4 down in the green sum 4. 3/5 vertical on the left: 3 up in the teal sum 3, 5 down in the teal sum 5. 2/3 vertical at the bottom-left: 2 up in the purple sum 2, 3 down in the blue sum 3. 1/5 flat: 5 in the pink sum 5, 1 in the uncoloured square. 2/5 vertical: 2 up in the teal sum 2, 5 down in the pink sum 5. 1/3 flat: 3 in the green sum 3, 1 in the purple sum 1. 1/2 vertical at the bottom-right: 2 up in the orange sum 2, 1 down in the uncoloured corner square.
💬 Community Discussion
Leave your comment