NYT Pips Hints & Answers for November 5, 2026

Nov 5, 2026

🚨 SPOILER WARNING

This page contains the final answer and the complete solution to today's NYT Pips puzzle. If you haven't attempted the puzzle yet and want to try solving it yourself first, now's your chance!

Click here to play today's official NYT Pips game first.

Want hints instead? Scroll down for progressive clues that won't spoil the fun.

SEE ALSO:

🎲 Today's Puzzle Overview

The NYT Pips easy is a warm-up that tells you exactly where to start. Both single-cell 'less than' squares sit on the right-hand edge, and a cap on one cell has nothing to hide behind — check what the tray can actually supply under the limit and each one collapses to a single pip. From there the board is a study in near-symmetry: a pink sum-11 pair across the top-left, a purple sum-11 pair down at the bottom-left, and a four-cell teal sum-14 block tying them together down the left column. The pleasure is that the two sum-11 pairs are completed by different tiles, so you can't simply copy your working from top to bottom.

Kurchan's medium puts the arithmetic on the rim and saves the thinking for the middle. You'll start at the top-right corner, where an equals pair is begging for a double, then work outward along the edges — a sum-1 square on the right with nowhere to send its partner, a sum-2 square on the left, and a three-cell sum-8 run along the bottom that keeps the last few tiles honest. The centre is where it bites: a green unequal pair and a purple greater-0 square leave you just enough slack to be wrong once, so those two interior cells are where the finish is genuinely earned.

Kurchan's hard is the one that makes you count the tray. The greater-17 block in the top-left looks monstrous until you remember that no pip beats 6 — three cells beating 17 must be three sixes, and that single realisation snowballs into the sum-16 block beneath it and the orange run along the bottom. The four-cell equals block in the middle of the board is the other half of the fight: it quietly demands four copies of one value, a much bigger ask than it looks. Clear those two regions and the far-right column — a chain of one-cell sum, less-than and greater-than squares — unravels almost by itself.

💡 Progressive Hints

Try these hints one at a time. Each hint becomes more specific to help you solve it yourself!

💡 Caps first
Two regions on this board are 'less than' squares holding a single cell each, and both sit down the right-hand side. A one-cell cap has no room to hide — look at what the tray can even supply under the limit, then ask which of those small pips has to go somewhere else entirely.
💡 The top-right corner has one door
The orange less-2 square at the top-right is your front door. It touches only one other cell — the right-hand cell of the pink sum-11 pair beside it — so whichever tile covers the orange square also drops a pip straight into pink. Only one tile in the tray can satisfy both jobs at once.
💡 Full easy solution
The 5/1 tile lies flat across the top-right: 1 in the orange less-2 square, 5 in the right-hand cell of the pink sum-11 pair, which forces 6 into the left cell. That 6 comes from the 6/0 tile, standing vertically down the top-left corner — 6 up in the pink pair, 0 down at the top of the teal sum-14 block. At the bottom, the blue less-3 square takes the 2 from the 5/2 tile (the tray's 0 and 1 are already spent), so 5 lies flat in the right-hand cell of the purple sum-11 pair and 6 must fill the left cell — the 6/6 double stands vertically, 6 down in the purple pair, 6 up in the teal block. Teal now holds 0 and 6 and needs 8 more, which is precisely the 4/4 double lying flat across the block's two middle cells.
💡 Two shapes to spot
Start with the constraint types that leave no room: an 'equals' pair, where matching pips cry out for a double, and a one-cell 'sum' region that can hold only a single low value. Both live near the edges, and between them they tell you which tiles the middle of the board cannot use.
💡 The corner and the dead end
The teal equals pair in the top-right corner is filled by the tray's only double — the 3/3 stands on end there. Then the purple sum-1 square on the right edge: it touches just one cell, the right-hand cell of the green unequal pair, so whatever tile serves it dumps its other pip into green.
💡 Full medium solution
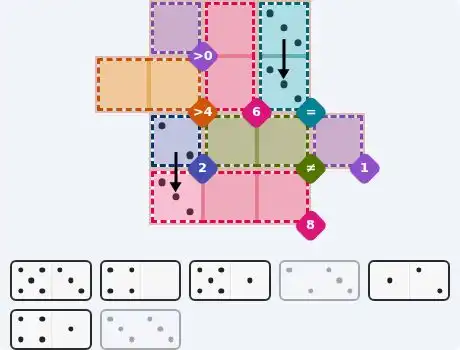
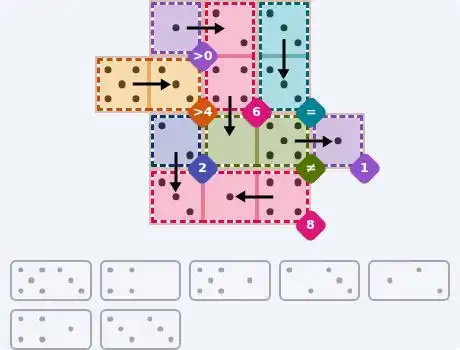
The 3/3 double stands vertically in the teal equals pair, 3 over 3. The purple sum-1 square on the right edge takes the 1 from the 5/1 tile, which lies flat with its 5 in the green unequal pair to the left. Down the left, the blue sum-2 square takes the 2 from the 2/3 tile, standing vertically — 2 up in the blue square, 3 down at the left end of the bottom pink sum-8 run. The purple greater-0 square at the top-left takes the 1 from the 1/2 tile, whose 2 slides right into the top of the pink sum-6 pair; that leaves 4 for the pair's lower cell, so the 4/0 stands vertically between them, 4 in the pink pair and 0 dropping into the left cell of the green unequal pair. Green now reads 0 and 5, comfortably unequal. The orange greater-4 pair in the top-left is the 5/3 lying flat, 5 left and 3 right, and the bottom pink run finishes with the 4/1 flat — 1 in the middle cell, 4 on the right, giving 3+1+4=8.
💡 Count before you place
Open with the most demanding constraint type here: a 'greater than' block, where the pips are shoved up against the ceiling and only one value can possibly work. Then look at the bottom-right corner, where three single-cell regions are packed together — sum, less-than and greater-than — and each has only one or two ways in.
💡 The greater-17 block
The pink greater-17 block in the top-left is three cells that must beat 17, and no pip goes above 6 — so it reads 6, 6, 6. The top corner cell of that column has exactly one neighbour, which means a double stands on end at the very top, and the third 6 has to come in sideways from the right-hand cell.
💡 Blue sum-16 follows
Underneath, the blue sum-16 block needs a 4 and two 6s, and its top cell is walled in on two sides once the pink and green cells around it are settled — so the 6/4 tile stands vertically with the 4 on top, which pins the tile below it too.
💡 Threes everywhere
The purple equals block in the middle reads 3 across all four cells. Its right-hand column can only be fed from inside the block, so the 3/3 double drops in there; the other two 3s arrive from the left, from the 5/3 (its 5 left in the uncoloured centre square) and the 2/3 (its 2 left in the teal less-3 cell). Down the left, the green unequal block becomes 5, 4, 0, with the 4/0 standing vertically in its right-hand column.
💡 Full hard solution
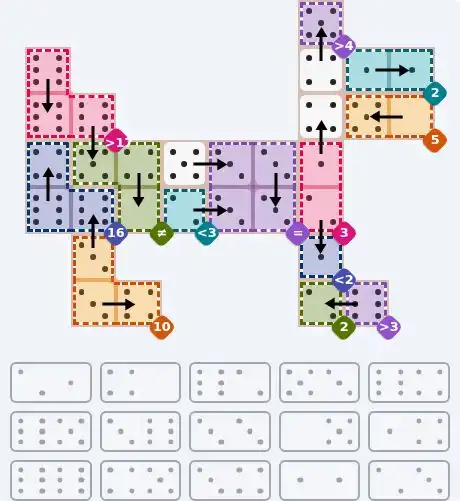
Pink greater-17 is 6/6/6: the 6/6 double stands vertically in the top-left corner (6 up, 6 down) and the 6/5 stands below it, 6 up in the block's right-hand cell and 5 down at the top-left of the green unequal block. Blue sum-16 resolves as 4+6+6 — the 6/4 stands with 4 up in its top cell and 6 down, then the 3/6 stands with 6 up in its right-hand cell and 3 down into the orange sum-10 block, whose remaining two cells take the 3/4 flat, 3 left and 4 right. The purple equals block is all 3s: the 3/3 double vertically in its right-hand column, the 5/3 flat into its top-left (5 in the uncoloured centre square), the 2/3 flat into its bottom-left (2 in the teal less-3 cell). Green unequal finishes 5, 4, 0 with the 4/0 vertical, 4 in its top-right cell and 0 in its bottom-right. The far-right column: the 4/5 stands with 5 up in the purple greater-4 square and 4 down in the uncoloured square beneath it; the 1/4 stands with 4 up in the next uncoloured square and 1 down at the top of the pink sum-3 pair; the 2/1 stands with 2 up in that pink pair and 1 down in the blue less-2 square. Bottom-right: the 6/2 lies flat, 2 left in the green sum-2 square and 6 right in the purple greater-3 square. Top-right corner: the 1/1 double lies flat in the teal sum-2 pair, and the 0/5 lies flat in the orange sum-5 pair with 5 left and 0 right.

🎨 Pips Solver

Nov 5, 2026

Click a domino to place it on the board. You can also click the board, and the correct domino will appear.
✅ Final Answer & Complete Solution For Hard Level

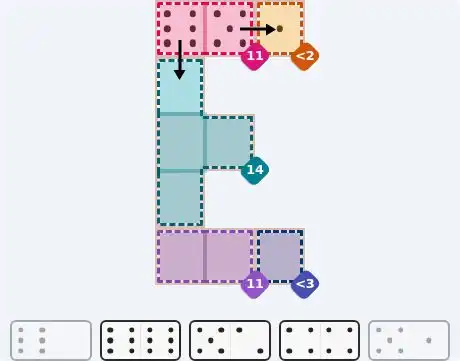
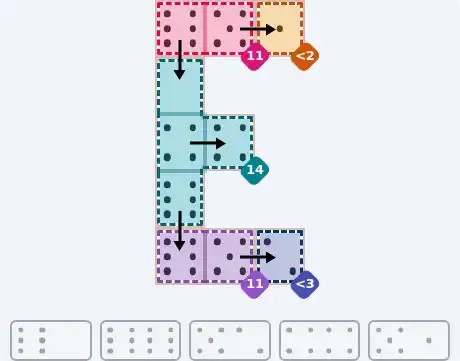
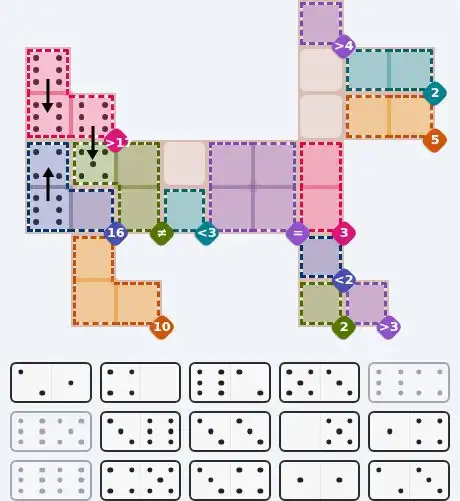
The key to solving today's hard puzzle was identifying the placement for the critical dominoes highlighted in the starting grid. Once those were in place, the rest of the puzzle could be solved logically. See the final grid below to compare your solution.

Starting Position & Key First Steps
Pips hint for November 5, 2026 – hard level puzzle grid with critical first placements and strategy

This image shows the initial puzzle grid for the hard level, with a few critical first placements highlighted.

Final Answer: The Solved Grid for Hard Mode
NYT Pips November 5, 2026 hard puzzle full solution grid showing final answer with hints

Compare this final grid with your own solution to see the correct placement of all dominoes.

🔧 Step-by-Step Answer Walkthrough For Easy Level

1
Step 1: Find the dead ends
Three cells on this grid touch exactly one neighbour, so each must be the far end of a flat domino: the orange less-2 square at the top-right pairs left into the pink pair, the blue less-3 square at the bottom-right pairs left into the purple pair, and the little nub on the right of the teal block pairs left inside its own block. You now know half of both sum-11 pairs and one teal cell.
2
Step 2: The top pair cannot be a double
The pink sum-11 pair can't use the 6/6 double — two sixes make 12, not 11 — so its 6 has to come from the 6/0 tile, standing vertically down the top-left corner with 6 in the pink pair and 0 dropping into the teal block. The pink pair's 5 must arrive on a tile whose other half fits under 2, and only the 5/1 works: 5 in pink, 1 in the orange square.
3
Step 3: The bottom pair mirrors it
The purple sum-11 pair also wants 6+5. The 6/0 is spent, so the 6 belongs to the 6/6 double, standing vertically with one 6 in the purple pair and the other 6 up inside the teal block. The 5 can no longer come from the 5/1, so the 5/2 tile lies flat with 5 in purple and 2 falling into the blue less-3 square.
4
Step 4: Teal closes itself
The teal sum-14 block now holds 0 at its top and 6 at its bottom — six of fourteen. The one tile left in the tray is the 4/4 double, and it lies flat across the block's two middle cells for 4+4, which is exactly the eight still owed. All ten cells are covered.

🔧 Step-by-Step Answer Walkthrough For Medium Level

1
Step 1: Equals in the corner
The teal equals pair in the top-right corner needs two identical pips, and the tray deals exactly one double. The 3/3 stands vertically: 3 in the upper cell, 3 in the lower.
2
Step 2: The lone sum-2 cell
The blue sum-2 square on the left is a single cell, so it reads 2. Send the 2/3 tile down through it — 2 in the blue square, 3 dropping to the left-hand end of the bottom pink sum-8 run. That 3 is already a third of the way to eight.
3
Step 3: Pink needs six
The pink sum-6 pair at the top wants two pips totalling six. The 1/2 tile lies flat across the top-left, 1 in the purple greater-0 square and 2 in the pink pair's upper cell; that leaves 4 for the lower cell, so the 4/0 tile stands vertically between them — 4 in the pink pair, 0 dropping into the left cell of the green unequal pair.
4
Step 4: The right edge
The purple sum-1 square on the right edge can only hold a 1, and it's a dead end with a single neighbour in the green unequal pair. The 5/1 tile lies flat: 5 in green, 1 in the purple square. Green now reads 0 and 5, which satisfies its inequality without any further thought.
5
Step 5: Orange and the bottom run
The orange greater-4 pair in the top-left is boxed in — its outer cell has no other neighbour — so a single tile must sit across it and total more than four: the 5/3 lies flat, 5 on the left, 3 on the right. The bottom pink run then owes five from its last two cells with 3 already at the left end; the final tile, the 4/1, lies flat with 1 in the middle and 4 on the right, completing 3+1+4=8.

🔧 Step-by-Step Answer Walkthrough For Hard Level

1
Step 1: Greater-17 means three sixes
Three cells have to beat 17, and the largest pip in the game is 6, so the only total that clears the bar is 18 — six, six, six. The corner cell at the top of that pink column touches exactly one other cell, the one directly below it, so the 6/6 double can only stand vertically there: 6 in the top cell, 6 in the middle cell.
2
Step 2: The third six drags a five
The block's right-hand cell still owes a 6, and its only free neighbour points down into the green unequal block. The 6/5 tile stands vertically: 6 up in the pink block, 5 dropping into the top-left cell of the green unequal block. Region satisfied at 18.
3
Step 3: Blue sum-16 resolves
The blue sum-16 block has to be 4+6+6. Its top cell is now walled in — the 6/6 sits above it and the green 5 to its right — so it can only pair downward, and the 6/4 tile stands vertically with 4 in that top cell and 6 in the bottom-left cell of the block. The remaining cell of the block needs the other 6, and its only free neighbour is in the orange sum-10 block below, so the 3/6 stands vertically: 6 up in blue, 3 down in orange.
4
Step 4: Bottom-left tidies up
Orange sum-10 already holds a 3, so its other two cells owe seven. The 3/4 tile lies flat along the bottom of the block — 3 on the left, 4 on the right — giving 3+3+4=10 and completing the whole left-hand side of the board.
5
Step 5: The equals block turns into threes
Four cells must share one pip. The block's right-hand column can only be fed from inside the block, so a double has to cover those two cells — that's the 3/3, standing vertically and fixing the block's value at 3. The other two cells take their 3s from tiles sliding in from the left: the 5/3 lies flat into the top-left corner (5 left in the uncoloured centre square), and the 2/3 lies flat into the bottom-left (2 left in the teal less-3 cell). Just below, the green unequal block's last two cells are the 4/0 standing vertically — 4 in the top-right cell, 0 in the bottom-right — so the block reads 5, 4, 0.
6
Step 6: The far-right column falls in
Column six is a chain of vertical dominoes. The 4/5 stands with 5 up in the purple greater-4 square and 4 down in the uncoloured square beneath it; the 1/4 stands with 4 up in the next uncoloured square and 1 down at the top of the pink sum-3 pair; the 2/1 stands with 2 up in that pink pair and 1 down in the blue less-2 square, so pink reads 1 over 2. At the very bottom the 6/2 lies flat, 2 left in the green sum-2 square and 6 right in the purple greater-3 square. The two little pairs finish it: the teal sum-2 is the 1/1 double lying flat, and the orange sum-5 is the 0/5 lying flat with 5 on the left and 0 on the right.

💡 Pro Tips for Similar Puzzles

Start with Constraints
Always begin with the most constrained regions - sum regions with small numbers or tight spaces.
Use Equal Regions
Use "equal" regions as anchors - they eliminate many possibilities quickly.
Work Systematically
Let the rules guide your placement rather than guessing randomly.
Double-Check
Verify each region's rules are satisfied before moving to the next.

🎓 Keep Learning & Improve