NYT Pips Hint, Answer & Solution for December 2, 2025

Dec 2, 2025

🚨 SPOILER WARNING

This page contains the final **answer** and the complete **solution** to today's NYT Pips puzzle. If you haven't attempted the puzzle yet and want to try solving it yourself first, now's your chance!

Click here to play today's official NYT Pips game first.

Want hints instead? Scroll down for progressive clues that won't spoil the fun.

🎲 Today's Puzzle Overview

Tuesday, December 2, 2025, brings a fresh trio of Pips NYT puzzles curated by editor Ian Livengood—a perfectly balanced lineup for solvers who enjoy sharing ideas, trading Pips Hints, and celebrating those delightful “a-ha!” moments together.

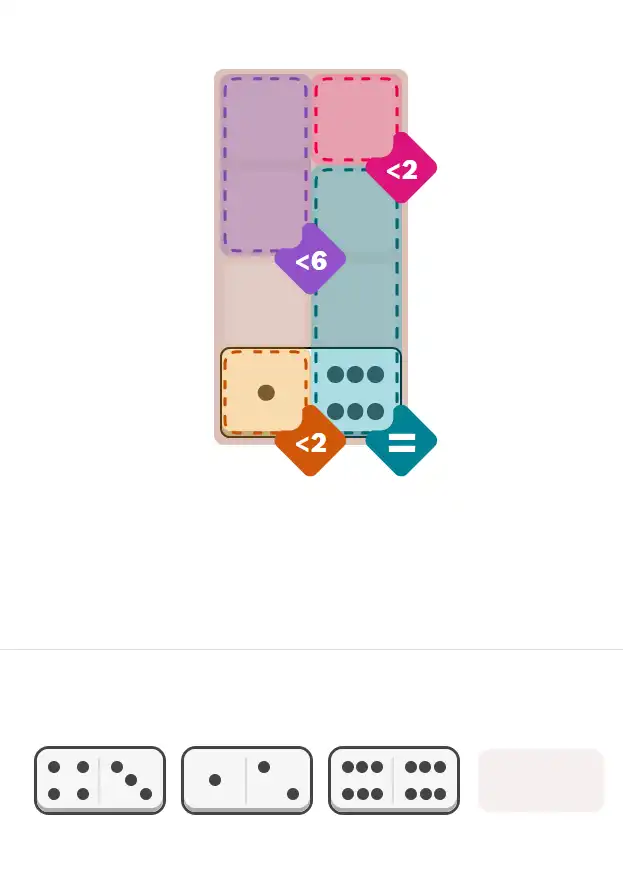
Easy #396, crafted by Livengood, opens the day with a warm and welcoming challenge.

This grid features two playful less-than clues that guide early deduction, a clean three-cell equals region that invites quick pattern spotting, and a lone empty cell that often becomes the spark for community conversations.

It’s the kind of easy-level puzzle where solvers naturally jump into the comments to compare opening moves, discuss pip-value possibilities, and share small insights that snowball into full solutions.

A perfect starter for building momentum—and for getting the chat humming.

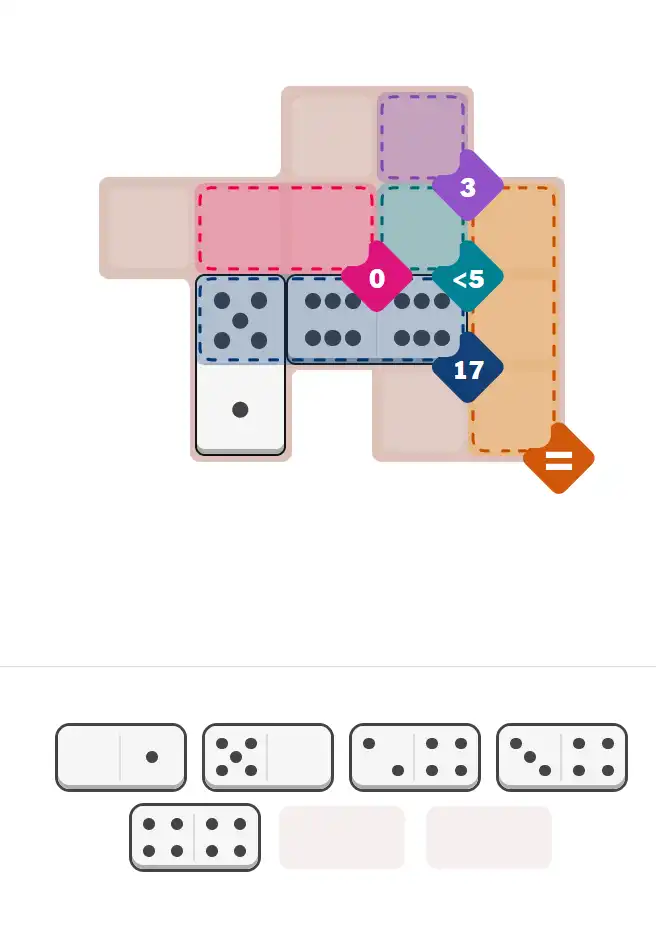
Medium #399, designed by Rodolfo Kurchan, adds even more fuel to the communal solving fire.

Four empty anchors create flexible openings, the bold 17-sum chain demands careful pip distribution, and the 0-sum pocket introduces a satisfying twist.

The less-than-5 clue often becomes the focus of early theories, making this puzzle a hotspot for shared breakdowns, mini-guides, and collaborative Pips Hint discussions.

Hard #404, also from Kurchan, delivers the final challenge of the day.

Here you’ll find layered equals formations, structured zero-sum groups, inequality checkpoints, and a demanding 12-sum tail that rewards meticulous deduction.

It’s the sort of puzzle where players naturally team up—posting partial grids, swapping logic paths, and celebrating each tiny breakthrough as a group victory.

Tag your puzzle buddy, drop your solve time, share your favorite Pips Hint, and enjoy the lively back-and-forth—December 2 is designed for community-powered solving at its best.

Written by Joe

Puzzle Analyst – Sophia

💡 Progressive Hints

Try these hints one at a time. Each hint becomes more specific to help you solve it yourself!

💡 Hint #1 - Observe
Dominoes Include: [6-6], [6-1], [4-3], [2-1]. The domino halves in Light Blue Equal region must be 6.
💡 Hint #1 - Observe
Dominoes Include: [6-6], [5-1], [5-0], [4-4], [4-3], [4-2], [1-0]. Only 2 domino halves that contain 0 pips for Red Number (0) region. Only one domino with 6 pips (6-6).
💡 Hint #2 - Blue Number (17)
The domino halves in this region must be 6+6+5.
💡 Hint #1 - Observe
Dominoes Include: [6-6], [6-2], [6-1], [5-3], [5-1], [4-3], [4-2], [4-0], [3-0], [2-2], [2-0], [1-0], [0-0]. Only 5 domino halves that contain 0 pips, Need four of them for Red Number (0) region. Only 5 domino halves that contain 2 pips for Green Equal region. The domino halves in Blue Number (12) region must be 6.
💡 Hint #2 - Blue Equal
The domino halves in this region must be 4.
💡 Hint #3 - Right Purple Equal
The domino halves in this region must be 1.

🎨 Pips Solver

Dec 2, 2025

Click a domino to place it on the board. You can also click the board, and the correct domino will appear.

Final Answer & Complete Solution For Hard Level

The key to solving today's hard puzzle was identifying the placement for the critical dominoes highlighted in the starting grid. Once those were in place, the rest of the puzzle could be solved logically. See the final grid below to compare your solution.

Starting Position & Key First Steps

Pips hint for December 2, 2025 – hard level puzzle grid with critical first placements and strategy

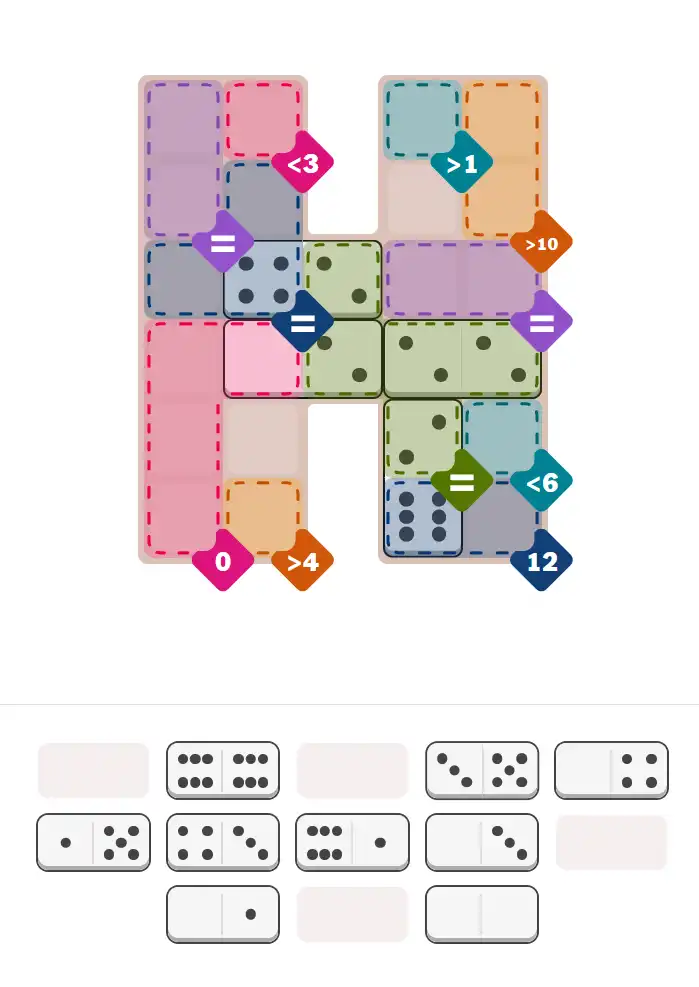
This image shows the initial puzzle grid for the hard level, with a few critical first placements highlighted.

Final Answer: The Solved Grid for Hard Mode

NYT Pips December 2, 2025 hard puzzle full solution grid showing final answer with hints

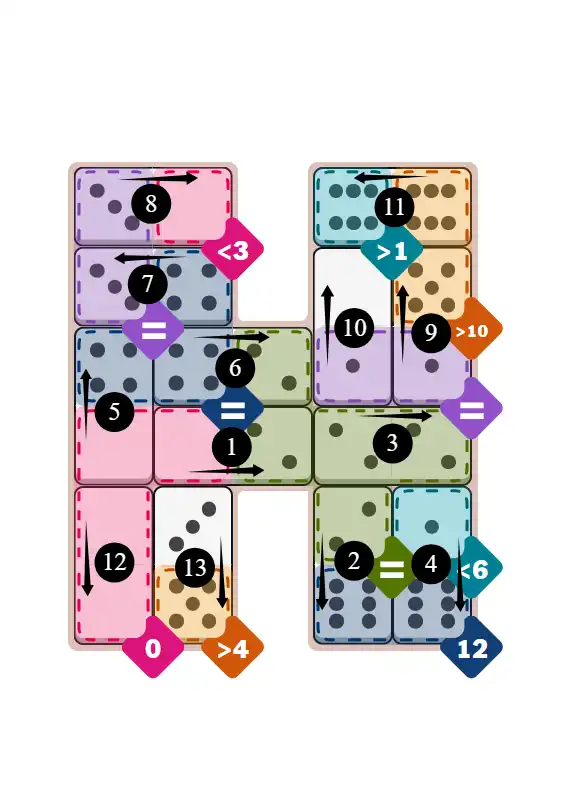
Compare this final grid with your own solution to see the correct placement of all dominoes.

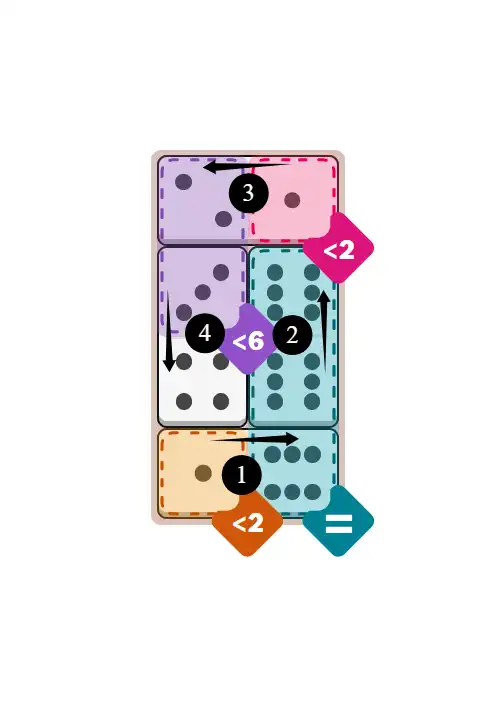
🔧 Step-by-Step Answer Walkthrough For Easy Level

1
Step 1: Inventory & Pips Analysis
Begin by analyzing the available domino inventory: [6-6], [6-1], [4-3], and [2-1]. Observing the grid's layout and unique 'Pips Hints' is crucial for determining the starting point of our logical deduction.
2
Step 2: Bottom Row & Teal Column Strategy
Follow Arrow #1. The Orange region features a strict '< 2' inequality constraint, which only the '1' pip can satisfy. Place the [1-6] domino horizontally here (1 in Orange). This forces a '6' into the Teal region. Guided by Arrow #2, the Teal region's '=' (Equal) hint implies uniformity, confirming the vertical placement of the [6-6] domino to match the existing 6.
3
Step 3: Top Row Placement (Pink Region)
Move to the top row (Arrow #3). The Pink region also requires a value '< 2'. Utilize the remaining '1' pip from the [2-1] domino, placing it horizontally. The '1' sits in the Pink zone, which logically forces the '2' pips into the adjacent upper Purple region.
4
Step 4: Purple Region Summation Verification
Place the final [4-3] domino vertically in the left column (Arrow #4). Crucial Logic: The Purple region has a specific '< 6' constraint. Since the region already holds a '2' from Step 3, you must orient the '3' pips into the Purple zone. Calculation: 2 (existing) + 3 (new) = 5. Since 5 is less than 6, the constraint is met. The '4' pips naturally fit into the neutral space below.

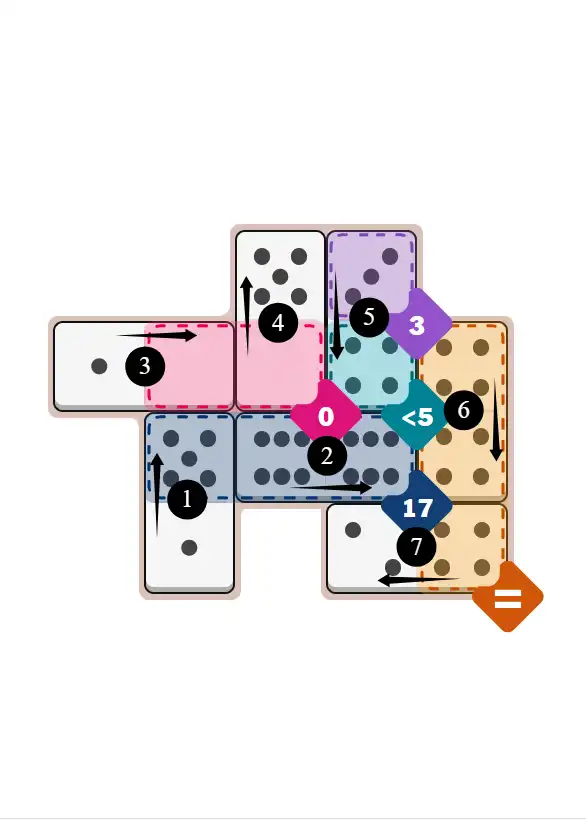
🔧 Step-by-Step Answer Walkthrough For Medium Level

1
Step 1: Strategic Inventory Assessment
Begin by cataloging the total domino inventory: [6-6], [5-1], [5-0], [4-4], [4-3], [4-2], and [1-0]. A critical observation is the scarcity of specific pips: there are only two '0' halves available (crucial for the Red '0' region) and only one '6-6' tile (vital for the high-sum Blue '17' region). This scarcity dictates the starting order.
2
Step 2: Blue Region Summation Logic (Arrows 1 & 2)
Target the Blue Region (Sum 17). The mathematical constraint is strict: across three cells, we need a sum of 17. The only combination from our inventory that reaches this high value is 6 + 6 + 5 = 17. 1. Follow Arrow #2: Place the [6-6] horizontally to provide the base twelve pips. 2. Follow Arrow #1: Place the [5-1] vertically, ensuring the '5' pips orient into the Blue zone to complete the sum (12+5=17), while the '1' sits in the outer blank space. **Remaining Dominoes:** [5-0], [4-4], [4-3], [4-2], [1-0].
3
Step 3: Red Region Zero Constraint (Arrows 3 & 4)
Move to the central Red Region, which demands a Sum of 0. This mandates that every half-domino inside the red boundary must be a blank (0). 1. Follow Arrow #3: Place the [1-0] horizontally, positioning the '0' rightward into the Red zone and the '1' leftward into the blank space. 2. Follow Arrow #4: Place the [5-0] vertically, positioning the '0' downward into the Red zone and the '5' upward into the blank space. **Remaining Dominoes:** [4-4], [4-3], [4-2].
4
Step 4: Purple & Teal Multi-Constraint (Arrow 5)
Analyze the vertical slot bridging the Purple and Teal regions. The constraints are specific: Top (Purple) must equal 3, and Bottom (Teal) must be < 5. Select the [4-3] domino. Follow Arrow #5 to place it vertically: orient the '3' pips into the Purple region (satisfying '3') and the '4' pips into the Teal region (satisfying '4 < 5'). **Remaining Dominoes:** [4-4], [4-2].
5
Step 5: Orange Equality Verification (Arrows 6 & 7)
Resolve the final Orange Region, which features the '=' (Equal) sign. This implies that all domino halves contributing to this region must share the same pip value. 1. Follow Arrow #6: Place the [4-4] vertically; both halves are '4', establishing the target value. 2. Follow Arrow #7: Place the final [4-2] domino horizontally. Crucially, orient the '4' into the Orange region to match the equality constraint, while positioning the '2' leftward into the remaining blank space. The puzzle is now logically solved. **Remaining Dominoes:** None.

🔧 Step-by-Step Answer Walkthrough For Hard Level

1
Step 1: Comprehensive Inventory - Anchoring with Scarce 0s and the Critical Double 2
Dominoes: 6-6, 6-2, 6-1, 5-3, 5-1, 4-3, 4-2, 4-0, 3-0, 2-2, 2-0, 1-0, 0-0. Critical observations: The Red Region (Sum 0) strictly demands four 0-pips. We have exactly five 0-halves available (from 4-0, 3-0, 2-0, 1-0, 0-0), giving us zero margin for error in the Red zone. Furthermore, the Green Equal (=2) region must be solved. Since the inventory lacks a [2-1] tile but contains [2-2], this double becomes the mandatory internal anchor for the Green region. Pips Hint: In logic puzzles, identifying 'Forced Doubles'—like [2-2] being the only tile capable of fitting strictly within a '2' region—provides the starting certainty needed to build outward.
2
Step 2: Green = 2 + Red 0 - The Central Anchor Cluster (Arrows ①②③)
Following the solution sequence (Arrows ①②③), the central Green Equal 2 region connects to Red 0 and Blue 12. Place 0-2 horizontally per Arrow ① (0 in Red 0, 2 in Green =2). Place 6-2 vertically per Arrow ② (2 in Green =2, 6 extends into Blue Sum 12). Place 2-2 horizontally per Arrow ③ (both 2s inside Green =2). Green is now locked at 2. Red 0 receives its first zero. Blue 12 receives a base of 6. This sequence consumes the critical [2-2] double immediately. Pips Hint: when an 'Equal' region requires a specific value like 2, and you possess the double of that value, placing it internally is the safest anchor as it confirms the region without relying on undefined neighbors.
3
Step 3: Blue Sum 12 + Light Blue <6 - Completing the Count (Arrow ④)
Following Arrow ④, the Blue Sum 12 region needs completion. From Step 2, it holds a 6. Target is 12. Calculation: 12-6=6. We need a domino with a 6. Place 1-6 vertically per Arrow ④ (6 in Blue Sum 12, 1 extends into Light Blue <6). Blue 12: 6+6=12 ✓. Light Blue <6: 1<6 ✓. This move effectively closes the Blue Sum 12 region using high-value pips. Pips Hint: High sums in limited space force the use of maximum pips; always calculate the 'Remaining Difference' (12-6=6) to verify which specific tile is forced into play.
4
Step 4: Blue Equal 4 - The Horizontal Bridge (Arrows ⑤⑥)
Following Arrows ⑤⑥, we bridge from Green to Blue. Arrow ⑥ is the critical horizontal connector. Place 4-2 horizontally per Arrow ⑥ (2 in Green =2, 4 in Blue =4). This forces the entire Blue region to 4. Place 4-0 vertically per Arrow ⑤ (4 in Blue =4, 0 in Red 0). Blue Equal 4 is established. Red 0 accumulates another necessary 0. Pips Hint: Horizontal placements between 'Equal' regions are strategic bridges; solving one side (Green=2) immediately dictates the necessary half for the other side (Blue=4).
5
Step 5: Left Purple 3 + Pink <3 - The Inequality Chain (Arrows ⑦⑧)
Following Arrows ⑦⑧, we expand to the top left. Place 4-3 horizontally per Arrow ⑦ (4 in Blue =4, 3 in Left Purple =3). Left Purple is set to 3. Place 3-0 horizontally per Arrow ⑧ (3 in Left Purple =3, 0 in Pink <3). Inequality check: 0<3 ✓. This sequence relies on the Blue region to define the Purple region. Pips Hint: For strict inequalities like <3, prioritizing the '0' pip is the most robust strategy to ensure the condition is met regardless of neighbors.
6
Step 6: Right Purple 1 + Yellow >10 - The High Sum Strategy (Arrows ⑨⑩⑪)
Following Arrows ⑨⑩⑪, we address the Right Purple =1 and Yellow >10 regions. Place 1-5 vertically per Arrow ⑨ (1 in Purple =1, 5 in Yellow). Place 1-0 vertically per Arrow ⑩ (1 in Purple =1, 0 in Blank). Now Yellow needs a high sum. Place 6-6 horizontally per Arrow ⑪ (one 6 in Teal >1, one 6 in Yellow). Yellow Sum: 5 (from Arrow ⑨) + 6 (from Arrow ⑪) = 11, which is >10 ✓. Teal: 6>1 ✓. Pips Hint: Reserve the 'Power Tile' [6-6] for 'Greater Than' regions; here it simultaneously satisfies Teal >1 and boosts Yellow to 11.
7
Step 7: Red 0 + Yellow >4 - Final Verification (Arrows ⑫⑬)
Following Arrows ⑫⑬, we place the final two tiles. Place 0-0 vertically per Arrow ⑫ (in Red 0). Red 0: 0+0+0+0=0 ✓. Place 5-3 vertically per Arrow ⑬ (5 in Yellow >4, 3 in Blank). Yellow >4: 5>4 ✓. Puzzle complete—Step 1's scarcity analysis proved accurate, with Red 0 consuming the exact 0s needed and the [2-2] anchor facilitating the entire flow. Pips Hint: The [0-0] is uniquely suited for 'Sum 0' regions; saving it for the final slot ensures no mathematical conflicts occur earlier.

🎥 Hidden Domino Trick — Unlock Today’s Pips NYT Logic! | December 2, 2025

Watch as one domino placement clears up a tricky constraint and reshapes the entire board logic.

💡 Pro Tips for Similar Puzzles

Start with Constraints
Always begin with the most constrained regions - sum regions with small numbers or tight spaces.
Use Equal Regions
Use "equal" regions as anchors - they eliminate many possibilities quickly.
Work Systematically
Let the rules guide your placement rather than guessing randomly.
Double-Check
Verify each region's rules are satisfied before moving to the next.

🎓 Keep Learning & Improve