NYT Pips Hints & Answers for November 22, 2026

Nov 22, 2026

🚨 SPOILER WARNING

This page contains the final answer and the complete solution to today's NYT Pips puzzle. If you haven't attempted the puzzle yet and want to try solving it yourself first, now's your chance!

Click here to play today's official NYT Pips game first.

Want hints instead? Scroll down for progressive clues that won't spoil the fun.

SEE ALSO:

🎲 Today's Puzzle Overview

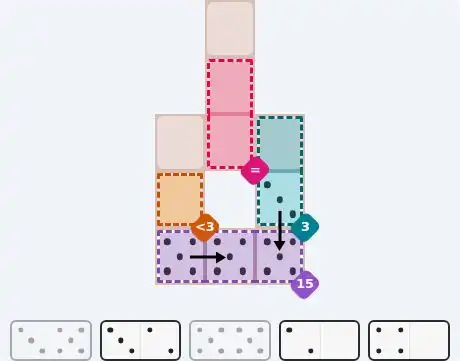
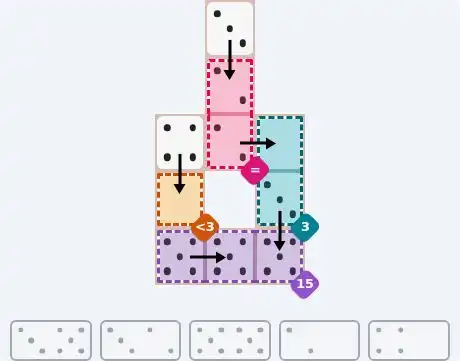
Ian Livengood builds the easy around one generous anchor: a three-cell sum along the bottom whose target is high enough that every cell in it must carry the same pip — and a tray that happens to hold exactly three of that pip and nothing to spare. It is a lovely piece of editing. Nothing has to be guessed, the opening move is almost an act of recognition, and the rest of the board then falls in one direction: the vertical tile at the right-hand end of that run spills a low pip into the teal pair, the teal pair hands a zero sideways into the pink equals pair, that pair copies a two upward, and one leftover tile walks into the last free corner.

The medium is Livengood working at a finer grain. He opens with a corner clue so tight that only one pip on one tile in the whole tray can satisfy it, then lets that single placement cascade across three rows: the partner pip completes a bottom sum, that region's shortfall names the next tile outright, and the tray's lone double quietly locks the top-left equals pair before you have touched the top-right at all. The design intent is visible — every region is a small room with exactly one door, and the doors line up.

Rodolfo Kurchan's hard is really an inventory puzzle wearing a colouring book's clothes. Two oversized equals regions — a four-tall column hugging the right edge and a 2×2 square in the bottom-left — each demand one repeated pip, and neither can be settled until you count how many copies of each pip the tray actually contains. Add three scattered single cells that all resolve at once, plus a handful of sum and less-than singletons doing the same, and the grid dismantles itself from the corners inward with a logic that feels almost mechanical.

💡 Progressive Hints

Try these hints one at a time. Each hint becomes more specific to help you solve it yourself!

💡 Start with the biggest sum
Skip the temptingly simple single cells and go straight to the long sum running along the bottom of the board. Its target is so tall for three cells that every one of them has to carry the same pip — that strip is the spine of the whole solve.
💡 Only two tiles can feed it
The purple sum-15 run needs three matching high pips, and the tray supplies them from just two tiles: the 5/5 double and the 5 half of the 3/5. The double must lie flat across two of the three cells, and the 3/5 can only stand upright at the right-hand end — the cell above the left end is the orange less-3 square, which will not take a 3.
💡 Full solution for the easy board
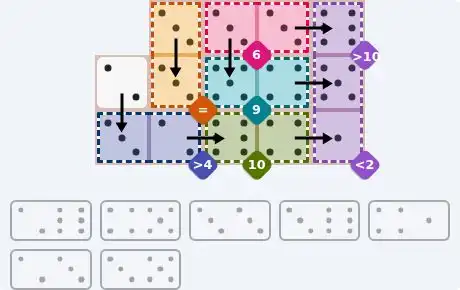
The 5/5 lies flat along the bottom: 5 in the left cell of the purple sum-15 run, 5 in the middle cell. The 3/5 stands vertically at the right-hand end: 3 in the upper half, landing in the lower cell of the teal sum-3 pair, and 5 in the lower half inside the purple run. That leaves teal needing 0 in its upper cell, supplied by the 2/0 lying flat — 0 in teal's upper cell, 2 in the lower cell of the pink equals pair. The equals pair forces its upper cell to 2 as well, and the 3/2 stands vertically to deliver it: 2 in the lower half in the pink pair, 3 in the upper half in the free square at the top of the board. The remaining 4/0 stands vertically with 4 in the upper half in the free square on the left edge and 0 in the lower half in the orange less-3 cell at the bottom-left.
💡 Begin with the smallest target
The quickest way in is the tightest single-cell 'less than' clue on the board — one lonely cell near a corner whose ceiling knocks out almost every domino in the tray before you have placed anything at all.
💡 The corner with no choice
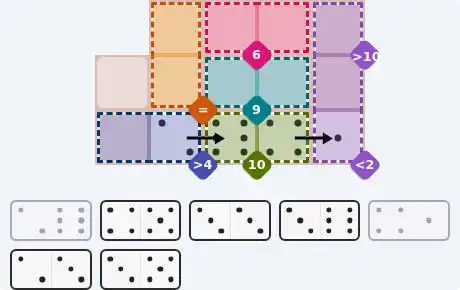
The purple less-2 cell tucked into the bottom-right corner can only take a 0 or a 1, and this tray contains no 0 at all — just the single 1 on the 4/1 tile. That tile has to lie flat along the bottom row, which pours a 4 into the neighbouring cell of the green sum-10 pair and leaves that region needing one specific high pip.
💡 Full solution for the medium board
The 4/1 lies flat: 1 in the purple less-2 corner at the bottom-right, 4 in the right cell of the green sum-10 pair. Green now needs 6, and the 2/6 supplies it — laid flat, 6 in green's left cell and 2 in the right cell of the blue greater-4 pair. The orange equals pair at the top-left must be a double, and the 3/3 is the tray's only one, so two 3s stack there. Blue greater 4 then reads 3 + 2 = 5, so the 2/3 stands vertically down the left edge: 2 in the upper half in the uncoloured free square, 3 in the lower half in blue's left cell. The purple greater-10 pair at the top-right needs more than 10, which takes a 5 and a 6: the 3/6 lies flat with 6 in the upper purple cell and 3 in the right cell of the pink sum-6 pair, while the 4/5 lies flat with 5 in the lower purple cell and 4 in the right cell of the teal sum-9 pair. Teal then needs 5 in its left cell, delivered by the 3/5 standing vertically — 5 in the lower half in teal, 3 in the upper half in pink's left cell, completing pink at 3 + 3.
💡 Hunt the stingiest targets
Ignore the big coloured blocks for a moment and scan for the smallest sum clues in the grid: three separate single cells whose target is as low as a target can go. Those three resolve instantly, and more importantly they decide which dominoes are still available for everything else.
💡 Three zeros, three tiles
The three nothing-cells are the pink sum-0 at the top-left, the teal sum-0 right beside it in the same top-left cluster, and the teal sum-0 sitting in the centre of the board. Each must hold a 0, and the tray carries exactly three tiles with a 0 on them: the 5/0, the 0/3 and the 6/0. Each is nailed to one of these cells and drags a 5, a 3 or a 6 into whatever sits next to it.
💡 Audit the two equals regions
The purple equals column running down the right edge and the green equals 2×2 square in the bottom-left both need four copies of one repeated pip. Fives, sixes and zeros come in threes or fewer in this tray; ones and threes fall short once the blue sum-1, orange sum-1, teal sum-3 and green sum-3 singletons claim theirs. That leaves 2s and 4s to divide between the two — and the six 4s, exactly enough for the bottom-left square plus the two sum-4 singles on the top row, settle the split: the square is fours, the column is twos.
💡 Build the square of fours
The 4/4 double stands vertically in the block's left column. The 6/4 lies flat along the block's top-right, its 4 settling inside the square while its 6 slides sideways into the purple sum-6 cell immediately to the right. The 4/1 lies flat along the block's bottom-right, 4 inside the square and 1 pushing out rightwards into the orange sum-1 cell.
💡 Full solution for the hard board
Top-left: the 5/0 lies flat on the second row, 0 in the pink sum-0 and 5 in the lower cell of the pink sum-8 pair; the 3/3 lies flat above it, 3 in the purple less-4 corner on the left and 3 in the pink sum-8's upper cell. The 6/0 lies flat further along the second row, 0 in the teal sum-0 and 6 in the orange greater-4 cell. Bottom-left square: 4/4 vertical (4 top-left, 4 bottom-left of the green equals block), 6/4 flat (4 at the block's top-right, 6 in the purple sum-6 cell), 4/1 flat (4 at the block's bottom-right, 1 in the orange sum-1 cell). Top row: 4/3 flat, 4 in the orange sum-4 and 3 in the teal sum-3; 4/2 flat, 4 in the blue sum-4 and 2 at the top of the green less-5 column. Right side: 1/1 flat, 1 in the blue sum-1 and 1 in the middle of the green less-5 column; 1/2 flat beneath it, 1 at the foot of that column and 2 at the bottom of the purple equals column; 2/2 vertical at the top of the equals column, two 2s; 3/2 flat along the bottom, 3 in the green sum-3 and 2 completing the equals column at four 2s. Finally 0/3 lies flat on the row above the bottom, 3 in the upper cell of the pink sum-9 pair and 0 in the central teal sum-0; 5/6 lies flat along the bottom row, 6 in the lower cell of the pink sum-9 pair and 5 in the blue sum-5 cell.

🎨 Pips Solver

Nov 22, 2026

Click a domino to place it on the board. You can also click the board, and the correct domino will appear.

✅ Final Answer & Complete Solution For Hard Level

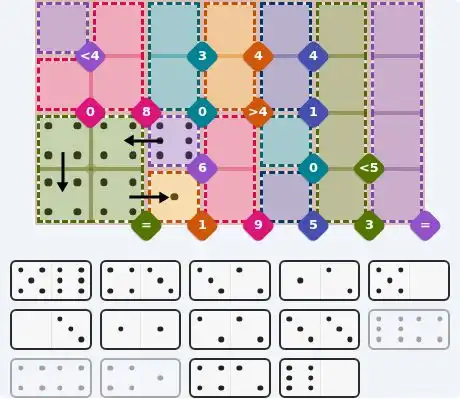
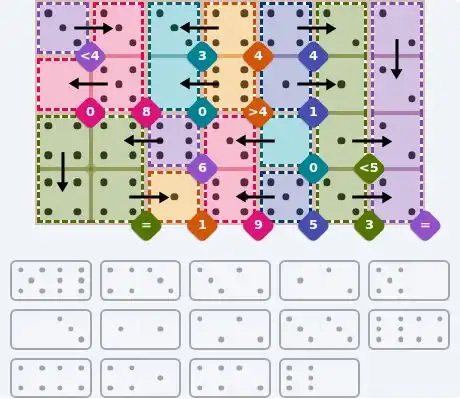
The key to solving today's hard puzzle was identifying the placement for the critical dominoes highlighted in the starting grid. Once those were in place, the rest of the puzzle could be solved logically. See the final grid below to compare your solution.

Starting Position & Key First Steps

Pips hint for November 22, 2026 – hard level puzzle grid with critical first placements and strategy

This image shows the initial puzzle grid for the hard level, with a few critical first placements highlighted.

Final Answer: The Solved Grid for Hard Mode

NYT Pips November 22, 2026 hard puzzle full solution grid showing final answer with hints

Compare this final grid with your own solution to see the correct placement of all dominoes.

🔧 Step-by-Step Answer Walkthrough For Easy Level

1
Step 1: The bottom run gives itself away
The highest pip anywhere in this tray is a 5, and the purple sum-15 run along the bottom has three cells to fill. With nothing bigger than a 5 available, three cells can only reach 15 one way: 5, 5 and 5. The target is effectively a triple-equals clue in disguise.
2
Step 2: One double, one upright
Only the 5/5 and the 3/5 carry a 5, so between them they must supply all three. The 5/5 lies flat over the left and middle cells of the run. The 3/5 cannot lie flat — it has only one 5 — so it stands vertically at the right-hand end, 3 in the upper half landing in the lower cell of the teal sum-3 pair and 5 in the lower half inside the purple run. It cannot stand at the left-hand end because the cell above that one is the orange less-3 square, which refuses a 3.
3
Step 3: Teal hands over a zero, pink copies a two
The teal pair now has a 3 in its lower cell and a target of 3, so its upper cell is 0. Only the 2/0 carries a 0, so it lies flat: 0 in the upper half in teal, 2 in the lower half in the lower cell of the pink equals pair. Equality then fixes the pink pair's upper cell at 2, and the 3/2 stands vertically to deliver it — 2 in the lower half in the pink pair, 3 in the upper half in the free square at the top of the board.
4
Step 4: The leftover tile takes the corners
One tile remains, the 4/0, with two cells open: the uncoloured square on the left edge and the orange less-3 cell at the bottom-left. It stands vertically, 4 in the upper half in the free square and 0 in the lower half in the orange cell — the only arrangement that keeps that last cell below 3, and the whole board is now accounted for.

🔧 Step-by-Step Answer Walkthrough For Medium Level

1
Step 1: The bottom-right corner has one answer
The single purple cell marked less than 2 can only hold a 0 or a 1. Scan the tray: there is no 0 anywhere in it, and the only 1 sits on the 4/1 tile. So that tile lies flat along the bottom row, 1 in the right half in the purple corner, 4 in the left half in the right cell of the green sum-10 pair.
2
Step 2: Green's shortfall names a tile
Green needs 10 and already has a 4, so its left cell must be 6. The 2/6 is the tile that fits here: laid flat, its 6 goes into green's left cell and its 2 pushes left into the right-hand cell of the blue greater-4 pair, which is precisely the small pip blue wants.
3
Step 3: The equals pair takes the only double
The orange equals region at the top-left is a vertical pair, so both of its cells must match, and the only double in the tray is the 3/3. It stands upright with two 3s stacked, and one whole tile disappears from the tray in a single move.
4
Step 4: Blue resolves the left edge
Blue's right cell is 2 and its total must exceed 4, so its left cell needs at least a 3. The 2/3 stands vertically down the left edge — 2 in the upper half in the uncoloured free square, 3 in the lower half in blue's left cell — giving 3 + 2 = 5 and clearing the bar.
5
Step 5: The top-right pair decides the rest
Purple's vertical pair must total more than 10, and with no 6/6 in the tray that means a 5 and a 6. The 3/6 lies flat with 6 in the upper purple cell and 3 in the right cell of the pink sum-6 pair; the 4/5 lies flat with 5 in the lower purple cell and 4 in the right cell of the teal sum-9 pair. Teal now needs 5 in its left cell, which the 3/5 supplies standing vertically — 5 in the lower half in teal, 3 in the upper half in pink's left cell, so pink closes at 3 + 3.

🔧 Step-by-Step Answer Walkthrough For Hard Level

1
Step 1: Three cells that want nothing
The pink sum-0 at the top-left, the teal sum-0 beside it and the teal sum-0 in the centre all resolve immediately to 0. The tray holds exactly three tiles with a 0 on them — the 5/0, the 0/3 and the 6/0 — so all three are committed here, each one carrying a 5, a 3 or a 6 into an adjacent cell. Meanwhile the singleton sums fix their own cells outright: the teal sum-3 takes a 3, the orange and blue sum-4 singles take 4s, the blue sum-1 and orange sum-1 take 1s, the purple sum-6 takes a 6, the blue sum-5 takes a 5 and the green sum-3 takes a 3.
2
Step 2: Counting picks the two equals values
The purple equals column down the right edge and the green equals 2×2 square in the bottom-left each need four copies of one pip. Count the tray: 5s appear twice, 6s and 0s three times — not enough. 1s appear four times but two of them are already pinned to the sum-1 cells; 3s appear five times but two are pinned to the sum-3 cells. So the two sinks must split the 2s and the 4s between them, and the 4s decide it: there are exactly six, which is precisely the bottom-left square plus the two sum-4 singles on the top row. The square is fours; the right-edge column is fours' leftover — four 2s.
3
Step 3: The square of fours and its two hand-offs
The 4/4 double stands vertically in the block's left column, filling both left-hand cells. The 6/4 lies flat along the block's top-right: 4 inside the square, 6 sliding sideways into the purple sum-6 cell, which is satisfied on the spot. The 4/1 lies flat along the block's bottom-right: 4 inside the square, 1 pushing out to the right into the orange sum-1 cell. Four 4s placed, and two singleton clues cleared as a side effect.
4
Step 4: The top row pays its own 4s
The 4/3 lies flat across the top row, 4 in the right half in the orange sum-4 cell and 3 in the left half in the teal sum-3 cell. The 4/2 lies flat beside it, 4 in the left half in the blue sum-4 cell and 2 in the right half at the top of the green less-5 column — a legal entry, since 2 is below 5. The 4/1 is already in the square, so every 4 in the tray is now used and no other region may contain one.
5
Step 5: The ones walk down the right-hand side
Two 1s remain once the orange sum-1 is filled. The 1/1 lies flat on the second row, 1 in the left half in the blue sum-1 cell and 1 in the right half in the middle cell of the green less-5 column. The 1/2 lies flat below it, 1 in the left half at the foot of that column and 2 in the right half at the bottom of the purple equals column. The 2/2 stands vertically at the top of that column for two more 2s, and the 3/2 lies flat along the bottom row, 3 in the left half in the green sum-3 cell and 2 in the right half — completing the equals column at four 2s.
6
Step 6: The last five tiles close the board
The 5/0 lies flat on the second row, 0 in the left half in the pink sum-0 and 5 in the right half in the lower cell of the pink sum-8 pair; that forces the pair's upper cell to 3, and the 3/3 lies flat directly above with 3 in the purple less-4 corner and 3 in the pink pair. The 6/0 lies flat further along the second row, 0 in the left half in the teal sum-0 and 6 in the right half in the orange greater-4 cell. The blue sum-5 still needs a 5, and the 5/0's 5 is long gone, so the 5/6 lies flat along the bottom row: 6 in the left half in the lower cell of the pink sum-9 pair, 5 in the right half in the blue sum-5 cell. Pink's nine now wants a 3 above, and the 0/3 lies flat on the row above with 3 in the upper cell of that pair and 0 in the central teal sum-0 — the last pip on the board.
💡 Pro Tips for Similar Puzzles

Start with Constraints
Always begin with the most constrained regions - sum regions with small numbers or tight spaces.
Use Equal Regions
Use "equal" regions as anchors - they eliminate many possibilities quickly.
Work Systematically
Let the rules guide your placement rather than guessing randomly.
Double-Check
Verify each region's rules are satisfied before moving to the next.

🎓 Keep Learning & Improve