NYT Pips Hints & Answers for November 19, 2026

Nov 19, 2026

🚨 SPOILER WARNING

This page contains the final answer and the complete solution to today's NYT Pips puzzle. If you haven't attempted the puzzle yet and want to try solving it yourself first, now's your chance!

Click here to play today's official NYT Pips game first.

Want hints instead? Scroll down for progressive clues that won't spoil the fun.

SEE ALSO:

🎲 Today's Puzzle Overview

Easy is a confidence-builder rather than a puzzle. Ian Livengood has built it from just five tiles and six regions, and almost everything you need is visible in the first thirty seconds: a one-cell sum that names its own pip, a one-cell greater-than that only the biggest pip on the tray clears, and two equals pairs that simply double whatever lands beside them. There is no fork and no guesswork — the only real decision is which of the two sum 11 pairs you read first. Expect a two-minute solve and a clean chain running from the top-right corner round to the bottom-left.

Medium is a genuine step up in bookkeeping. Rodolfo Kurchan packs fourteen cells into nine regions, four of which are lone squares — three greater-than and one less-than — and those little squares do most of the pointing. The bottleneck is the purple equals block in the bottom-right corner: three cells sharing one pip, which the tray can only supply by spending a double plus a half from a neighbouring tile. Nail that and the bottom-left sum 7 column and greater 7 pair follow almost immediately; chase the singles in the wrong order and you will be double-checking for a while.

Hard is the one that will slow you down. Kurchan's board is tall and gappy — twenty-four cells across eleven regions, several of which touch only one neighbour, turning them into free single-tile regions. The strain point is the purple greater 14 column down the centre: three cells have to clear fourteen between them, and the tray only just carries enough high pips to give the column that headroom. The blue sum 12 block at the bottom and the orange sum 5 L at the top-left are your twin anchors; work those first and the middle usually unzips. Budget ten minutes and expect one backtrack.

💡 Progressive Hints

Try these hints one at a time. Each hint becomes more specific to help you solve it yourself!

💡 Singles before pairs
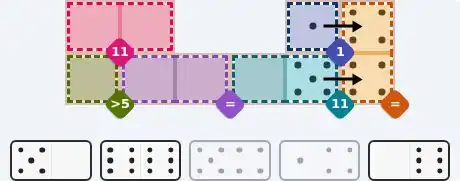
Every region in today's NYT Pips easy is either a pair or a lone square, and the lone squares are the way in. A single-cell sum region names its own pip outright; a single-cell greater-than region throws out most of the tray in one glance. Find both of them before you think about the pairs at all.
💡 The corner that pays double
Look at the green greater 5 square in the bottom-left corner, tucked directly under the pink sum 11 pair. Only the highest pip in the game clears that floor, so the tile sitting there is a double — and its other half lands in the pink pair immediately above. That hands you half of the pink region before you have placed anything else.
💡 The full easy layout
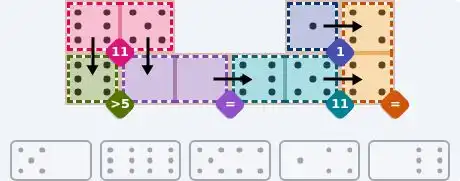
The 1/4 tile lies flat along the top edge: 1 in the blue sum 1 square at the top-right, 4 in the upper cell of the orange equals column. That column needs a matching 4 beneath, so the 5/4 tile lies flat across the bottom-right — 4 on the right in the orange column, 5 on the left in the teal sum 11 pair. Teal then needs 6 to reach 11, supplied by the 0/6 tile lying flat along the bottom row: 6 on the right in the teal pair, 0 on the left in the right-hand cell of the purple equals pair. Purple must match itself, so its other cell is 0 too — the 5/0 tile stands vertically one column to the left, 0 low in the purple pair and 5 up in the pink sum 11 pair. Pink now needs 6, so the 6/6 double stands vertically in the top-left corner: 6 up in the pink pair, 6 down in the green greater 5 square.
💡 Read the lone squares first
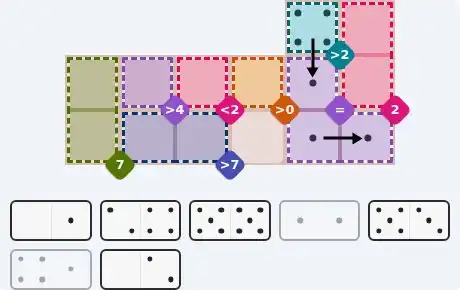
Today's NYT Pips medium scatters five single-cell regions across the middle rows — three greater-than squares, one less-than square and one free uncoloured square with no rule at all. Read those before anything else: each of them quietly removes a slice of the tray, and the less-than square in particular is brutal about which pips it will accept.
💡 Three cells, one pip
The purple equals block in the bottom-right corner is the bottleneck: three cells that all have to carry the same pip, and the tray only offers two values with three or more halves to spare. The higher option is needed elsewhere in the bottom-left, so the trio runs on the small pip — two halves from a double, plus one donated by the tile that crosses the block's border. That crossing tile is the one filling the teal greater 2 square directly above the trio's top cell.
💡 The full medium layout
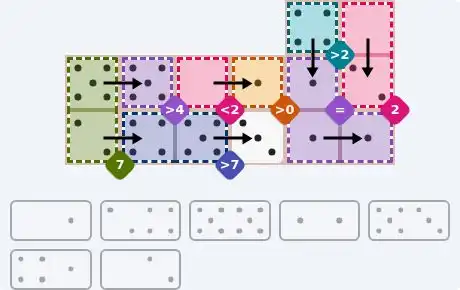
The 4/1 tile stands vertically on the right: 4 up in the teal greater 2 square, 1 down in the top cell of the purple equals trio. The trio takes three matching 1s, so the 1/1 double lies flat across the bottom-right — 1 in the bottom-centre cell, 1 in the bottom-right corner. The pink sum 2 column at the top-right can only be the 0/2 tile standing vertically, 0 above and 2 below. In the bottom-left, the green sum 7 column and the blue greater 7 pair lock together through the 5/5 double lying flat: 5 in the top of the green column, 5 in the purple greater 4 square. Green needs 2 underneath, supplied by the 2/4 tile lying flat — 2 in the lower green cell, 4 in the left cell of the blue pair. Blue must beat 7, so the leftover 5/3 lies flat with 5 in blue's right cell and 3 on the uncoloured square. Last, the two centre cells pair with each other: the 0/1 tile lies flat, 0 in the pink less 2 square and 1 in the orange greater 0 square.
💡 Closed sums come first
Today's NYT Pips hard mixes two families of rule: closed sums that name a total, and open-ended greater-than regions that only set a floor. Ignore the floors to begin with. The sum 6 pair in the top-left corner, the sum 5 block just below it and the sum 4 pair in the top-right corner are where your first three tiles go.
💡 Two left-hand anchors
The purple sum 6 pair in the top-left corner is a two-cell region, and exactly one tile in the whole tray adds up to six. Meanwhile the green sum 2 square further down the left edge is a one-cell sum, so its value is fixed on sight and its tile has to reach up into the orange block above it. Those two anchors crack the entire left side of the board.
💡 The right-hand spine
The blue equals pair on the right edge must be a double, and its lower cell has only one neighbour on the board, so the pair is a single tile. Two of the tray's three doubles are already spent on the sum 6 pair and on the green/orange seam, which leaves the 4/4. Directly above it, the teal sum 4 pair is also a single tile, and with the 2/2 gone the only tile adding to four is the 3/1.
💡 Two long columns
The purple greater 14 column down the centre and the teal greater 3 column on the bottom-right each need two tiles, because the top cell of each touches only the cell below. The centre column's top two cells take the 5/6 tile — nothing smaller gives the column enough headroom — and the third cell then takes a 5 from the 5/2 tile, whose other half drops into the blue sum 12 block. On the right, the pink sum 4 square is a lone cell worth 4, and the 4/1 spends its other half as the first 1 of the teal column.
💡 The full hard layout
The 3/3 double stands vertically in the top-left corner — 3 in the upper cell of the purple sum 6 pair, 3 in the lower. Below it the 0/3 tile lies flat as the top row of the orange sum 5 block: 3 in the left cell, 0 in the right cell. That leaves 2 for the block's bottom cell, which is the 2/2 double — 2 in the orange block, 2 below it in the green sum 2 square. On the right edge the 4/4 double fills the blue equals pair; above it the 3/1 tile stands in the teal sum 4 pair, 1 upper and 3 lower. Down the centre the 5/6 tile takes the top two cells of the purple greater 14 column, 5 above and 6 below, and the 5/2 tile stands under it — 5 in the column's bottom cell, 2 down in the top-right cell of the blue sum 12 block. The pink sum 4 square on the right holds a lone 4 from the 4/1 tile, whose 1 sits directly beneath as the top cell of the teal greater 3 column; the 1/6 tile finishes that column, 1 in the middle and 6 at the foot. At the bottom-left the 1/2 tile stands with 1 in the orange greater 0 square and 2 in the block's bottom-left cell, while the 2/6 lies flat, 2 in the bottom-centre cell and 6 in the bottom-right — 2 + 2 + 2 + 6 making exactly 12. The last tile, 0/1, lies flat across the pink unequal pair at the top, 1 on the left and 0 on the right.

🎨 Pips Solver

Nov 19, 2026

Click a domino to place it on the board. You can also click the board, and the correct domino will appear.
✅ Final Answer & Complete Solution For Hard Level

The key to solving today's hard puzzle was identifying the placement for the critical dominoes highlighted in the starting grid. Once those were in place, the rest of the puzzle could be solved logically. See the final grid below to compare your solution.

Starting Position & Key First Steps
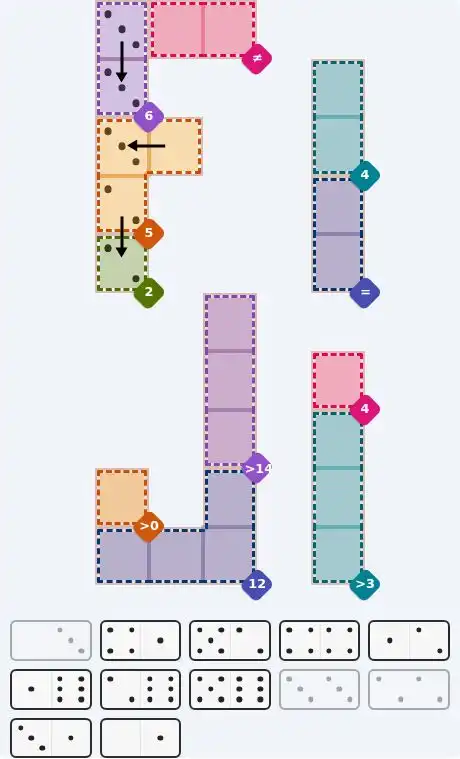
Pips hint for November 19, 2026 – hard level puzzle grid with critical first placements and strategy

This image shows the initial puzzle grid for the hard level, with a few critical first placements highlighted.

Final Answer: The Solved Grid for Hard Mode
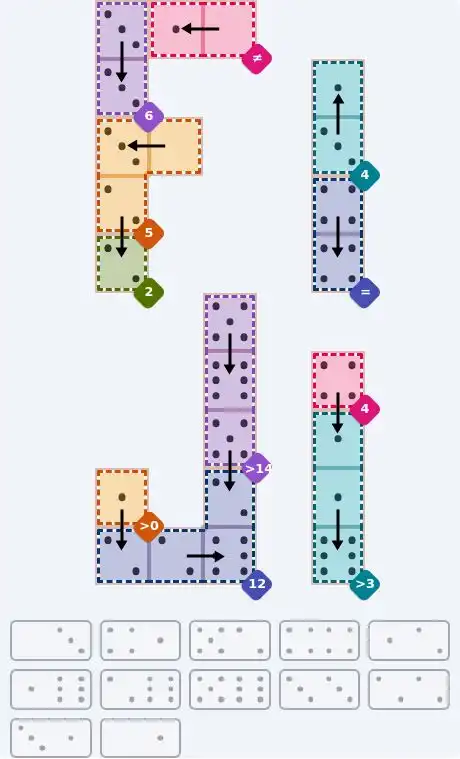
NYT Pips November 19, 2026 hard puzzle full solution grid showing final answer with hints

Compare this final grid with your own solution to see the correct placement of all dominoes.

🔧 Step-by-Step Answer Walkthrough For Easy Level

1
Step 1: The blue square names its tile
The blue sum 1 region at the top-right is a single cell, so its pip has to be 1 — and only the 1/4 tile in the tray carries a 1. It cannot drop down into the teal row, because that would put 4 in the teal sum 11 pair and leave 7 for its partner, which no pip can be. So the 1/4 lies flat along the top edge: 1 on the left in the blue square, 4 on the right at the top of the orange equals column.
2
Step 2: The equals column doubles up
The orange equals column on the right-hand edge has to show the same pip twice, and its upper cell now holds 4. The lower cell is therefore 4 as well, and the 5/4 tile is the only remaining candidate. It lies flat across the bottom-right: 5 on the left in the right-hand cell of the teal sum 11 pair, 4 on the right in the orange column.
3
Step 3: Teal reaches for a six
The teal sum 11 pair at the bottom-right now reads 5 plus something, so its left-hand cell needs 6. The 0/6 tile lies flat and supplies it — 6 on the right inside the teal pair, 0 on the left in the right-hand cell of the purple equals pair. Because purple must match itself, its remaining cell is also 0, which is the second pin in this step.
4
Step 4: The last two tiles lock in
A 0 in the purple pair's left cell can only come from the 5/0 tile, standing vertically one column over: 0 low in the purple pair, 5 up in the right-hand cell of the pink sum 11 pair. Pink now needs 6 to reach its target, and the 6/6 double is the only tile left. It stands vertically in the top-left corner — 6 up in the pink pair, 6 down in the green greater 5 square, comfortably above the floor.

🔧 Step-by-Step Answer Walkthrough For Medium Level

1
Step 1: Three cells, one pip
The purple equals block in the bottom-right corner holds three cells that must all show the same value. Count the halves in the tray: only two values appear three or more times, and the bottom-left pair regions need every high pip going. So the trio is 1s, and the 1/1 double lies flat across the two bottom cells of the block, leaving the block's top cell to be fed from outside.
2
Step 2: The crossing tile
A domino covers two cells, so an odd three-cell block must have exactly one tile crossing its border. Look at the teal greater 2 square in the top-right corner, whose top cell sits directly above the block's top cell. That square has only two neighbours, and if it paired with the pink sum 2 column instead, pink could never reach its total. So the teal tile drops down into the trio: the 4/1 stands vertically, 4 up in the teal square, 1 down in the trio.
3
Step 3: The pink corner resolves
With the teal square accounted for, the pink sum 2 column at the top-right has no choice but to be covered by a single tile spanning its two cells. Only the 0/2 adds to two, since the 1/1 is already spent in the equals trio. It stands vertically: 0 in the upper cell, 2 in the lower.
4
Step 4: The bottom-left lock
No tile in the tray adds to 7, so the green sum 7 column cannot be a single tile — it has to borrow from both sides. The upper green cell's only other neighbour is the purple greater 4 square, so it needs at least 5 there; the 5/5 double lies flat and puts 5 in both. Green then needs 2 below, which the 2/4 tile supplies flat along the bottom row: 2 in the lower green cell, 4 in the left cell of the blue greater 7 pair.
5
Step 5: The last three tiles
The blue pair already holds 4 and has to beat 7, so its right-hand cell cannot be small: the leftover 5/3 lies flat, 5 in the blue pair and 3 on the uncoloured square at the bottom. That leaves the 0/1 for the two middle cells, which by now have no other free neighbours. Because the orange greater 0 square refuses a 0, the 0 goes left into the pink less 2 square and the 1 goes right.

🔧 Step-by-Step Answer Walkthrough For Hard Level

1
Step 1: The corner that adds to six
The purple sum 6 pair hugs the top-left corner as a plain vertical two-cell region. Scan the tray and exactly one tile totals six, so the 3/3 double is committed: 3 in the upper cell, 3 in the lower.
2
Step 2: The block with one exit
Drop down to the orange sum 5 block. Its top-right cell touches nothing else on the board — its only neighbour is the cell to its left — so those two top cells are a single tile. The block's bottom cell, meanwhile, has to feed the green sum 2 square beneath it, a one-cell sum, so that seam is a tile carrying a 2. Only the 0/3 fits across the top, 3 on the left and 0 on the right, leaving 2 for the bottom cell and making the seam tile the 2/2 double.
3
Step 3: The right-hand spine
The blue equals pair on the right edge is a single tile, because its lower cell has one neighbour only, and equals means a double. With 3/3 and 2/2 already used, the 4/4 stands there with 4 in each cell. Directly above, the teal sum 4 pair is also a single tile, and the only tile left adding to four is the 3/1: 1 in the upper cell, 3 in the lower.
4
Step 4: The greater 14 column
The purple greater 14 column runs down the centre. Its top cell touches only the cell below, so the top two cells form one tile, and nothing smaller than the 5/6 gives the column enough headroom — 5 above, 6 below. That leaves the third cell needing at least four, and the 5/2 tile provides it: 5 in the column, and its 2 dropping into the top-right corner of the blue sum 12 block.
5
Step 5: The pink 4 and the teal column
On the right, the single-cell pink sum 4 square is worth exactly 4, and its only neighbour is the top cell of the teal greater 3 column below. So the 4/1 tile stands vertically, 4 in the pink square and 1 in the teal column. The column's lower two cells then take a single tile, and the 1/6 is what fits: 1 in the middle, 6 at the foot, giving the column a comfortable total.
6
Step 6: Bottom row and top row
Four tiles remain. The orange greater 0 square at the bottom-left has one neighbour, the bottom-left cell of the blue sum 12 block, so they share a tile — the 1/2 stands there, 1 in the orange square and 2 in the block. The block's bottom-centre and bottom-right cells must then be one tile, and with 2 + 2 already banked the 2/6 lies flat, 2 then 6, bringing the block to exactly 12. The final 0/1 goes flat across the pink unequal pair at the top, 1 on the left and 0 on the right.

💡 Pro Tips for Similar Puzzles

Start with Constraints
Always begin with the most constrained regions - sum regions with small numbers or tight spaces.
Use Equal Regions
Use "equal" regions as anchors - they eliminate many possibilities quickly.
Work Systematically
Let the rules guide your placement rather than guessing randomly.
Double-Check
Verify each region's rules are satisfied before moving to the next.

🎓 Keep Learning & Improve