NYT Pips Hints & Answers for November 20, 2026

Nov 20, 2026

🚨 SPOILER WARNING

This page contains the final answer and the complete solution to today's NYT Pips puzzle. If you haven't attempted the puzzle yet and want to try solving it yourself first, now's your chance!

Click here to play today's official NYT Pips game first.

Want hints instead? Scroll down for progressive clues that won't spoil the fun.

SEE ALSO:

🎲 Today's Puzzle Overview

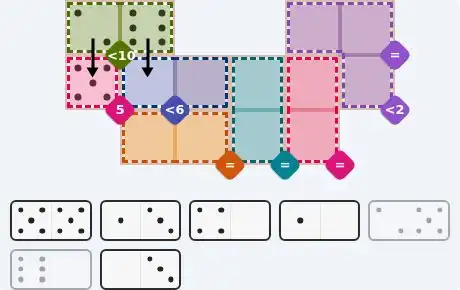
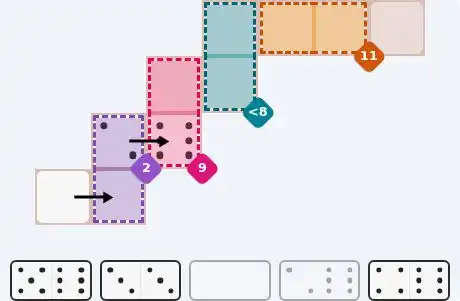
Today's NYT Pips easy, from Ian Livengood, is a five-tile straight line rather than a board to be searched. The generator of the whole inference is the sum-2 vertical pair in the bottom-left corner: the tray carries no pip of value 1 at all, so the symmetric split is dead on arrival and the region resolves the instant you read the inventory. From that node the deduction graph only moves one way — the pair's lower cell has to borrow its partner from the uncoloured free square on the bottom-left corner, and each region thereafter passes a single pip sideways to the next, a staircase that terminates in the free square up at the top-right. His medium keeps the relay shape but changes the constraint family. Eight regions, four of them equals pairs, mean the graph is mostly propagation: one region hands a value over and the next simply echoes it back. The only true arithmetic node is the pink sum-5 cell clinging to the left edge, and resolving it commits the top-left less-than strip, which in turn decides the direction the equality cascade runs. Expect to spend your time on the two less-than strips, not on the equals pairs — those collapse on their own once the first value arrives. Rodolfo Kurchan's hard is a different animal: fourteen regions packed into a two-column strip, most of them a single square. That makes the constraint graph a ladder rather than a chain, with one-square sums and greater-than cells down the right pressing against longer sum, equals and unequal runs down the left. The work here is inventory arithmetic, not adjacency — the tray carries exactly one 6, so the single-cell sum that needs it monopolises it and effectively converts every greater-than-4 cell into a fixed value, while three doubles have to be rationed across runs that each accept only one of them.

💡 Progressive Hints

Try these hints one at a time. Each hint becomes more specific to help you solve it yourself!

💡 Start With the Constraint Types
Before a single tile moves, sort the board by constraint type. This grid leans on sum regions, and the tightest of them is the one with the smallest target — a two-cell sum that tiny has almost no legal combinations once you check which pips the tray can actually supply.
💡 The Purple Pair in the Bottom-Left Corner
The purple sum-2 vertical pair in the bottom-left corner is your seed. Scan the tray first: no pip of value 1 appears anywhere in it, which strikes out every symmetric split. Then look to the pair's lower cell — the uncoloured free square on the bottom-left corner sits directly to its left, and free squares absorb whatever half a domino has left over.
💡 The Full Easy Layout
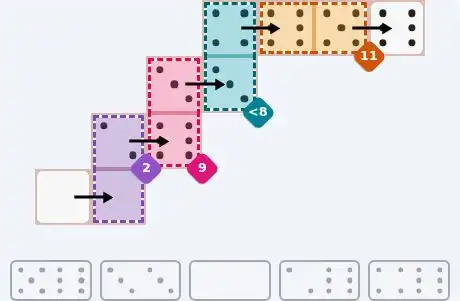
The 0/0 double lies flat along the bottom-left corner: 0 in the uncoloured free square, 0 in the lower cell of the purple sum-2 pair. The purple pair's upper cell takes the 2 of the 2/6 tile, lying flat with 6 falling into the lower cell of the pink sum-9 pair on the left. Pink needs 3 more, so the 3/3 double lies flat across the middle: 3 in pink's upper cell, 3 in the lower cell of the teal less-8 pair at the top. The 4/6 tile then lies flat with 4 in teal's upper cell and 6 in the left cell of the orange sum-11 pair in the top-right, and the 5/6 tile finishes along the top-right edge — 5 in orange's right cell, 6 in the uncoloured free square at the top-right corner.
💡 Small Regions, Sharp Constraints
Sort this grid by constraint type before placing anything: a cluster of equals pairs, two multi-cell less-than strips, one single less-than and one single sum. The single sum is the sharpest thing on the board — a one-cell sum does not really add anything up, it simply names the pip that must sit there.
💡 The Lone Sum Cell on the Left Edge
The pink sum-5 cell on the left edge is where the board starts. Its value is settled before you look at a single tile; the only open question is which domino delivers it. Look at the cell immediately above — the left half of the green less-10 pair at the top-left — and at how few 5s the tray actually holds.
💡 The Full Medium Layout
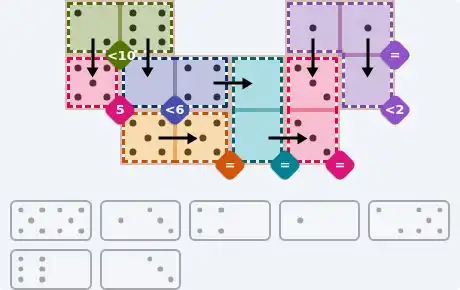
The 2/5 tile stands vertically at the left edge: 5 in the pink sum-5 cell, 2 in the left cell of the green less-10 pair at the top-left. Green's right cell takes the 6 of the 6/0 tile, standing vertically to drop 0 into the left cell of the blue less-6 strip. Blue's right cell takes the 4 of the 4/0 tile, laid flat with 0 in the upper cell of the teal equals pair at the bottom. Teal's lower cell takes the 0 of the 0/3 tile, laid flat with 3 in the lower cell of the pink equals pair at the bottom-right; pink's upper cell answers with the 3 of the 1/3 tile, standing vertically to put 1 in the left cell of the purple equals pair at the top-right. The 1/0 tile stands vertically to finish that pair — 1 filling the right cell, 0 landing in the purple less-2 cell on the right edge — and the 5/5 double fills the orange equals pair at the bottom-left.
💡 A Ladder of One-Cell Constraints
Count the constraint types before you place anything. This grid is dominated by single-cell regions — three greater-than cells, a less-than cell, several one-square sums — and each of those is a fence rather than an equation. Working out which pips the tray can supply at all is worth more here than guessing where tiles go.
💡 The Tray Has Exactly One 6
Scan the tray and you will find a single 6, on the 1/6 tile. The teal sum-6 cell just below the top-left corner is a one-square region, so it demands that exact pip — the 6 is spoken for before anything else moves. That has a knock-on effect: the three greater-4 cells (two orange, one purple) can no longer reach a 6, so every one of them must be filled with a 5. The tray holds exactly four 5s, across the 5/3, the 4/5 and the 5/5.
💡 The Right-Hand Stack
Look down the right-hand column. The teal sum-3 cell sits directly above an orange greater-4 cell, so one vertical domino has to satisfy both at once. The upper value is fixed at 3; the lower one must beat 4; and among the tiles carrying a 3, the 5/3 is the only one whose partner clears that bar. Stand it upright — 3 on top, 5 underneath.
💡 Two Doubles Find Their Runs
Down in the bottom-right corner the blue sum-2 cell gives you a 2, and its only free neighbour is the foot of the pink sum-5 column on the left, so the 3/2 lies flat there — 3 into the column, 2 into the blue cell. That leaves two cells in the pink column that must add to 2 as one upright domino, which is exactly the 1/1 double. Meanwhile the three greater-4 cells eat three of the tray's four 5s, so the 5/5 cannot be wasted on the equals pair at the bottom-left corner; the 0/0 double stands vertically in it instead.
💡 The Full Hard Layout
Top-left: the 1/6 stands vertically — 1 in the purple less-2 cell, 6 in the teal sum-6 cell below it. Beside it the 0/2 stands vertically in the pink unequal pair, 0 above and 2 below. Under them the 4/5 lies flat across the top block: 5 in the orange greater-4 cell on the left, 4 in the blue less-5 cell on the right. Right column: the 5/3 stands vertically with 3 in the teal sum-3 cell and 5 in the orange greater-4 cell beneath; the 3/2 lies flat below that, 3 at the foot of the pink sum-5 column, 2 in the blue sum-2 cell; and the 1/1 double stands vertically in the top two cells of that pink column. Bottom-left: the 0/0 stands vertically in the green equals pair at the corner, with the 2/4 standing vertically beside it in the purple greater-2 pair, 2 above and 4 below. Left middle: the 3/4 lies flat with 3 in the upper cell of the green sum-8 pair and 4 in the uncoloured free square, and the 5/5 lies flat directly beneath it — 5 completing the green sum 8, 5 filling the purple greater-4 cell on the right.

🎨 Pips Solver

Nov 20, 2026

Click a domino to place it on the board. You can also click the board, and the correct domino will appear.
✅ Final Answer & Complete Solution For Hard Level

The key to solving today's hard puzzle was identifying the placement for the critical dominoes highlighted in the starting grid. Once those were in place, the rest of the puzzle could be solved logically. See the final grid below to compare your solution.

Starting Position & Key First Steps
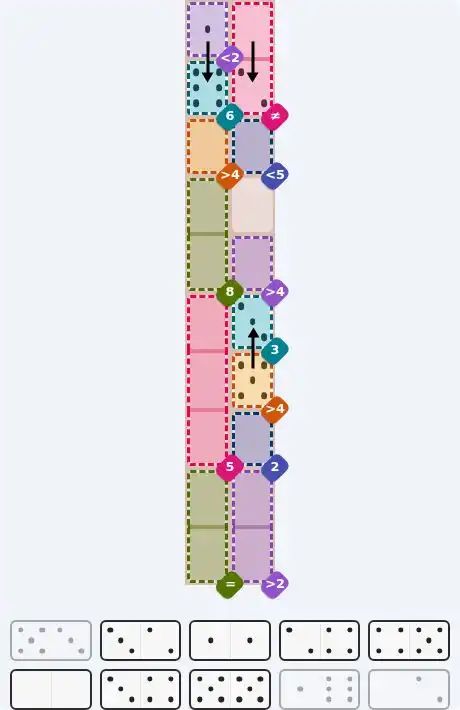
Pips hint for November 20, 2026 – hard level puzzle grid with critical first placements and strategy

This image shows the initial puzzle grid for the hard level, with a few critical first placements highlighted.

Final Answer: The Solved Grid for Hard Mode
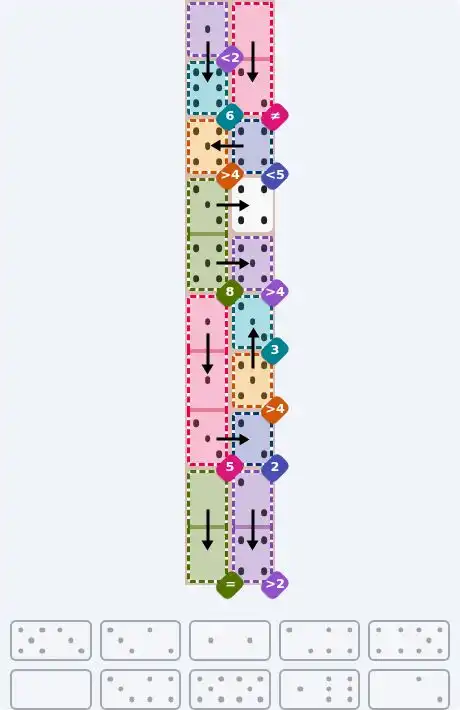
NYT Pips November 20, 2026 hard puzzle full solution grid showing final answer with hints

Compare this final grid with your own solution to see the correct placement of all dominoes.

🔧 Step-by-Step Answer Walkthrough For Easy Level

1
Step 1: Two Pips, No Alternative
Start with the purple sum-2 vertical pair tucked into the bottom-left corner. Adding to 2 across two cells leaves just two possibilities: two 1s, or a 0 beside a 2. The tray kills the first option outright — not one tile in it carries a 1 — so the pair is locked as a 0 and a 2 the moment you count the pips on offer.
2
Step 2: The Free Square Pays for the Zero
The lower cell of the purple pair has only two neighbours: its partner above, and the uncoloured free square on the bottom-left corner to its left. The 0 that must go there needs a partner, and the only tile that can follow it into a free square is the second 0 of the 0/0 double. Lay it flat along the bottom edge — 0 in the free square, 0 in the purple pair's lower cell.
3
Step 3: The Two Hands Pink a Six
The purple pair's remaining value, 2, now needs a tile that can also continue to the right. The 2/6 is the only fit: lay it flat with 2 in the purple pair's upper cell and 6 landing in the lower cell of the pink sum-9 pair on the left. Pink's other cell must therefore be a 3, and the 3/3 double satisfies it while pushing the second 3 into the lower cell of the teal less-8 pair at the top of the board.
4
Step 4: The Top Row Closes Itself
Teal now holds a 3 in its lower cell and needs an upper value below 8 — the 4 of the 4/6 tile slips in, laid flat so its 6 fills the left cell of the orange sum-11 pair in the top-right. That leaves orange needing a 5, and the 5/6 tile answers it along the top-right edge: 5 in orange's right cell, 6 in the uncoloured free square at the top-right corner. Every region is satisfied and the tray is empty.

🔧 Step-by-Step Answer Walkthrough For Medium Level

1
Step 1: The Single-Cell Sum
Begin at the pink sum-5 cell hugging the left edge. A sum region with only one square in it is not an equation — it is a label, and the label says 5. Everything that follows is about which tile can hand over a 5 without wrecking the strict less-than strip directly above it.
2
Step 2: The Top-Left Less-Than Pair
The 2/5 tile is the one that pays: stand it upright so the 5 sits in the single sum cell and the 2 rises into the left cell of the green less-10 pair at the top-left. Green still needs a second value under 10 in its right cell, and the 6/0 goes there upright, dropping its 0 down into the left cell of the blue less-6 strip on the left — comfortably under that strip's limit.
3
Step 3: Blue Passes a Zero Downward
Blue's other cell is now the only gap left in the less-6 strip, and the 4/0 tile lies flat to close it: 4 in blue's right cell, 0 falling into the upper cell of the teal equals pair at the bottom of the board. That zero is contagious — an equals region repeats whatever it is given, so teal's lower cell is a 0 as well.
4
Step 4: The Equals Relay Begins
The 0/3 tile lies flat across the bottom to supply it: 0 in teal's lower cell, 3 in the lower cell of the pink equals pair at the bottom-right. Pink's upper cell is therefore a 3 as well, and the 1/3 tile stands upright to provide it, sending its 1 up into the left cell of the purple equals pair at the top-right.
5
Step 5: Three Pairs Fall in Order
The purple equals pair at the top-right needs a second 1, and the 1/0 tile stands upright to deliver it — 1 in the right cell, 0 dropping into the purple less-2 cell on the right edge, which the limit happily accepts. Only the orange equals pair at the bottom-left is still empty, and the tray's single double, the 5/5, lies flat inside it: 5 on each side. Nothing is left over.

🔧 Step-by-Step Answer Walkthrough For Hard Level

1
Step 1: The Only Six in the Tray
Start with the teal sum-6 cell just under the top-left corner. A one-square sum is a label, so that cell must hold a 6 — and the tray contains exactly one 6, on the 1/6 tile. Its partner has to land in a neighbouring cell, and directly above sits the purple less-2 cell, the one square in the top-left block begging for a small pip. Stand the 1/6 upright: 1 on top, 6 below.
2
Step 2: The Unequal Pair Seals the Top Row
With the 1/6 in place, the pink unequal pair beside it is cut off — its upper cell now touches nothing except the cell below, so one vertical domino must span the pair, and the pair's rule forbids matching pips. The 0/2 slots in, 0 above and 2 below, leaving every remaining tile free for the strict inequalities further down the board.
3
Step 3: Three Greater-Than Cells, One Value
Now count 5s and 6s. The tray's only 6 is already spent on teal, and no other tile carries one, so the three greater-4 cells — two orange, one purple — can only take a 5. The tray offers exactly four 5s across the 5/3, the 4/5 and the 5/5, so those three cells are settled without any positional guesswork.
4
Step 4: The Right Column Solves Itself
Down the right-hand column, the teal sum-3 cell sits directly above an orange greater-4 cell, so one upright domino covers both. The upper value is fixed at 3 and the lower must be a 5, which is precisely the 5/3 tile — no other tile carrying a 3 has a partner above 4. Stand it upright: 3 on top, 5 underneath.
5
Step 5: The Row Beneath the Top Block
The orange greater-4 cell on the left and the blue less-5 cell beside it are the next pair to fall. The orange cell takes a 5, the blue one needs something under 5, and the 4/5 tile lies flat across them to give exactly that — 5 on the left, 4 on the right. Two of the three greater-than cells are now paid for.
6
Step 6: The Bottom Rows Finish Themselves
The blue sum-2 cell in the bottom-right corner is a 2, and its only remaining neighbour is the foot of the pink sum-5 column on the left, so the 3/2 lies flat there — 3 into the column, 2 into the blue cell. The column's last two cells must therefore total 2 as one upright domino, which is the 1/1 double. Down in the bottom-left corner, the green equals pair takes the 0/0 standing vertically, with the 2/4 standing vertically beside it in the purple greater-2 pair — 2 above, 4 below. That leaves two horizontal tiles in the left middle: the 3/4 lies flat with 3 in the upper cell of the green sum-8 pair and 4 in the uncoloured free square, and the 5/5 lies flat directly beneath it, 5 completing the green sum 8 and 5 filling the purple greater-4 cell on the right.

💡 Pro Tips for Similar Puzzles

Start with Constraints
Always begin with the most constrained regions - sum regions with small numbers or tight spaces.
Use Equal Regions
Use "equal" regions as anchors - they eliminate many possibilities quickly.
Work Systematically
Let the rules guide your placement rather than guessing randomly.
Double-Check
Verify each region's rules are satisfied before moving to the next.

🎓 Keep Learning & Improve