NYT Pips Hints & Answers for November 13, 2026

Nov 13, 2026

🚨 SPOILER WARNING

This page contains the final answer and the complete solution to today's NYT Pips puzzle. If you haven't attempted the puzzle yet and want to try solving it yourself first, now's your chance!

Click here to play today's official NYT Pips game first.

Want hints instead? Scroll down for progressive clues that won't spoil the fun.

SEE ALSO:

🎲 Today's Puzzle Overview

The easy board teaches you a shape lesson before it hands you a puzzle: the ten cells sit in five separate horizontal pairs that never touch each other, so every domino has to lie flat and you never spend a second worrying about orientation. From there the singles do all the talking — the orange sum-4 square in the corner announces that a 4 is needed, the teal greater-4 cell rules out everything except the two biggest pips, and the uncoloured squares quietly soak up whichever half is left over. The one genuinely satisfying beat is working out which of the two 4-bearing tiles belongs in the corner and which one the purple equals pair gets to keep.

Kurchan's medium board looks busier than it plays. Your first minute is all about a single gift: the pink sum-0 in the top row is a freebie, and it drags a 4 down into the blue equals block, which then has to become three matching pips. Once the block is settled you find yourself doing inventory rather than deduction — the tray carries no 2s at all, so both sum-8 pairs have to be built out of 3s and 5s, and the small less-6 and greater-4 cells start ruling tiles out instead of in. Work the edges toward the middle and it unravels in a hurry.

The hard grid flips the whole idea on its head. Every coloured cell is a one-cell sum region, which means the board simply prints its own pip values — there is no arithmetic left to do, and the puzzle becomes pure tiling: pair up adjacent cells so that all sixteen tiles in the tray are used exactly once. That sounds gentle until you notice the zeros alone demand five separate tiles and several pips turn up in clusters that will happily pair two different ways. Start with the single uncoloured square on the right edge; today's NYT Pips hard makes you commit to that cell first and never looks back.

💡 Progressive Hints

Try these hints one at a time. Each hint becomes more specific to help you solve it yourself!

💡 Read the shape before the numbers
Look at how the ten filled cells are arranged: they form five isolated horizontal pairs, with no neighbours above, below or between them. That means every domino must lie flat inside one pair. Now go hunting among the single-cell constraints — the sum and greater-than cells — because each of those fixes a pip on its own.
💡 The 4 in the corner
Focus on the orange sum 4 cell in the top-right corner and the free square immediately to its left. Whatever tile sits there must carry a 4, and the tray offers exactly two such tiles. The purple equals pair down in the bottom-right needs two identical pips, so it has first claim on the double — which settles who gets the corner.
💡 Full answer
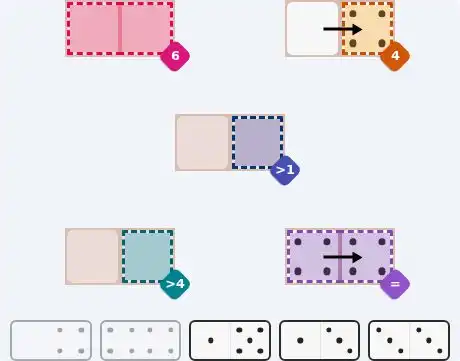
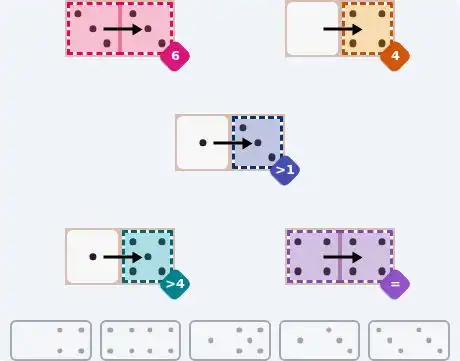
The top-right pair is the 0/4 tile lying flat: 0 in the free square, 4 in the orange sum 4 cell. The purple equals pair in the bottom-right is the 4/4 double, flat across both cells. The pink sum 6 pair at the top-left is the 3/3 double, 3 in each cell. The bottom-left pair is the 1/5 tile, 1 in the free square and 5 in the teal greater-4 cell. The centre pair is the 1/3 tile, 1 in the free square and 3 in the blue greater-1 cell.
💡 Two clue types carry the start
Begin with the cells that name their own total and with the equals block — a single-cell sum hands you a pip outright, and an equals region forces repetition. Forget the sum-8 pairs for a moment; they only make sense once you know what has already been spent.
💡 The gift in the top row
The pink sum-0 in the top row is the easiest cell on the board, and the one tile in the tray carrying a 0 has to travel with it. Its partner pip looks straight down into the blue equals block below, which needs three identical pips — the 4/4 double can supply two of them, but the third has to arrive from outside. That outside arrival is sitting on the 0.
💡 Full answer
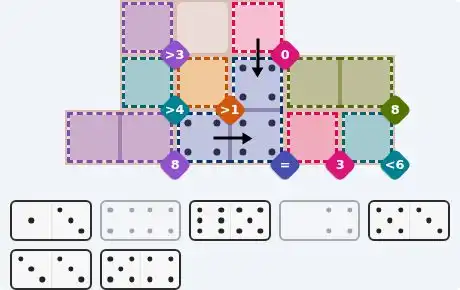
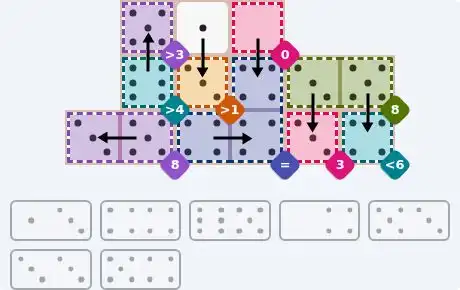
Pink sum 0 takes the 0/4 standing vertically: 0 on top in the pink cell, 4 below in the blue equals block. The 4/4 double then lies flat across the two bottom cells of that block, giving three 4s. The bottom-left purple sum-8 pair is the 5/3 tile lying flat, 3 in the leftmost cell, 5 in the cell to its right. The 3/3 double stands vertically on the right: 3 up in the green sum-8's left cell, 3 down in the pink sum-3. The 5/4 stands vertically beside it: 5 up in the green sum-8's right cell, 4 down in the teal less-6 cell. The 6/5 stands vertically near the top-left: 5 up in the purple greater-3 cell, 6 down in the teal greater-4 cell. The 1/3 stands vertically with 1 up in the free square at the top and 3 down in the orange greater-1 cell.
💡 The board already knows its numbers
Every coloured cell here is its own one-cell sum region, so the grid is printing a pip value in every square you can fill. Nothing needs adding up. What you are actually doing is pairing: matching adjacent cells so each tile in the tray is used exactly once. Begin by scanning for pips that turn up only a single time across the whole board.
💡 The loneliest pip on the right edge
The one uncoloured square on the right edge is the only cell that does not announce its own value, and only one tile in the tray carries the pip that belongs there. That tile is forced, and its partner must sit in the teal sum-3 cell immediately to its left. Lock that flat pair in before anything else.
💡 Then the edge above it, then the zeros
Once the 3/6 is down, the orange sum-1 cell directly above the uncoloured square loses the neighbour below and has only the teal sum-5 to its left — so the 1/5 tile lies flat, 5 on the left and 1 on the right. Now count: five cells demand a 0, and the tray holds exactly five zero-bearing tiles (0/1 through 0/5), so all five will be used. One of them falls almost immediately.
💡 The zero that touches a 1
Of the five zero cells, only one has a 1 next to it: the teal 0 sitting in the second row, with the orange sum-1 directly above it. That forces the 0/1 tile upright, 1 up and 0 down. That placement seals the blue sum-4 in the top-right corner as well — its left neighbour is gone, so the 4/5 tile must stand vertically, 4 up in the blue and 5 down in the orange sum-5 beneath.
💡 Full layout — all sixteen tiles
Top row: 0/3 upright, 0 in the corner purple 0, 3 below in the green 3; 2/5 flat, 5 in the pink 5 and 2 in the teal 2 beside it; 0/1 upright, 1 up in the orange 1, 0 down in the teal 0; 4/5 upright on the right, 4 up in the blue 4, 5 down in the orange 5. Second row: 0/4 upright, 0 in the second purple 0, 4 down in the green 4; 3/5 upright at centre, 3 up in the pink 3, 5 down in the purple 5; 1/5 flat on the right, 5 left in the teal 5, 1 right in the orange 1. Third row: 0/2 upright centre-right, 2 up in the pink 2, 0 down in the pink 0; 3/4 upright on the left edge, 4 up in the blue 4, 3 down in the blue 3. Fourth row: 1/4 flat, 1 left in the green 1, 4 right in the purple 4; 3/6 flat on the right edge, 3 left in the teal 3, 6 right in the uncoloured square. Fifth row: 1/2 upright bottom-left, 1 up in the orange 1, 2 down in the teal 2; 0/5 flat, 5 left in the blue 5, 0 right in the green 0; 2/4 upright bottom-right, 2 up in the purple 2, 4 down in the green 4; 1/3 upright on the right, 3 up in the pink 3, 1 down in the purple 1. Bottom row: 2/3 flat, 2 left in the orange 2, 3 right in the blue 3.

🎨 Pips Solver

Nov 13, 2026

Click a domino to place it on the board. You can also click the board, and the correct domino will appear.
✅ Final Answer & Complete Solution For Hard Level

The key to solving today's hard puzzle was identifying the placement for the critical dominoes highlighted in the starting grid. Once those were in place, the rest of the puzzle could be solved logically. See the final grid below to compare your solution.

Starting Position & Key First Steps
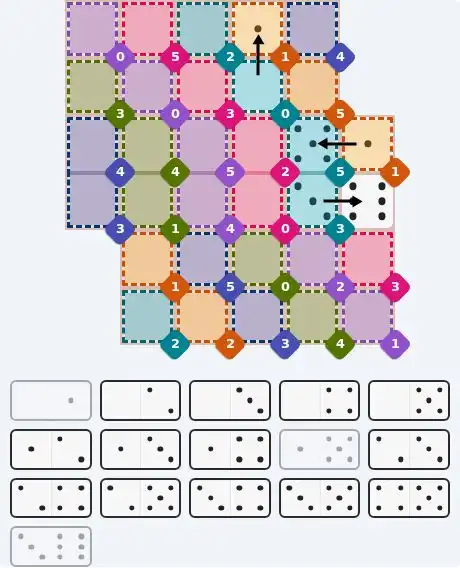
Pips hint for November 13, 2026 – hard level puzzle grid with critical first placements and strategy

This image shows the initial puzzle grid for the hard level, with a few critical first placements highlighted.

Final Answer: The Solved Grid for Hard Mode
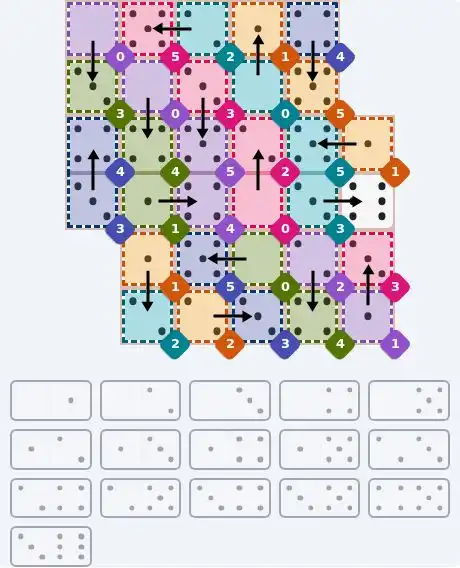
NYT Pips November 13, 2026 hard puzzle full solution grid showing final answer with hints

Compare this final grid with your own solution to see the correct placement of all dominoes.

🔧 Step-by-Step Answer Walkthrough For Easy Level

1
Step 1: Five separate slots
Study the ten cells: they clump into five horizontal pairs with no vertical neighbours anywhere. A domino needs two touching cells, so each pair is a slot that must be filled flat by exactly one tile. That single observation removes every orientation question from the puzzle.
2
Step 2: The corner 4 decides the doubles
The orange sum 4 in the top-right corner can only hold a 4, so the tile in that pair must contain one. Two tiles do: the 0/4 and the 4/4. Suppose the 4/4 went to the corner — then the purple equals pair in the bottom-right would have to take the 3/3, the pink sum 6 would need the 1/5, and the teal greater-4 cell would be left with nothing above 4. So the 4/4 stays in the equals pair and the 0/4 goes to the corner, 0 on the left and 4 in the orange cell.
3
Step 3: The top-left sum of 6
The pink pair needs its two pips to total 6. Only two tiles do that: the 1/5 and the 3/3. But the 1/5 is the sole remaining source of a pip bigger than 4, and the teal greater-4 cell at the bottom-left demands exactly that. So the pink pair takes the 3/3 double, flat with a 3 in each cell, and the 1/5 is reserved.
4
Step 4: The last two free squares
Place the 1/5 flat at the bottom-left with the 1 in the free square and the 5 in the teal greater-4 cell — the only pip there that clears the constraint. The 1/3 tile finishes the centre pair with its 3 in the blue greater-1 cell (the 1 would fail that rule outright) and its 1 in the free square on the left.

🔧 Step-by-Step Answer Walkthrough For Medium Level

1
Step 1: The zero in the top row
The pink sum-0 cell can only hold a 0, and there is exactly one zero in the tray, on the 0/4 tile. So that tile is spoken for immediately — the only question is which of its two neighbours receives the 4.
2
Step 2: Three matching pips
The blue equals block of three cells has to end up identical, and the most efficient way is the 4/4 double covering two of them. The third 4 must arrive from outside the block, and the 0/4 tile sitting on the 0 above is the candidate that fits: stand it upright with 0 in the pink cell and 4 in the top-right corner of the block. The 4/4 then lies flat across the block's two lower cells.
3
Step 3: The trapped sum-8 pair
The bottom-left purple sum-8 pair is easy to overlook but impossible to avoid: its leftmost cell touches absolutely nothing else, so one single tile has to span both purple cells and its pips must add to 8. The 5/3 tile is the one that does it, laid flat with 3 on the left and 5 on the right.
4
Step 4: Building the other 8
The green sum-8 pair on the right edge is different — its two cells will not be a single tile, because the only 5/3 is already spent and the tray contains no 2s, so a 6+2 is impossible and a 4+4 would need two loose 4s the tray no longer has. That leaves 3+5. The pink sum-3 cell below is fixed at 3, so the 3/3 double stands upright there: 3 up in the green pair's left cell, 3 down in the pink cell. The green pair therefore needs a 5 in its right cell, supplied by the 5/4, whose 4 drops into the teal less-6 cell below.
5
Step 5: Two tiles for two pairs
Only four cells and two tiles remain. The 6/5 stands vertically near the top-left, 5 up in the purple greater-3 cell and 6 down in the teal greater-4 cell — the only split that satisfies both inequalities. The 1/3 then stands vertically beside it, 1 up in the free square at the top and 3 down in the orange greater-1 cell, since a 1 would break that rule.

🔧 Step-by-Step Answer Walkthrough For Hard Level

1
Step 1: Read the grid as a list of numbers
Every coloured cell is a one-cell sum region, so all 32 pips are printed for you; the uncoloured square on the right edge is the single unknown. The task is therefore a pure pairing problem: cut the grid into sixteen adjacent pairs so that the tray's 0/1, 0/2, 0/3, 0/4, 0/5, 1/2, 1/3, 1/4, 1/5, 2/3, 2/4, 2/5, 3/4, 3/5, 4/5 and 3/6 are each used exactly once. Four squares are holes, which kills some pairings before you start.
2
Step 2: The only 6 in the tray
A 6 appears on exactly one tile, and the only cell on the board that can hold it is the uncoloured square on the right edge. So the 3/6 tile lies flat there, 6 in the free square and 3 in the teal sum-3 immediately to its left.
3
Step 3: The 1 directly above
The orange sum-1 cell one row above the uncoloured square now has a gap above it and the freshly placed 6 below, leaving only the teal sum-5 to its left. The 1/5 tile lies flat, 5 on the left in the teal cell and 1 on the right in the orange cell.
4
Step 4: The zeros, and the sealed corner
Five cells want a 0 — the two purple 0s at the top-left, the teal 0 in the second row, the pink 0 in the middle and the green 0 lower down — and the tray holds exactly five zero-bearing tiles, so every one of them gets used. Only the teal 0 (second row, third column) has a 1 for a neighbour, so the 0/1 stands upright with 1 up in the orange sum-1 and 0 down. That closes the blue sum-4 in the top-right corner: with its left neighbour taken, the 4/5 must stand vertically, 4 up in the blue and 5 down in the orange sum-5 beneath.
5
Step 5: Sorting the family of 4s
Five cells hold a 4 and five tiles contain one. With the 4/5 spent, the 0/4, 1/4, 2/4 and 3/4 are left. The blue sum-4 on the left edge only touches 3s, so it must take the 3/4, standing upright with 4 on top and 3 below in the blue sum-3. The green 4 beside it and the purple 4 in the middle each touch a 0 and a 1, so between them they claim the 0/4 and the 1/4 — which leaves 2/4 for the green 4 at the bottom-right, upright with 2 above in the purple sum-2. The green sum-1 on the left must then point right into the purple sum-4; sending it upward instead would leave the 0/2 tile with no 0 next to a 2 anywhere.
6
Step 6: The remainder drops in
The top-left purple 0 pairs with the green 3 below it via 0/3, giving 0 in the corner and 3 underneath. The green 0 lower down takes 0/5 with 5 to its left in the blue sum-5, and the pink 0 in the middle takes 0/2 with 2 above it in the pink sum-2. Along the top, 2/5 lies flat with 5 in the pink 5 and 2 in the teal 2. At centre, 3/5 stands upright, 3 up in the pink 3 and 5 down in the purple 5. At the bottom-left, 1/2 stands upright, 1 up in the orange 1 and 2 down in the teal 2; along the bottom, 2/3 lies flat with 2 in the orange 2 and 3 in the blue 3; and on the right edge, 1/3 stands upright with 3 up in the pink 3 and 1 down in the purple 1.

💡 Pro Tips for Similar Puzzles

Start with Constraints
Always begin with the most constrained regions - sum regions with small numbers or tight spaces.
Use Equal Regions
Use "equal" regions as anchors - they eliminate many possibilities quickly.
Work Systematically
Let the rules guide your placement rather than guessing randomly.
Double-Check
Verify each region's rules are satisfied before moving to the next.

🎓 Keep Learning & Improve