🔧 Step-by-Step Answer Walkthrough For Easy Level
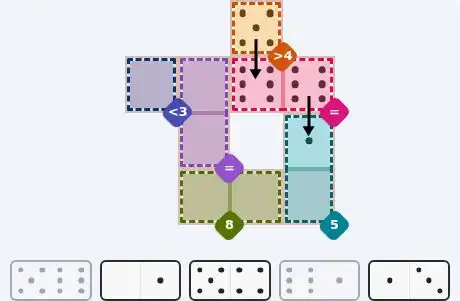
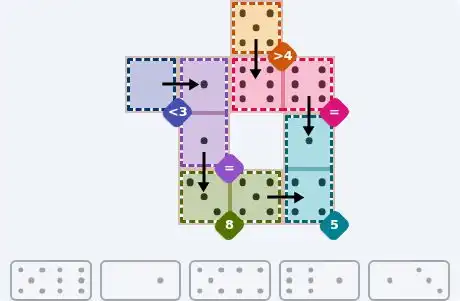
The orange greater-than-4 square on the top edge accepts only a 5 or a 6, and it has exactly one neighbour: the left cell of the pink equals pair in the top-right corner. So it must be covered vertically, and pink inherits that tile's partner — a value pink will then have to repeat. The 5/6 tile is the one that makes the repeat work: 5 stays in orange, 6 drops into pink.
Pink's right-hand cell now needs a second 6. The only other 6 in the tray sits on the 6/1 tile, and that tile can only reach the pink cell from underneath. It stands upright: 6 in pink, 1 falling into the upper cell of the teal sum-5 pair tucked into the bottom-right corner.
Teal holds a 1 and needs four more to reach five. The 5/4 tile supplies exactly that, lying flat along the bottom row — 5 in the right-hand cell of the green sum-8 pair, 4 in the teal cell to its right. Nothing else in the tray offers a 4, so this placement is a single option rather than a choice.
Green now holds 5 and wants 3. The 1/3 tile stands vertically at the bottom-left: 3 into green's left-hand cell, 1 above it in the lower cell of the purple equals pair on the left. Purple has to match, and the last remaining tile is the 0/1 — it lies flat on the left edge, putting 1 in purple's upper cell and 0 in the blue less-than-3 square beside it.
🔧 Step-by-Step Answer Walkthrough For Medium Level
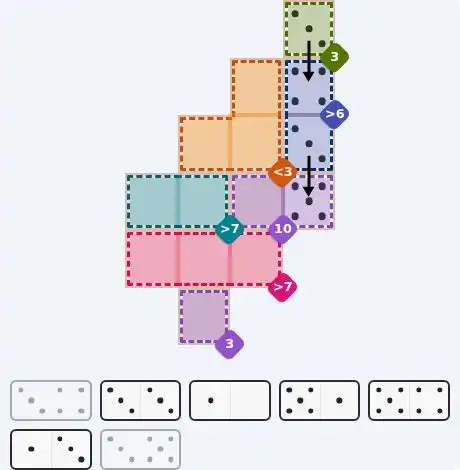
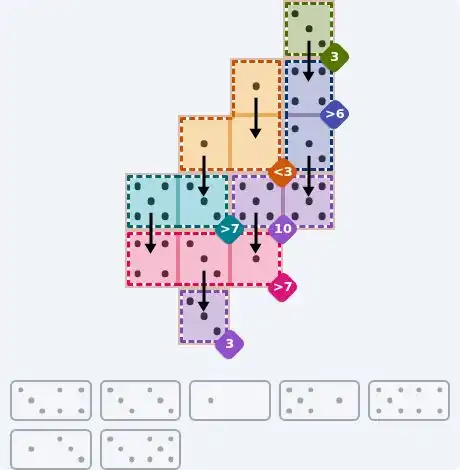
The green sum-3 square at the top-right corner is the most constrained region on the board: its only usable neighbour is the cell directly beneath it in the blue greater-than-6 pair. So the tile covering it must stand vertically, and the green square demands a 3. The 3/4 tile obliges — 3 on top in green, 4 falling into the blue pair.
The purple sum-10 pair on the right cannot reach ten with a 6, because today's tray tops out at 5. That leaves exactly one combination: two 5s. Both purple cells must hold a 5, and the tray offers three tiles carrying a 5 — the 5/1, the 5/4 and the 3/5 — so one of them will be spent somewhere else entirely.
The blue greater-than-6 pair already holds a 4, so its second cell must be at least 3 for the total to clear six. Of the three 5-bearing tiles, only the 3/5 pairs a 5 with a value that large. It stands upright: 3 up into the blue pair, 5 down into the right-hand cell of the purple sum-10 pair. The purple pair's left-hand cell is left waiting for a 5 from either the 5/1 or the 5/4.
The orange less-than-3 block is the tightest region here: three cells totalling under three can only be 1, 1 and 0. The tray holds a single 0, on the 1/0 tile, so it must sit inside the block — the tile stands upright in the block's right-hand column, 1 in the top-right cell and 0 in the bottom-right. The block's third cell takes the 1 from the 1/3 tile, whose 3 drops into the right-hand cell of the teal greater-than-7 pair. With 3 already banked, teal needs a 5 alongside, and the 5/4 tile fits: 5 on top in teal, 4 falling into the pink run's left end.
The pink greater-than-7 run now reads 4, 3 and 1 from left to right — eight in total. The 4 came from the 5/4 tile and the 1 from the 5/1 tile, which simultaneously gave the purple sum-10 pair its left-hand 5. The middle 3 arrives from the 3/3 double, and that tile's lower half fills the purple sum-3 square at the very bottom of the board. Every tile in the tray is now accounted for.
🔧 Step-by-Step Answer Walkthrough For Hard Level
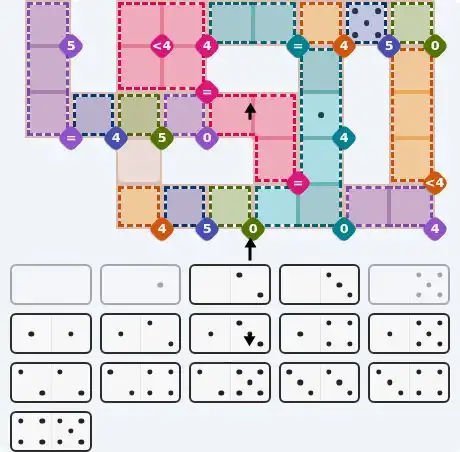
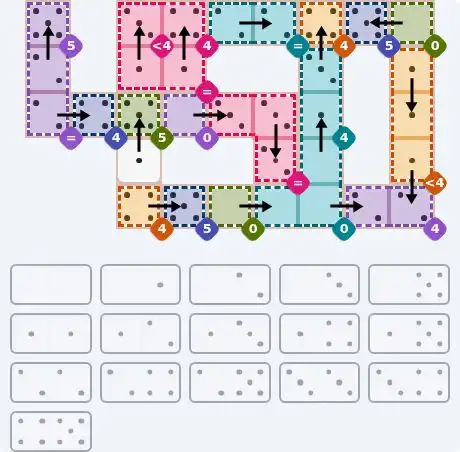
Four regions on this board are told to total zero: the green sum-0 square at the far top-right, the purple sum-0 cell in the centre, the green sum-0 square near the bottom, and the teal three-cell sum-0 block in the bottom-right corner. That is six cells demanding nothing. Now scan the tray: the zeros sit on the 0/0 double, the 0/1, the 0/2, the 0/3 and the 0/5 — six zeros, five tiles. The supply exactly matches the demand, so every zero is committed from the start and no sum-0 region can hold anything else.
The green sum-0 square at the far top-right has a single neighbour — the blue sum-5 cell immediately to its left — so the tile covering it has to lie flat and carry a zero into green. That means the 0/5: 0 on the right in the green square, 5 on the left in blue. The blue cell wants exactly five and gets it in one move, so no second tile can reach it.
The other green sum-0 square sits in the bottom row, flush against the bottom-left cell of the teal sum-0 block. Both cells need a zero and both are free, so they take the 0/0 double lying flat across them — the green square on the left, the teal block's bottom-left cell on the right. The 0/0 is now spent, which matters later: it can never be used to rescue another zero cell.
Two cells of the teal block are still without a zero. Its top-right cell can only be approached from above, from the teal sum-4 pair, so the 0/1 tile stands upright — 0 in the block, 1 rising into the sum-4 pair. Its bottom-right cell can only be approached from its right, from the purple sum-4 pair, so the 0/2 tile lies flat — 0 in the block, 2 heading right into purple. Purple now holds one 2 and must match it, so its second cell is also a 2.
Teal sum-4 holds a 1, so its upper cell needs a 3 — and the only square that cell can reach is the orange sum-4 directly above it. The 3/4 tile stands upright, 3 below in teal and 4 above in orange. At the bottom-right, the purple pair's second 2 comes from the 1/2 tile, which leaves a 1 in the last cell of the orange less-than-4 column — a perfect fit, since everything in that column must stay under four. The column's top two cells are then left with only the 1/1 double to fill them.
The purple sum-5 corner square touches only the cell below it, so the 2/5 tile stands upright: 5 in the corner, 2 down in the purple equals pair, whose lower cell then needs a 2 as well. That cell's only free neighbour is the blue sum-4 square, so the 2/4 tile lies flat, 2 in purple and 4 in blue. Moving right, the pink less-than-4 cell above the pink equals pair takes a 3 from the 1/3 tile, while the pink sum-4 square beside it takes the 4 from the 1/4 tile — both leaving 1s in the equals pair below. The green sum-5 square pairs with the uncoloured free square through the 1/5 tile, 5 above and 1 below. The purple sum-0 centre cell can only escape into the pink equals block, so the 0/3 tile lies flat with 0 on the left and 3 on the right, and the block completes 3-3-3 with the 3/3 double. The last two cells, the orange sum-4 at bottom-left and the blue sum-5 beside it, are filled by the 4/5 tile lying flat.
💬 Community Discussion
Leave your comment