🔧 Step-by-Step Answer Walkthrough For Easy Level
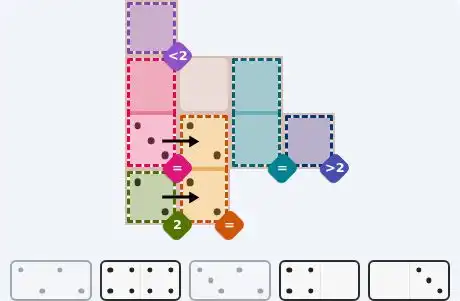
The single-cell region at [3,0] has a sum target of 2, so the cell must contain a 2. The only domino with a 2-2 pair is domino 0 (2-2). To place it, [3,0] must be paired with an adjacent cell. The cell to its right, [3,1], is available and not otherwise constrained; placing the domino horizontally at [3,0][3,1] satisfies the requirement immediately.
With [3,1] now 2, the equals region linking [2,1] and [3,1] forces [2,1] to also be 2. Domino 2 (3-2) is the only remaining domino that offers a 2 alongside a 3. Placing it vertically at [2,0][2,1] puts the 2 at [2,1] and the 3 at [2,0]. This also satisfies the equals region between [1,0] and [2,0]—so [1,0] must now be 3.
The cell [0,0] is in a less-2 region, so it can only be 0 or 1. Since [1,0] needs a 3, the only way to cover both cells is with a vertical domino. Domino 4 (0-3) fits perfectly: placed vertically at [0,0][1,0], it gives [0,0]=0 (satisfying less-2) and [1,0]=3, locking in the equals requirement.
The remaining cells are [1,1] (empty), [1,2] and [2,2] (equals pair), [2,3] (greater-2), and the dominoes 1 (4-4) and 3 (4-0). Domino 3 (4-0) must cover [1,1] and [1,2]; placing it horizontally with 0 at [1,1] (empty) and 4 at [1,2] sets [1,2]=4, which forces [2,2]=4 via the equals pair. Then domino 1 (4-4) slides horizontally into [2,2][2,3], giving [2,3]=4 which easily beats the greater-2 target.
🔧 Step-by-Step Answer Walkthrough For Medium Level
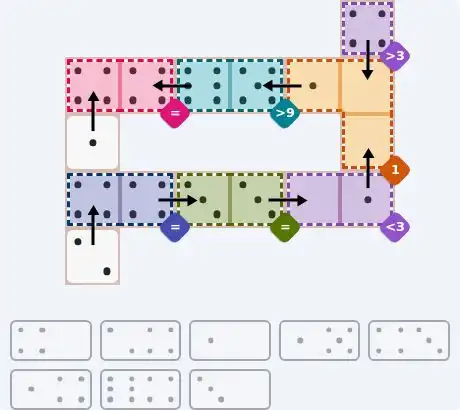
The sum-1 region covering [1,4], [1,5], and [2,5] must sum to exactly 1, so the only possible values among those three cells are two 0s and one 1. The lone greater-3 cell at [0,5] sits directly above [1,5] and must be at least 4. Domino 0 (4-0) can satisfy both by running vertically at [0,5][1,5]: 4 above (greater-3) and 0 below. That gives [1,5]=0. Next, [2,5] also needs a 0, and the domino covering it will also have to reach [3,5]. Domino 2 (1-0) placed vertically at [3,5][2,5] puts 0 at [2,5] and 1 at [3,5]. Now the sum-1 region still needs the 1, so [1,4] must be 1.
Domino 3 (1-5) is placed horizontally at [1,4][1,3] with 1 at [1,4] and 5 at [1,3]. The greater-9 region covering [1,2] and [1,3] now has [1,3]=5, so [1,2] must be 6 to exceed 9. Domino 6 (6-4) bridges [1,2] and [1,1] horizontally, yielding 6 at [1,2] and 4 at [1,1]. The equals region [1,0][1,1] then forces [1,0]=4. Domino 5 (1-4) completes the column by dropping vertically at [2,0][1,0] with 1 below (the empty cell [2,0]) and 4 above.
We shift to row 3. The less-3 pair [3,4][3,5] already has [3,5]=1 from Step 1, so [3,4] must be 0. Domino 7 (3-0) sits horizontally at [3,3][3,4], putting 3 at [3,3] and 0 at [3,4]. The equals region [3,2][3,3] now makes [3,2] also 3.
Domino 4 (4-3) stretches horizontally across [3,1][3,2]. That places the 4 at [3,1] and the 3 at [3,2] (matching the 3). The equals pair [3,0][3,1] then demands [3,0]=4.
The only uncovered cell is [4,0] and the remaining domino is 1 (2-4). Placing it vertically at [4,0][3,0] gives [4,0]=2 (the empty cell) and [3,0]=4, perfectly completing the grid.
🔧 Step-by-Step Answer Walkthrough For Hard Level
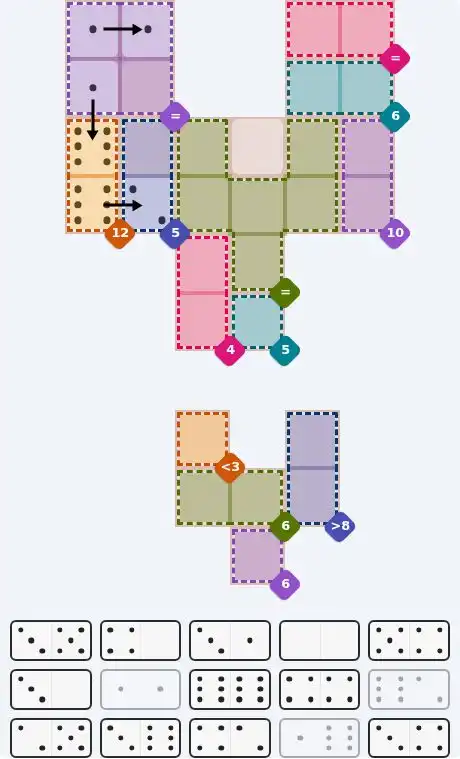
The region [2,0] and [3,0] targets a sum of 12, which with standard pips (0–6) forces both cells to be 6. This immediately draws your attention to the dominoes with 6s: [6,6] (index 7), [6,2] (9), and [1,6] (13). A single 6-6 domino could cover both cells, but that would block [1,0] and [3,1] connections. Instead, the unique path uses domino 13 (1-6) vertically at [1,0][2,0] delivering 6 to [2,0] and 1 to [1,0], and domino 9 (6-2) horizontally at [3,0][3,1] giving 6 to [3,0] and 2 to [3,1].
With [3,1]=2, the sum-5 region [2,1][3,1] forces [2,1]=3. Domino 2 (3-1) can cover [2,1] and an adjacent cell; placing it vertically at [2,1][1,1] sets [1,1]=1. Now the top-left 2x2 equals region [0,0],[0,1],[1,0],[1,1] already has [1,0]=1 and [1,1]=1, so all four cells must be 1. Domino 6 (1-1) is placed horizontally at [0,0][0,1] to satisfy the top row, locking in the equals block.
The massive equals region spans six cells. Adjacent to it, the sum-4 pair [4,2][5,2] must sum to 4. The only way to achieve this while respecting nearby numbers points to 2+2. Domino 12 (4-2) is placed vertically at [3,2][4,2] with 4 at [3,2] and 2 at [4,2]. This plants the number 4 into the equals block. Simultaneously, domino 1 (4-0) goes horizontally at [2,2][2,3] giving 4 to [2,2] and 0 to the empty cell [2,3]. The equals value 4 now propagates through all six cells.
With the equals value fixed at 4, we fill the remaining equals cells. Domino 14 (3-4) runs horizontally at [1,4][2,4] (3,4) to give [2,4]=4 and [1,4]=3. Domino 8 (4-4) vertically at [3,3][4,3] reinforces 4 in those positions. Domino 4 (5-4) sits horizontally at [3,5][3,4]—[3,4]=4, [3,5]=5. Finally, the sum-10 pair [2,5][3,5] demands 5+5, so [2,5]=5. Domino 0 (3-5) horizontally at [1,5][2,5] (3,5) and domino 4 already in place; now the sum-6 pair [1,4][1,5] is satisfied with 3 and 3.
We handle the middle row. Domino 10 (2-5) goes horizontally at [5,2][5,3] with 2 at [5,2] (completing sum-4 with [4,2]=2) and 5 at [5,3] (satisfying the single-cell sum-5). The grid's midsection is now solid.
The bottom-right corner holds a less-3 cell [7,2], a greater-8 pair [7,4][8,4], and sum-6 pairs [8,2][8,3] and [9,3]. Domino 5 (3-0) is placed vertically at [8,2][7,2]—0 below (less-3) and 3 above (part of sum-6). Domino 11 (3-6) shares vertically at [8,3][9,3] with 3 top, 6 bottom, hitting sum-6 for [9,3]=6 and completing the [8,2][8,3] sum-6 as 3+3. Finally, domino 7 (6-6) runs horizontally at [7,4][8,4] to crush the greater-8 target and close the puzzle.


💬 Community Discussion
Leave your comment