NYT Pips Hints & Answers for June 25, 2026

Jun 25, 2026

🚨 SPOILER WARNING

This page contains the final **answer** and the complete **solution** to today's NYT Pips puzzle. If you haven't attempted the puzzle yet and want to try solving it yourself first, now's your chance!

Click here to play today's official NYT Pips game first.

Want hints instead? Scroll down for progressive clues that won't spoil the fun.

SEE ALSO:

🎲 Today's Puzzle Overview

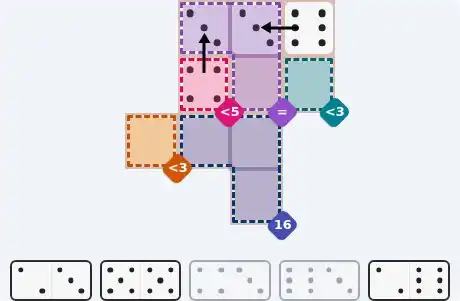
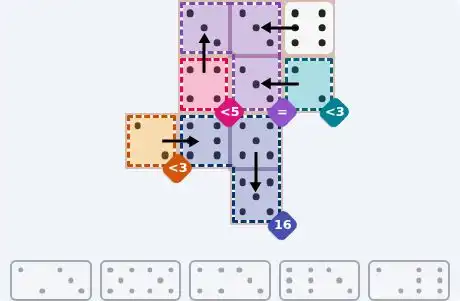
Ian Livengood’s easy grid hands you a friendly opener. The moment you spot that three‑cell equals region in the top left, the puzzle practically solves itself — only one pip value appears on enough dominoes to fill three matching cells. Once you commit to 3s there, the neighboring less‑than constraints snap into place, and the chunky sum‑16 falls in line right behind.

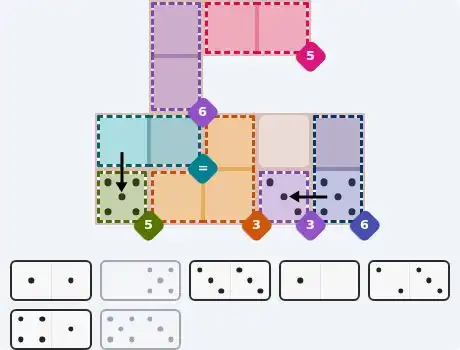
Rodolfo Kurchan’s medium puzzle flips the script with two single‑cell sum regions that are impossible to ignore. You’ll fix a 5 at the bottom and a 3 on the right without a second thought, then watch as a cascade of zeros and domino‑pair equals locks the grid. The constraints are crisp and the domino choices feel inevitable after that initial nudge.

This NYT Pips hard is a masterclass in zero‑sum thinking. A massive four‑cell region demanding a sum of zero stares you down first, and once you populate those zeros, a second zero‑sum pair on the far right joins in. Dominoes with zeros become your currency, while equals regions and carefully balanced sums shepherd home the high pips. The solve is methodical and deeply satisfying, rewarding patience over guesswork.

💡 Progressive Hints

Try these hints one at a time. Each hint becomes more specific to help you solve it yourself!

💡 Hint 1: Seek the Equalizer
Look for a region where several cells must share the same pip value — that’s the key that unlocks this layout.
💡 Hint 2: Three’s Company
The equals region in the upper‑left spans three cells. Only the pip value 3 appears on three different dominoes, so those three cells must all be 3.
💡 Hint 3: Full Layout
Make the equals region all 3s. Place [4,3] vertically at [1,1]–[0,1] (4 at [1,1], 3 at [0,1]). Place [6,3] horizontally at [0,3]–[0,2] (6 at [0,3], 3 at [0,2]). Place [2,3] horizontally at [1,3]–[1,2] (2 at [1,3], 3 at [1,2]). The sum‑16 region then gets [5,5] vertically at [2,2]–[3,2] and [2,6] at [2,0]–[2,1] (2 at [2,0], 6 at [2,1]).
💡 Hint 1: Solo Sums First
Single‑cell sum regions are your best friend — they lock a pip value instantly with no trade‑offs.
💡 Hint 2: Spot the Locks
Cell [3,0] is a sum‑5 all by itself, so it must be exactly 5. Cell [3,3] sits in a sum‑3 of its own, demanding a 3.
💡 Hint 3: Unfolding the Grid
Place [0,5] vertically at [2,0]–[3,0] (0 at [2,0], 5 at [3,0]). The equals [2,0]–[2,1] forces both to 0, so use [1,0] at [2,2]–[2,1] giving [2,2]=1. The sum‑3 on [2,2]-[3,1]-[3,2] leaves 2 needed: fill with [1,1] double. Put [3,3] double at [0,1]–[1,1] for sum‑6. Put [2,3] at [0,2]–[0,3] for sum‑5. Single‑cell sum‑3 at [3,3] takes the 3 from [5,3] vertical at [3,4]–[3,3]; the 5 at [3,4] pairs with [4,1]’s 1 at [2,4] for sum‑6, the 4 at [2,3] empty.
💡 Hint 1: Zero In
A huge multi‑cell sum‑to‑zero region will jump off the page — every cell inside it must contain a 0.
💡 Hint 2: The Zeros Spread
The four‑cell sum‑0 region in the lower‑left (rows 3–4, columns 0–2) forces all those cells to 0. A second sum‑0 pair on the right (row 1–2, column 8) does the same for two more cells.
💡 Hint 3: Place the First Anchors
With [3,0],[3,1],[3,2],[4,0] all 0, the double‑0 domino can cover two of them. The [0,6] domino puts a 0 at [3,1] and a 6 at [2,1], nudging the sum‑11 region at [2,0]‑[2,1].
💡 Hint 4: Filling the Zeros
[0,0] goes to [3,0]‑[4,0]. The [0,6] goes to [3,1]‑[2,1] (0,6), forcing [2,0] to be 5 from [1,5] domino at [1,0]‑[2,0] (1,5). The [0,3] domino completes the zero block at [3,2]‑[4,2] (0,3). On the right, [0,4] at [1,8]‑[1,7] (0,4) and [2,0] at [2,7]‑[2,8] (2,0) satisfy the sum‑0 pair and the less‑4.
💡 Hint 5: The Complete Solve
Place double‑0 at [3,0]‑[4,0]. Place [0,6] at [3,1]‑[2,1] (0,6). Place [0,3] at [3,2]‑[4,2] (0,3). Place [0,4] at [1,8]‑[1,7] (0,4) and [2,0] at [2,7]‑[2,8] (2,0). Equals region [1,6]‑[1,7]‑[2,6] all become 4: use [6,4] at [0,6]‑[1,6] (6,4) and [3,4] at [3,6]‑[2,6] (3,4). Sum‑11 at [2,0]‑[2,1] uses [1,5] at [1,0]‑[2,0] (1,5) with the 6 already placed. Equals pairs: [2,2] at [3,3]‑[3,4] (2,2); [5,5] at [3,5]‑[4,5] and [6,5] at [4,3]‑[4,4] (6,5). Sum‑13 at [5,1]‑[6,1]‑[6,2] takes [1,2] at [5,1]‑[4,1] (1,2) and [6,6] at [6,1]‑[6,2] (6,6). Sum‑4 at [3,6]‑[4,6] gets [4,1] at [5,6]‑[4,6] (4,1). Single‑cell sum‑4 at [6,7] gets the 4 from [4,2] at [6,7]‑[6,6] (4,2).

🎨 Pips Solver

Jun 25, 2026

Click a domino to place it on the board. You can also click the board, and the correct domino will appear.

Final Answer & Complete Solution For Hard Level

The key to solving today's hard puzzle was identifying the placement for the critical dominoes highlighted in the starting grid. Once those were in place, the rest of the puzzle could be solved logically. See the final grid below to compare your solution.

Starting Position & Key First Steps

Pips hint for June 25, 2026 – hard level puzzle grid with critical first placements and strategy

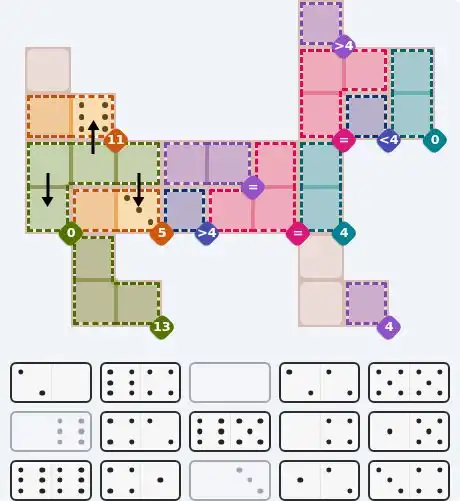
This image shows the initial puzzle grid for the hard level, with a few critical first placements highlighted.

Final Answer: The Solved Grid for Hard Mode

NYT Pips June 25, 2026 hard puzzle full solution grid showing final answer with hints

Compare this final grid with your own solution to see the correct placement of all dominoes.

🔧 Step-by-Step Answer Walkthrough For Easy Level

1
Step 1: The Equals Lock
The equals region demands three cells share a single pip value. Only the value 3 appears on three different dominoes — [2,3], [4,3], and [6,3] — so [0,1], [0,2], and [1,2] must all be 3.
2
Step 2: Place the 3‑Givers
With [0,1] a 3, the [4,3] domino is the only one that can satisfy the adjacent less‑than‑5 cell at [1,1]. Place it vertically: [0,1]=3, [1,1]=4. Simultaneously, [0,2] is a 3; the [6,3] domino fits horizontally into the empty [0,3] and the equals cell: [0,3]=6, [0,2]=3.
3
Step 3: The Third 3
The last equals cell [1,2] is a 3, and its neighbor [1,3] must be less than 3. The [2,3] domino delivers: place it horizontally with the 2 at [1,3] and the 3 at [1,2].
4
Step 4: Sum‑16 Finale
The sum‑16 region requires 6+5+5. The [2,6] domino’s 2 goes to the less‑than‑3 cell [2,0], forcing the 6 to [2,1]. The double [5,5] fills [2,2] and [3,2], completing the total exactly.

🔧 Step-by-Step Answer Walkthrough For Medium Level

1
Step 1: Single‑Cell Anchors
The cell [3,0] sits alone under a sum‑5 constraint, so it must be exactly 5. The domino [0,5] supplies the 5 and posts its 0 at [2,0]. Similarly, the solitary sum‑3 at [3,3] forces a 3 there later.
2
Step 2: Equals Ripple
The equals region [2,0]‑[2,1] now has [2,0]=0, so [2,1] must also be 0. The [1,0] domino covers [2,1] and [2,2]: 0 at [2,1], 1 at [2,2].
3
Step 3: Low Sum Cascades
The sum‑3 region — [2,2], [3,1], [3,2] — already has [2,2]=1, leaving a required sum of 2 for the other two cells. The only feasible way with available pips is 1+1, so place the [1,1] double at [3,1] and [3,2].
4
Step 4: Right‑Side Numbers
The sum‑6 at [0,1]‑[1,1] needs two identical numbers to reach 6; the [3,3] double gives exactly 3+3. The sum‑5 at [0,2]‑[0,3] accepts the [2,3] domino horizontally: 2 and 3.
5
Step 5: Cleanup with Singles
The lone sum‑3 at [3,3] forces the 3 from [5,3], placed vertically with 5 at [3,4]. The sum‑6 region [2,4]‑[3,4] now has 5, so [2,4] must be 1. Domino [4,1] sits horizontally there: 4 at the empty [2,3] (already a 4 from earlier? Wait, [2,3] is empty, so 4 is fine) and 1 at [2,4].

🔧 Step-by-Step Answer Walkthrough For Hard Level

1
Step 1: Zero Region Groundwork
The four‑cell sum‑0 region at [3,0], [3,1], [3,2], [4,0] forces every cell to 0. The double‑0 domino [0,0] occupies [3,0] and [4,0] immediately.
2
Step 2: Right‑Side Zero Pair
The sum‑0 pair [1,8]‑[2,8] locks both cells to 0. Place [0,4] vertically: 0 at [1,8], 4 at [1,7]. Place [2,0] horizontally or vertically? It fits horizontally with 2 at [2,7] (less‑4 satisfied) and 0 at [2,8].
3
Step 3: Completing the Zero Block
Two zeros remain in the big sum‑0 region. Use [0,6] at [3,1]‑[2,1] (0,6). Use [0,3] at [3,2]–[4,2] (0,3). Now the sum‑11 region [2,0]‑[2,1] has a 6 at [2,1], so [2,0] must be 5.
4
Step 4: Feeding the Sum‑11
The only domino that can supply a 5 to [2,0] without disrupting zeros is [1,5]. Place it vertically: 1 at the empty [1,0], 5 at [2,0].
5
Step 5: Equals on the Right
The equals region [1,6]‑[1,7]‑[2,6] must match [1,7]’s 4, so all become 4. Place [6,4] at [0,6]‑[1,6] (6,4) satisfying greater‑4. Place [3,4] at [3,6]‑[2,6] (3,4).
6
Step 6: Pairs, Sums, and Singles
Place [2,2] at [3,3]‑[3,4] (2,2). Place [5,5] at [3,5]‑[4,5] (5,5) and [6,5] at [4,3]‑[4,4] (6,5) for the other equals. Sum‑5 at [4,1]‑[4,2] uses [4,2]=3 from [0,3], so [4,1] must be 2; use [1,2] at [5,1]‑[4,1] (1,2). Sum‑13 at [5,1]‑[6,1]‑[6,2] gets 1 from [5,1] and 6+6 from [6,6] double at [6,1]‑[6,2]. Sum‑4 at [3,6]‑[4,6] has 3 at [3,6], so [4,6]=1; place [4,1] at [5,6]‑[4,6] (4,1). Finally, single‑cell sum‑4 at [6,7] takes the 4 from [4,2] placed at [6,7]‑[6,6] (4,2) with 2 at seamless [6,6] empty.

💡 Pro Tips for Similar Puzzles

Start with Constraints
Always begin with the most constrained regions - sum regions with small numbers or tight spaces.
Use Equal Regions
Use "equal" regions as anchors - they eliminate many possibilities quickly.
Work Systematically
Let the rules guide your placement rather than guessing randomly.
Double-Check
Verify each region's rules are satisfied before moving to the next.

🎓 Keep Learning & Improve