NYT Pips Hints & Answers for June 13, 2026

Jun 13, 2026

🚨 SPOILER WARNING

This page contains the final **answer** and the complete **solution** to today's NYT Pips puzzle. If you haven't attempted the puzzle yet and want to try solving it yourself first, now's your chance!

Click here to play today's official NYT Pips game first.

Want hints instead? Scroll down for progressive clues that won't spoil the fun.

SEE ALSO:

🎲 Today's Puzzle Overview

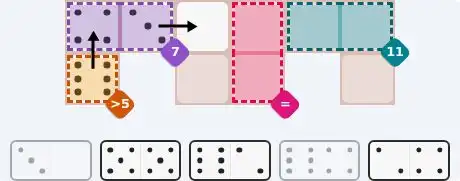
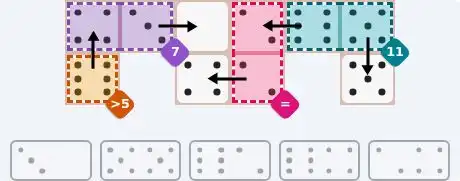
Today’s NYT Pips puzzles offer three distinct solving rhythms. In Ian Livengood’s easy grid, you’re greeted by a tight set of constraints that almost solve themselves: a greater-than-5 cell forces an immediate high pip, which cascades through a sum-7 pair and an equals region to neatly lock everything into place without any detours. The 2×6-shaped board feels like a gentle warm-up, with each domino finding its home as soon as you scan the available numbers.

Rodolfo Kurchan’s medium puzzle expands to a 6×4 grid and introduces a sum-0 column — three cells that must all be 0. That column of zeros acts like a spine, splitting the board into left and right halves and dictating exactly which dominos must land there. From that anchor, a sum-3 triple on the left forces a trio of 1s, while a greater-than-3 cell at the top right pulls in a 6, and the rest of the pips fall into step through overlapping sum-9 regions.

Kurchan’s hard puzzle escalates to a 5×9 grid governed by equals regions — one sprawling across five cells in the middle, another linking three cells on the right edge, and a third vertical cluster on the far left. Single-cell sum-3 and sum-0 constraints on the top row trigger a chain reaction that forces pip choices directly into those equals networks. A bottom‑left corner pits a greater-than-3 cell against a less-than-3 neighbor, creating a precise balance that ripples through the whole board and makes every placement feel tightly interlocked.

💡 Progressive Hints

Try these hints one at a time. Each hint becomes more specific to help you solve it yourself!

💡 Hint 1: Zero in on forced values
Look for regions that dictate a specific number. A greater-than constraint forces exactly one possible pip, and a sum region right next to it will then have only one way to complete its total.
💡 Hint 2: Anchor at the bottom left
The cell at [1,0] must be greater than 5, so it can only be a 6. The only domino with a 6 that can fit vertically there also places a 4 in the cell above, which belongs to a sum-7 region. That sum-7 pair then forces a 3 in its other cell.
💡 Hint 3: The full chain
Place the [6,4] domino vertically with 6 at [1,0] and 4 at [0,0]. The sum-7 region now reads 4+?, so place [3,0] horizontally with 3 at [0,1] and 0 at [0,2]. The equals region needs identical pips, so use [6,2] horizontally: 6 at [0,4], 2 at [0,3]. The [5,5] domino then goes vertically at [0,5]-[1,5], and the last domino [2,4] completes the equals region horizontally at [1,3]-[1,2] with 2 and 4.
💡 Hint 1: Spot the zero sum
A column of three cells shares a sum-0 constraint. That means every cell in that column must be a 0. Focus on which dominos carry a 0 pip — they’ll have to land in that column.
💡 Hint 2: Build from the zero column outward
The zero at [3,2] pairs naturally with [3,1] using a 5‑0 domino. Once that’s placed, the zero at [4,2] forces a 1‑0 domino next to it, filling in part of a sum‑3 region. The third zero fills later with a 0‑4 domino to the right.
💡 Hint 3: Final placements
[5,0] goes vertically at [3,1]-[3,2] (5 then 0). [1,0] goes vertically at [4,1]-[4,2] (1 then 0). The sum‑3 region at [4,1]+[5,1] now needs [5,1]=2, so place [1,2] horizontally at [5,0]-[5,1] (1,2). [4,1] goes horizontally at [2,1]-[2,2] (4,1) to satisfy sum‑9 above. The sum‑3 triple gets [6,1] horizontally at [0,3]-[0,2] (6,1) and [1,3] horizontally at [1,2]-[1,1] (1,3). Finally [6,2] horizontal at [0,1]-[0,0] (6,2) and [0,4] horizontal at [5,2]-[5,3] (0,4) finish the grid.
💡 Hint 1: Single-cell dictations
The top row contains three tiny regions that each impose a hard number: one sum‑3, one sum‑0, and one greater‑than‑3. Their pip values are completely forced by the constraints alone.
💡 Hint 2: Top-row domino placements
[0,1] must be exactly 3 because it’s a sum‑3 region with no other cells. [0,2] must be 0 from sum‑0. Since [0,1] can’t pair with the 0 (no 3‑0 domino exists), it must pair with [0,0], which must be >3. The available dominos with a 3 point to [3,5] or [6,3]. Meanwhile [0,2] pairs with [1,2] and a 0‑something domino will go there, creating a 6 that spreads via an equals region.
💡 Hint 3: Bottom‑left corner balance
At the bottom left, [4,0] is >3 and [4,1] is <3. A domino that covers both can satisfy these if it supplies a 4 and a 2. That same placement also influences the solitary sum‑3 cell at [4,2], which forces a 3 and pulls a 1 into [3,2].
💡 Hint 4: The equals regions unravel
The large equals region spanning [1,6], [2,5], [2,6], [3,5], [3,6] must all share the same pip. After placing the top‑row and bottom‑left dominos, the remaining [4,4] and [4,5] dominos fit there. The equals region on the far right links [1,7], [1,8], and [2,8] — a [5,5] domino covers two of them, and a [0,4] settles into the chain.
💡 Hint 5: Complete solution
Start with [3,5] horizontally at [0,1]-[0,0] (3,5). Place [0,6] horizontally at [0,2]-[1,2] (0,6). The equals region forces [2,2]=6, so [6,3] horizontally at [2,2]-[2,1] (6,3). Bottom left: [4,2] horizontally at [4,0]-[4,1] (4,2). The sum‑3 cell [4,2] gets 3 from [1,3] vertical at [3,2]-[4,2] (1,3). Equals cluster: [4,4] vertical at [2,6]-[3,6] (4,4), [4,5] horizontal at [1,6]-[1,7] (4,5), [0,4] horizontal at [1,5]-[2,5] (0,4), and [3,4] horizontal at [4,5]-[3,5] (3,4). Right equals: [5,5] vertical at [1,8]-[2,8] (5,5) and [0,0] horizontal at [4,6]-[4,7] (0,0). Fill remaining: [1,1] vertical at [3,8]-[4,8] (1,1), [0,3] horizontal at [1,4]-[1,3] (0,3), [1,2] horizontal at [4,4]-[4,3] (1,2), [2,2] already placed, [4,4] used, etc.

🎨 Pips Solver

Jun 13, 2026

Click a domino to place it on the board. You can also click the board, and the correct domino will appear.
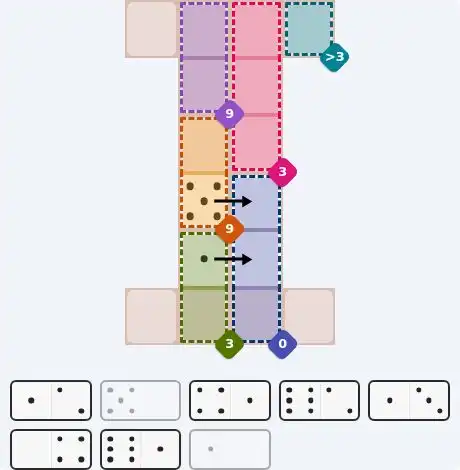
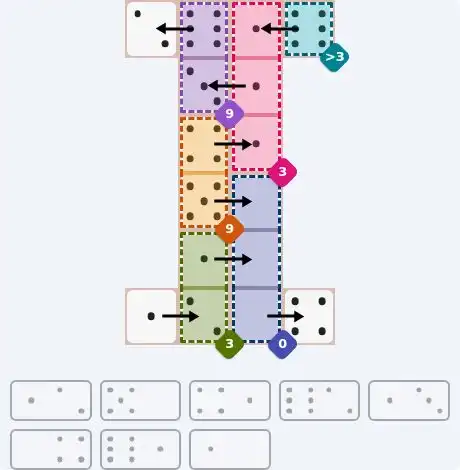
Final Answer & Complete Solution For Hard Level

The key to solving today's hard puzzle was identifying the placement for the critical dominoes highlighted in the starting grid. Once those were in place, the rest of the puzzle could be solved logically. See the final grid below to compare your solution.

Starting Position & Key First Steps

Pips hint for June 13, 2026 – hard level puzzle grid with critical first placements and strategy

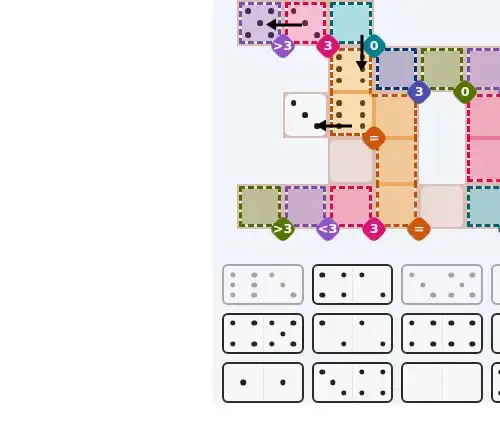
This image shows the initial puzzle grid for the hard level, with a few critical first placements highlighted.

Final Answer: The Solved Grid for Hard Mode

NYT Pips June 13, 2026 hard puzzle full solution grid showing final answer with hints

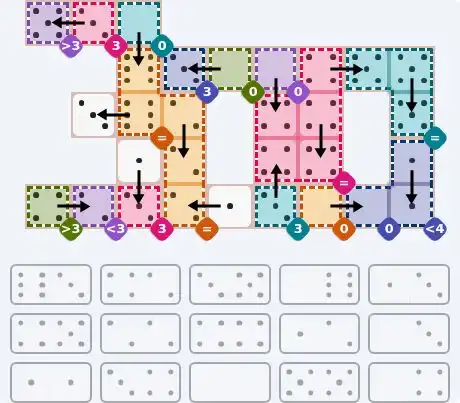
Compare this final grid with your own solution to see the correct placement of all dominoes.

🔧 Step-by-Step Answer Walkthrough For Easy Level

1
Step 1: Greater‑than‑5 anchor
The region at [1,0] is a ‘greater 5’ constraint, meaning it must be a 6 (the only pip >5). The domino must cover [1,0] and its neighbor [0,0]. Of the available dominos, only [6,4] contains a 6 and fits vertically: place it with 6 at [1,0] and 4 at [0,0].
2
Step 2: Sum‑7 resolves the top left
The sum‑7 region covers [0,0] and [0,1]. With [0,0]=4, [0,1] must be 3. The only unused domino with a 3 is [3,0]. Place it horizontally: 3 at [0,1] and 0 at [0,2] (which is unconstrained, so 0 is fine).
3
Step 3: Equals and sum‑11 interlock
The equals region at [0,3] and [1,3] requires both cells to have the same pip. The sum‑11 region at [0,4]-[0,5] will need high numbers. The [6,2] domino can cover [0,4]-[0,3]: put 6 at [0,4] and 2 at [0,3]. This satisfies sum‑11 (6+5) once [0,5] gets 5, and sets the equals value to 2.
4
Step 4: Final two dominos
The [5,5] domino goes vertically at [0,5]-[1,5] (both 5), completing the sum‑11 region. The last domino [2,4] covers the equals cell [1,3] and the empty cell [1,2] horizontally: 2 at [1,3] matches the equals value, and 4 at [1,2] finishes the grid.

🔧 Step-by-Step Answer Walkthrough For Medium Level

1
Step 1: The column of zeros
The sum‑0 region at [3,2], [4,2], [5,2] forces a 0 in each cell. The domino [5,0] (index1) can supply a 0 at [3,2] while its 5 lands at [3,1]. Place it vertically: 0 at [3,2], 5 at [3,1].
2
Step 2: Filling the second zero
[4,2] also needs a 0. The [1,0] domino (index7) fits vertically: 1 at [4,1], 0 at [4,2]. This feeds the sum‑3 region [4,1]+[5,1] — with 1 already placed, [5,1] must become 2.
3
Step 3: Sum‑9 domino above
The sum‑9 region [2,1]+[3,1] already has [3,1]=5, so [2,1]=4. The [4,1] domino (index2) covers [2,1]-[2,2] horizontally: 4 at [2,1], 1 at [2,2]. Now the sum‑3 triple [0,2]+[1,2]+[2,2] has [2,2]=1, so the other two must sum to 2 — meaning both must be 1.
4
Step 4: Greater‑than‑3 and the sum‑3 triple
The cell [0,3] must be >3. The only unused high pip that fits with the available dominos is 6. The [6,1] domino (index6) can go horizontally at [0,3]-[0,2]: 6 at [0,3], 1 at [0,2] — satisfying the sum‑3 triple since [0,2] needs 1. The triple now needs [1,2]=1 as well; the [1,3] domino (index4) placed horizontally at [1,2]-[1,1] supplies 1 and 3, making sum‑9 [0,1]+[1,1] require [0,1]=6.
5
Step 5: Last gaps
The [6,2] domino (index3) covers [0,1]-[0,0] horizontally: 6 at [0,1], 2 at [0,0]. The [1,2] domino (index0) goes horizontally at [5,0]-[5,1] giving 1 and 2 (2 needed for [5,1]). The final domino [0,4] (index5) fills the rightmost zero and its neighbor: 0 at [5,2], 4 at [5,3].

🔧 Step-by-Step Answer Walkthrough For Hard Level

1
Step 1: Top row’s forced trio
The single‑cell sum‑3 at [0,1] forces a 3, and the sum‑0 at [0,2] forces a 0. [0,1] must pair with [0,0] (since it can’t pair with the 0‑only cell next door without breaking the sum‑0), and [0,0] must be >3. The [3,5] domino (index2) fits: place it horizontally with 3 at [0,1] and 5 at [0,0].
2
Step 2: Zero spreads into an equals chain
The forced 0 at [0,2] pairs with [1,2] via the [0,6] domino (index3): place 0 at [0,2], 6 at [1,2]. The equals region [1,2] and [2,2] now demands [2,2]=6. The only way to get a 6 there is the [6,3] domino (index0) placed horizontally: 6 at [2,2] and 3 at [2,1] (the latter is unconstrained, so 3 works).
3
Step 3: Bottom‑left corner’s balancing act
[4,0] is >3 and [4,1] is <3; they must be covered by the same domino. The [4,2] domino (index1) has the required 4 and 2: place it horizontally with 4 at [4,0] and 2 at [4,1], satisfying both constraints. The single‑cell sum‑3 at [4,2] now forces a 3. The [1,3] domino (index4) can cover [3,2]-[4,2] vertically with 1 and 3: 3 at [4,2], 1 at [3,2] (empty).
4
Step 4: The large equals cluster
The equals region spanning [1,6], [2,5], [2,6], [3,5], [3,6] requires identical pips. After the previous steps, several dominos remain that can contribute 4s. The [4,4] domino (index7) goes vertically at [2,6]-[3,6] (both 4). The [4,5] domino (index5) goes horizontally at [1,6]-[1,7] (4 and 5). The equals region rightside links [1,7], [1,8], [2,8] — [1,7] is 5 from the previous placement, so [5,5] (index13) goes vertically at [1,8]-[2,8] (both 5), and [1,7] remains 5. The chain then forces [2,5] to match the equals value; the [0,4] domino (index14) placed horizontally at [1,5]-[2,5] supplies 0 and 4 — so 4 at [2,5] matches the equals value.
5
Step 5: Remaining equals and final inserts
The equals region [3,5] still needs a 4; the [3,4] domino (index11) goes horizontally at [4,5]-[3,5] (3 and 4) to nail that. The equals column [2,3],[3,3],[4,3] needs identical values; the [2,2] domino (index6) goes vertically at [2,3]-[3,3] (2,2), and then [1,2] (index8) horizontally at [4,4]-[4,3] (1,2) puts 2 at [4,3] matching the 2s. The bottom row also has sum‑0 cells at [4,6]‑[4,7]; the [0,0] domino (index12) fits horizontally (0,0). Finally, the less‑4 region [3,8]-[4,8] gets [1,1] (index10) vertically (1,1), and [0,3] (index9) covers [1,4]-[1,3] (0,3) to complete the grid.

💡 Pro Tips for Similar Puzzles

Start with Constraints
Always begin with the most constrained regions - sum regions with small numbers or tight spaces.
Use Equal Regions
Use "equal" regions as anchors - they eliminate many possibilities quickly.
Work Systematically
Let the rules guide your placement rather than guessing randomly.
Double-Check
Verify each region's rules are satisfied before moving to the next.

🎓 Keep Learning & Improve