NYT Pips Hint, Answer & Solution for November 14, 2025

Nov 14, 2025

🚨 SPOILER WARNING

This page contains the final **answer** and the complete **solution** to today's NYT Pips puzzle. If you haven't attempted the puzzle yet and want to try solving it yourself first, now's your chance!

Click here to play today's official NYT Pips game first.

Want hints instead? Scroll down for progressive clues that won't spoil the fun.

🎲 Today's Puzzle Overview

Each Pips NYT puzzle released this Friday, November 14, 2025, isn’t just about solving logic — it’s about appreciating the craftsmanship that turns reasoning into rhythm.

Curated and edited by Ian Livengood, with designs by Rodolfo Kurchan and Ian Livengood, today’s lineup — Easy (#292), Medium (#293), and Hard (#294) — captures the essence of structured creativity and mathematical storytelling.

Every grid in today’s pips hint collection tells its own narrative.

The Easy puzzle invites you to warm up gently, teasing your logic with minimalism and clean design.

The Medium puzzle raises the tempo, where balance and symmetry meet careful deduction.

And the Hard puzzle? That’s where you’ll find elegance hidden in chaos — a layered challenge that rewards patience and sharp reasoning.

Each move feels intentional, like a composer placing notes with precision.

Every placement of a domino carries meaning; every connection between numbers is deliberate.

Behind each pips hint today, there’s a moment of discovery — the realization that logic and beauty can coexist in perfect harmony.

So take a moment to enjoy the artistry behind each solution.

Log your progress, share your insights, and explore the deeper rhythm of reasoning that defines the Pips NYT puzzle.

Because when logic flows this naturally, the final pips answer today isn’t just a result — it’s a small masterpiece in itself.

Written by Mike

Puzzle Analyst – Lukas (NYT Pips Hint Team)

💡 Progressive Hints

Try these hints one at a time. Each hint becomes more specific to help you solve it yourself!

💡 Hint #1 - So easy
You have three dominoes with 6-pips—where on the board needs lots of 6s?
💡 Hint #1 - Observe
Dominoes Include: [6-2], [5-4], [5-1], [4-2], [2-0], [1-1], [1-0]. The domino halves in the Blue Number (9) and Green Number (9) region must be 4+5. Only 2 domino halves that contain 4 pips. Only 2 domino halves that contain 5 pips. The domino halves in the Purple Equal region must be 0.
💡 Hint #1 - Observe
Dominoes Include: [5-4], [5-1], [5-0], [4-2], [3-3], [3-1], [3-0], [2-2], [2-0], [1-0], [0-0]. Only 3 domino halves that contain 5 pips. The rearranged dominoes will reveal the password to you.

🎨 Pips Solver

Nov 14, 2025

Click a domino to place it on the board. You can also click the board, and the correct domino will appear.

Final Answer & Complete Solution For Hard Level

The key to solving today's hard puzzle was identifying the placement for the critical dominoes highlighted in the starting grid. Once those were in place, the rest of the puzzle could be solved logically. See the final grid below to compare your solution.

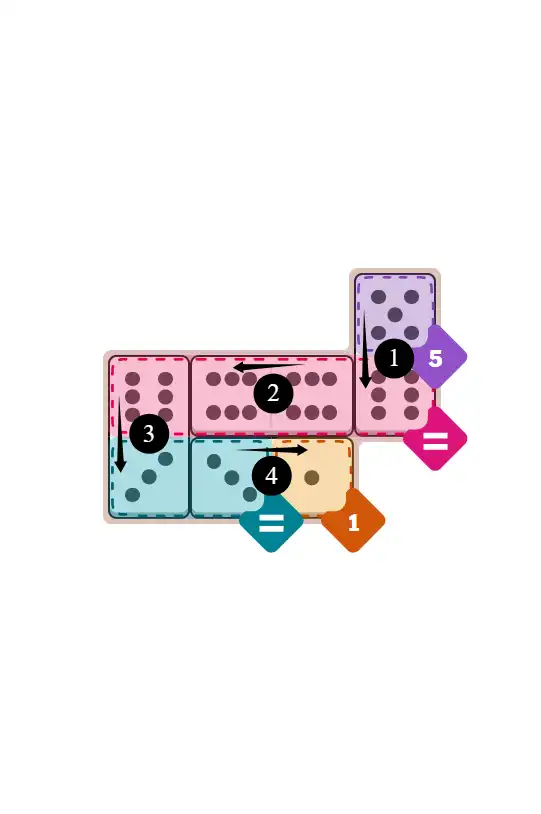
Starting Position & Key First Steps

Pips hint for November 14, 2025 – hard level puzzle grid with critical first placements and strategy

This image shows the initial puzzle grid for the hard level, with a few critical first placements highlighted.

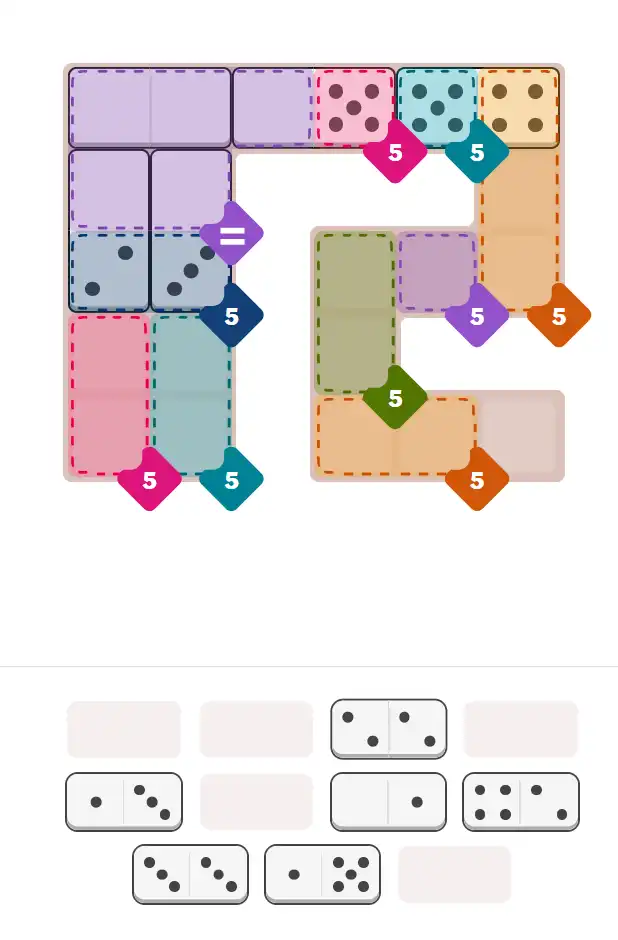
Final Answer: The Solved Grid for Hard Mode

NYT Pips November 14, 2025 hard puzzle full solution grid showing final answer with hints

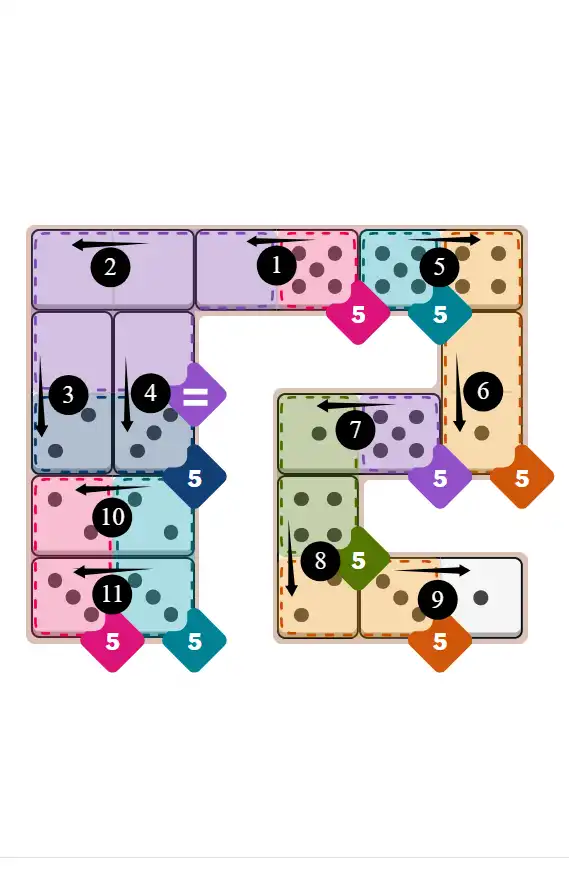
Compare this final grid with your own solution to see the correct placement of all dominoes.

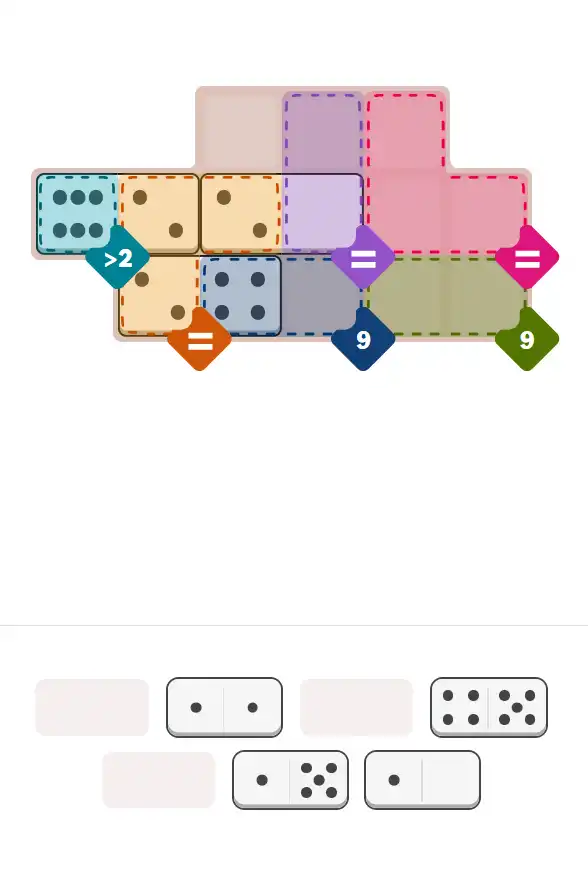
🔧 Step-by-Step Answer Walkthrough For Easy Level

1
Step 1: Domino Lineup & Quick Scan
Before diving in, take a moment to check your domino collection for today’s puzzle — we’ve got [6-6], [6-5], [6-3], and [3-1]. Notice something right away? Yep, that’s a heavy dose of sixes. This tells us early that any 'equal' or 'sum' regions involving higher values are going to lean on those 6-pip dominoes. It’s always smart to identify your most limited numbers before you start placing anything — they tend to unlock the puzzle faster than you expect!
2
Step 2: Equal Region – All About the Sixes
Now let’s look at the Equal region. The rule here is simple but powerful — both halves must show the same pip count. Since we’ve already spotted our six-heavy setup, this region practically shouts: use the 6s! Confirmed by neighboring cells, the logic flows smoothly — the correct placements are [5-6] vertically, [6-6] horizontally, and [6-3] vertically. You can almost feel the grid start to stabilize — like the puzzle is nodding in approval. Always satisfying when your first assumptions click perfectly!
3
Step 3: Wrapping It Up – The Number (1) Zone
After handling those dominant sixes, there’s not much left to untangle. The final region labeled Number (1) is refreshingly straightforward — it practically invites the [3-1] domino to settle in horizontally. The moment you drop it in, the whole puzzle feels complete and balanced. It’s a short solve today, but the lesson is clear: start with the rare numbers, confirm with neighboring clues, and let logic (and a bit of intuition) guide you to a clean finish!

🔧 Step-by-Step Answer Walkthrough For Medium Level

1
Step 1: Getting Our Domino Lineup & Reading the Clues
Let’s take stock of today’s domino collection: [6-2], [5-4], [5-1], [4-2], [2-0], [1-1], and [1-0]. That’s a healthy mix of middle-range pips — but notice something right away: only two halves have 4s and only two have 5s. That scarcity makes them valuable. Keep an eye on those — they’ll likely end up in the higher-numbered regions. In fact, both the Blue and Green Number (9) zones scream '4+5' just from their totals. Meanwhile, our Purple Equal region stands out as the calm spot in the chaos — every half there must show a perfect zero. A peaceful starting point before the number storm!
2
Step 2: Cracking the Yellow Equal Zone
Time to tackle the Yellow Equal region. From Step 1, we already know how limited the higher numbers are, so we turn to something more balanced — 2s. The math and neighboring clues agree: both halves here need to show the same pip value, and 2 fits perfectly. The placements fall into place smoothly — [6-2] horizontally, [2-0] horizontally, and [2-4] horizontally. It’s like watching dominoes line up in harmony — one neat move after another!
3
Step 3: Solving the Green Number (9) Region
Now we return to our earlier suspicion: the Green 9-zone must involve that 4+5 combo. With a little cross-checking against the Yellow zone, the logic locks in — the correct moves are [5-4] placed horizontally and [1-5] vertically. It’s one of those moments where the grid almost solves itself. When numbers and intuition agree, you know you’re on the right track.
4
Step 4: The Red Equal Region — Clean and Simple
After those busy high-value regions, the Red Equal area feels refreshingly minimalistic. The rule? Both halves must match — and in this case, the only logical fit is 1. Drop the [1-1] domino in vertically and admire how neatly it connects to its neighbors. Sometimes, the simplest placements are the most satisfying!
5
Step 5: The Purple Equal Wrap-Up
Finally, we finish strong with the Purple Equal region — where calm logic wins the day. Every half here must be 0, and thankfully we’ve got the perfect piece left for the job. The [1-0] domino fits horizontally like the final puzzle piece clicking into place. Another grid conquered — smart moves, clean logic, and zero guesswork!

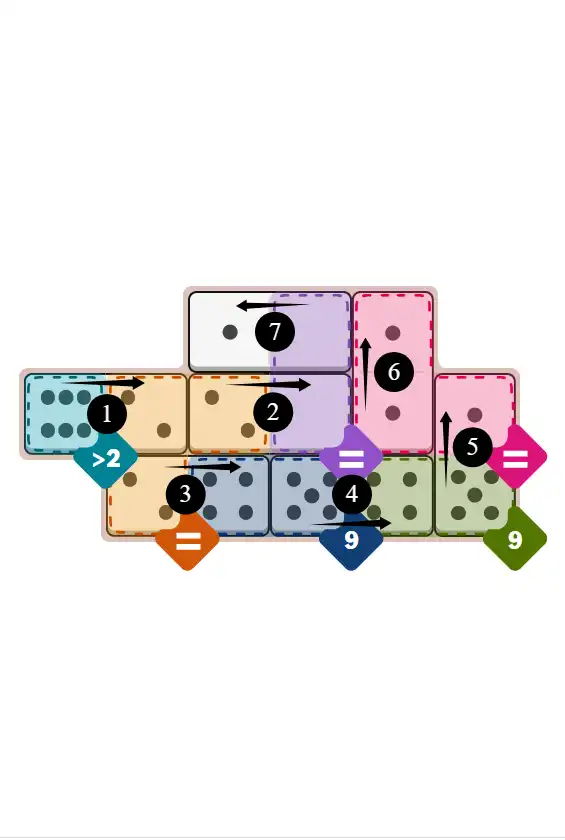
🔧 Step-by-Step Answer Walkthrough For Hard Level

1
Step 1: Scouting the Domino Field
Let’s size up our team of dominoes: [5-4], [5-1], [5-0], [4-2], [3-3], [3-1], [3-0], [2-2], [2-0], [1-0], [0-0]. Right away, something jumps out — only three halves contain the number 5. That’s gold! In logic puzzles like this, scarcity is your secret weapon. Fives will drive the key sum regions, so keep them on a short leash. Everything else—especially the zeros and threes—will likely fill in the quieter corners. Think of this as organizing your toolkit before you start building.
2
Step 2: The Equal Zone — All About Zero
We’re kicking things off with the Equal region, and the surrounding clues practically scream for zeros. From Step 1, we know there are plenty of zero halves to work with, and the neighboring regions leave no room for higher values. So, the Equal area becomes our zone of nothingness — literally. The placements: [0-5] horizontally, [0-0] horizontally, [0-2] vertically, and [0-3] vertically. It’s neat, it’s balanced, and it clears out those pesky zeros early on. Who knew nothing could feel so satisfying?
3
Step 3: The Right Yellow Number (5) — The Balancing Act
Now it’s time to tackle the Right Yellow 5 region, where everything inside must add up to 5. Since there are only three domino halves with 5 pips, we have to be careful. After checking the neighboring regions, it’s clear that [5-4] fits perfectly here (because [5-0] is already spoken for elsewhere, [5-1] would block later placements). Pair that with [0-1] placed vertically to complete the sum: the 5 half satisfies the region total while the 4/1 pairing preserves flexibility for neighboring areas.
4
Step 4: Purple Number (5) — The Final Five
Ah, the last of our fives finally gets its spotlight. With the other two 5-pip dominoes already in play, [1-5] stands alone as the perfect fit for the Purple 5 region. Dropped in horizontally, it locks in beautifully with its neighbors. This move ties up our high-value tiles — no wasted potential, no guesswork. Sometimes the last piece just clicks — literally and logically.
5
Step 5: Down Yellow Number (5) — A Little Domino Dance
This region adds a bit of flair to the board. Another sum-to-five zone means we’re looking for combinations that stay balanced without reusing key numbers. After a quick scan, [4-2] fits vertically and [3-1] drops horizontally, completing the five-point target perfectly. You can almost imagine these dominoes high-fiving each other for teamwork!
6
Step 6: Down Red (5) + Light Blue (5) — The Double Finale
We’re in the endgame now, and the last few dominoes tell their own story. The remaining pieces, [2-2] and [3-3], slide right into place, both horizontally. Each region neatly sums to five, wrapping up the puzzle with a satisfying sense of symmetry. The final layout looks clean, the math checks out, and every domino earned its keep. That’s how you end a puzzle — logically, cleanly, and with just a touch of style.

🎥 Today's overall pips hint

Count what's rare, place it first, and let the abundant pieces fill in around it. Give us a thumb, leave your suggestions.

💡 Pro Tips for Similar Puzzles

Start with Constraints
Always begin with the most constrained regions - sum regions with small numbers or tight spaces.
Use Equal Regions
Use "equal" regions as anchors - they eliminate many possibilities quickly.
Work Systematically
Let the rules guide your placement rather than guessing randomly.
Double-Check
Verify each region's rules are satisfied before moving to the next.

🎓 Keep Learning & Improve