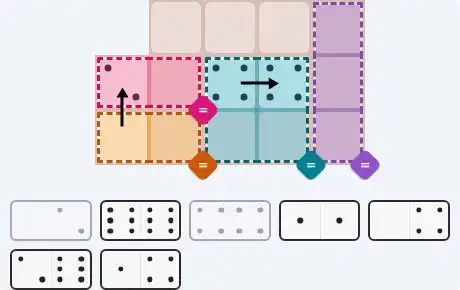
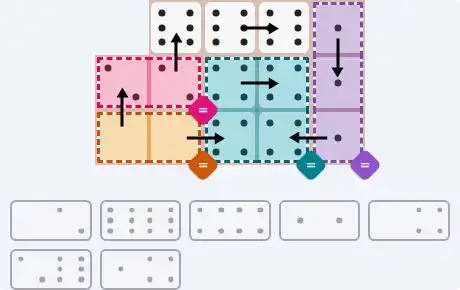
NYT Pips Hints & Answers for September 8, 2026

Sep 8, 2026

๐Ÿšจ SPOILER WARNING

This page contains the final **answer** and the complete **solution** to today's NYT Pips puzzle. If you haven't attempted the puzzle yet and want to try solving it yourself first, now's your chance!

Click here to play today's official NYT Pips game first.

Want hints instead? Scroll down for progressive clues that won't spoil the fun.

SEE ALSO:

๐ŸŽฒ Today's Puzzle Overview

Ian Livengood's easy board is a compact deduction graph anchored by a high-target sum region that forces its two cells to the maximum pip value. From that pin, a less-than region strips the left column to its floor, while two equals regions and a single empty cell propagate values outward. The early placement order is almost rigid once the central sum pair is locked.

Rodolfo Kurchan's medium board is all equals propagation. A four-cell equals block acts as the keystone, forcing a doubled tile and sending a fixed value through adjacent bottom-row equals blocks. The three empty singles along the top row are not as free as they lookโ€”they resolve only after the bottom dominoes settle the available pips.

Kurchan's hard board extends the constraint graph into a true cascade. Micro sum singles feed a low-valued three-cell equals cluster, which then branches into a six-cell equals band across the middle, a top-right three-cell equals band, and a right-side four-cell equals band. This NYT Pips hard rewards solvers who treat the small sums as entry nodes and follow the equals edges.

๐Ÿ’ก Progressive Hints

Try these hints one at a time. Each hint becomes more specific to help you solve it yourself!

๐Ÿ’ก Hint 1: Find the tight sum
The entry point is a sum region whose target is so large that both cells must carry the highest possible pip. Once you see that, the adjacent single-cell sum and equals pairs all start to pull their dominoes into place.
๐Ÿ’ก Hint 2: Pin the max pair
Focus on the sum region at [1,1] and [2,1]. Since the target forces both cells to 6, neither can share a domino; each must take a different 6-bearing tile, which then dictates the sum-2 cell at [0,1] and the equals pair at [2,2]/[2,3].
๐Ÿ’ก Hint 3: Complete the board
Place [6,2] on [1,1]/[0,1] and [6,3] on [2,1]/[2,2]. The equals pair then makes [2,3]=3 and forces [5,3] onto [1,3]/[2,3] with [1,3]=5. The less-2 region takes [0,0] on [1,0]/[2,0], and the equals pair [0,2]/[1,2] takes [4,4].
๐Ÿ’ก Hint 1: Read the equals blocks
Every region in the medium grid is an equals region except for three single empty cells. That means the solve is less about arithmetic and more about which doubled or shared values can propagate through adjacent blocks.
๐Ÿ’ก Hint 2: Keystone in the middle
Look at the four-cell equals block spanning [1,2], [1,3], [2,2], and [2,3]. Settling that block with a doubled tile sends its value downward to the bottom-row equals blocks and upward to the empty top cells.
๐Ÿ’ก Hint 3: Full medium map
Use [4,4] on [1,2]/[1,3] and set the big block to 4. Then [0,2] goes on [2,0]/[1,0], [0,4] on [2,1]/[2,2], [2,6] on [0,1]/[1,1], [6,6] on [0,2]/[0,3], [1,1] on [0,4]/[1,4], and [1,4] on [2,4]/[2,3].
๐Ÿ’ก Hint 1: Start with the microscopic sums
The smallest sums are the most restrictive cells in the graph. They force individual values immediately, and those values act as seeds for the three- and six-cell equals regions nearby.
๐Ÿ’ก Hint 2: Enter through the upper-left
Work with the single sum cells at [0,2] and [1,0], plus the three-cell equals block at [1,1], [1,2], [2,1]. Settling these forces the first few dominoes and unlocks the equals pair at [2,2]/[3,2].
๐Ÿ’ก Hint 3: Follow the chain to row 5
From the upper-left equals pair, a sum-10 region forces a 6, which injects a 2 into the large six-cell equals band. Then the lower-left sum-1 cell at [4,2] reinforces that band and lets it lock completely.
๐Ÿ’ก Hint 4: Branch to the side bands
Once the big row-5 band is fixed, two smaller equals systems resolve cleanly: the top-right three-cell band and the all-equal pair at [6,2]/[6,3]. The greater-3 single then pairs naturally with the right-side 4-band.
๐Ÿ’ก Hint 5: Full hard map
Place [1,0] on [0,2]/[1,2], [2,0] on [1,0]/[1,1], and [3,0] on [2,1]/[2,2]. Set [3,4] on [3,2]/[3,1], [6,2] on [4,1]/[5,1], and [1,2] on [4,2]/[5,2]. For the row-5 band: [2,2] on [5,3]/[5,4], [3,2] on [5,6]/[5,5], [4,2] on [7,4]/[6,4]. Then [3,3] on [5,7]/[6,7], [0,0] on [6,2]/[6,3], [4,5] on [6,5]/[7,5]. Finish with [6,4] on [7,2]/[7,3], [5,1] on [8,2]/[9,2], and [4,1] on [8,5]/[9,5].

๐ŸŽจ Pips Solver

Sep 8, 2026

Click a domino to place it on the board. You can also click the board, and the correct domino will appear.
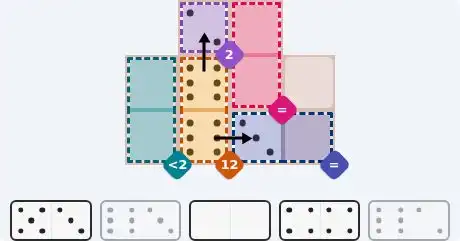
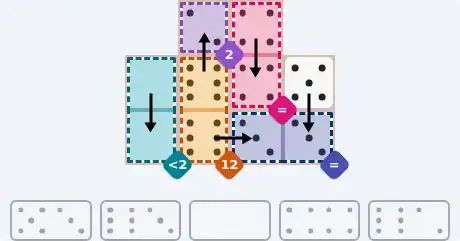
โœ… Final Answer & Complete Solution For Hard Level

The key to solving today's hard puzzle was identifying the placement for the critical dominoes highlighted in the starting grid. Once those were in place, the rest of the puzzle could be solved logically. See the final grid below to compare your solution.

Starting Position & Key First Steps
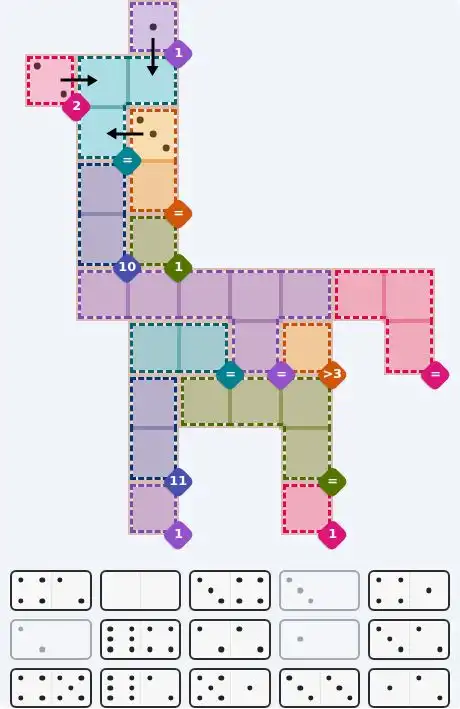
Pips hint for Sept 8, 2026 โ€“ hard level puzzle grid with critical first placements and strategy

This image shows the initial puzzle grid for the hard level, with a few critical first placements highlighted.

Final Answer: The Solved Grid for Hard Mode
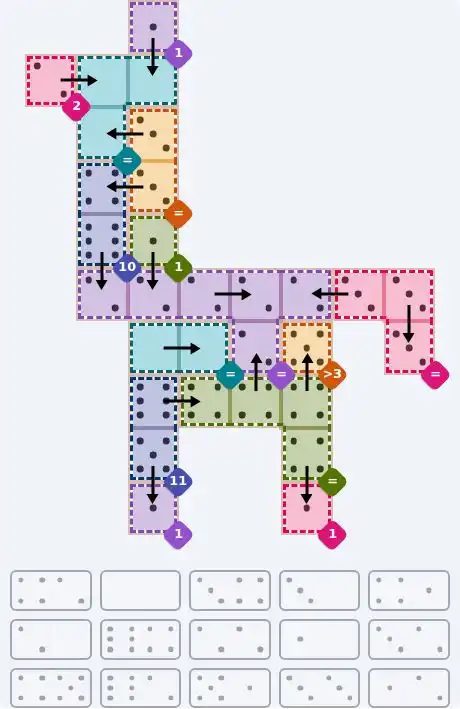
NYT Pips Sept 8, 2026 hard puzzle full solution grid showing final answer with hints

Compare this final grid with your own solution to see the correct placement of all dominoes.

๐Ÿ”ง Step-by-Step Answer Walkthrough For Easy Level

1
Step 1: The sum-12 anchor
The region at [1,1]/[2,1] must sum to 12. Since the maximum pip value per cell is 6, both cells are forced to exactly 6, creating two fixed anchors.
2
Step 2: Place the first high domino
With [1,1]=6, the adjacent [0,1] is a sum-2 single, so [0,1] is forced to 2 and becomes the only partner for [6,2]. Place [6,2] on [1,1]=6 and [0,1]=2.
3
Step 3: Place the second high domino
With [2,1]=6, it cannot pair with [1,1] because no double 6 is available. It must pair with [2,2] through [6,3], so [2,2]=3. The equals region at [2,2]/[2,3] then forces [2,3]=3.
4
Step 4: Finish the left and middle
The less-2 region [1,0]/[2,0] must both stay below 2, so [0,0] covers them with 0/0. The equals pair [0,2]/[1,2] takes [4,4] as 4/4. Finally, [5,3] fills [1,3]/[2,3], giving [1,3]=5 and [2,3]=3.

๐Ÿ”ง Step-by-Step Answer Walkthrough For Medium Level

1
Step 1: Lock the big equals block
The four-cell equals region at [1,2],[1,3],[2,2],[2,3] behaves as the puzzle's keystone. The clean way to satisfy all four cells is to place the doubled [4,4] across [1,2]/[1,3], making the whole block 4.
2
Step 2: Seed the bottom-left equals pair
The bottom-left equals region [2,0]/[2,1] must share a value. Place [0,2] on [2,0]=0 and [1,0]=2, which fixes [2,0] and simultaneously sets up the [1,0]/[1,1] equals requirement.
3
Step 3: Complete the bottom row
Place [0,4] on [2,1]=0 and [2,2]=4. This completes the bottom-left equals pair and reinforces the big block's value at [2,2].
4
Step 4: Resolve the top empty row
With [1,0]=2, the equals region [1,0]/[1,1] forces [1,1]=2. Therefore [2,6] covers [0,1]=6 and [1,1]=2. The top empty singles [0,2]/[0,3] take the double 6 to keep them both 6.
5
Step 5: Close the vertical equals band
The remaining equals region [0,4]/[1,4]/[2,4] must all be 1. Place [1,1] on [0,4]/[1,4], and [1,4] on [2,4]/[2,3], where [2,3] is already fixed at 4.

๐Ÿ”ง Step-by-Step Answer Walkthrough For Hard Level

1
Step 1: Seed the upper-left sum-1
The sum-1 cell [0,2] forces 1. Domino [1,0] must cover [0,2]=1 and [1,2]=0; otherwise the upper equals trio would have no consistent 0 seed.
2
Step 2: Lock the three-cell equals cluster
The sum-2 cell [1,0] forces 2. Domino [2,0] covers [1,0]=2 and [1,1]=0. The triple equals at [1,1],[1,2],[2,1] now locks all three at 0, so [2,1]=0.
3
Step 3: Move into the first sum-10 branch
Domino [3,0] covers [2,1]=0 and [2,2]=3; the equals pair [2,2]/[3,2] then forces [3,2]=3. Domino [3,4] covers [3,2]=3 and [3,1]=4. The sum-10 region [3,1]+[4,1] makes [4,1]=6; [6,2] then covers [4,1]=6 and [5,1]=2.
4
Step 4: Lock the big row-5 equals band
The lower-left sum-1 at [4,2] seeds the large band: [1,2] covers [4,2]=1 and [5,2]=2. The six-cell equals band at row 5 plus [6,4] now locks to 2: place [2,2] on [5,3]/[5,4], [3,2] on [5,6]/[5,5], and [4,2] on [7,4]/[6,4].
5
Step 5: Complete side equals and singles
Complete the top-right all-3 and nearby singles: [3,3] on [5,7]/[6,7] sets the all-3 trio [5,6],[5,7],[6,7]; [0,0] covers the all-0 pair [6,2]/[6,3]; the greater-3 cell [6,5] becomes 5 via [4,5] on [6,5]/[7,5].
6
Step 6: Finish the right-side chain
Finish the right-side sum-11 and 4-equals chain. [6,4] covers [7,2]=6/[7,3]=4; [5,1] covers [8,2]=5/[9,2]=1. The 4-equals band [7,3],[7,4],[7,5],[8,5] completes with [4,2] at [7,4], [4,5] at [7,5], and [4,1] at [8,5]/[9,5], making [9,5]=1.

๐Ÿ’ก Pro Tips for Similar Puzzles

Start with Constraints
Always begin with the most constrained regions - sum regions with small numbers or tight spaces.
Use Equal Regions
Use "equal" regions as anchors - they eliminate many possibilities quickly.
Work Systematically
Let the rules guide your placement rather than guessing randomly.
Double-Check
Verify each region's rules are satisfied before moving to the next.

๐ŸŽ“ Keep Learning & Improve